Instructions for translating documents in Excel
The translation feature in Excel is available for users to translate content into many different languages, with 60 popular languages in the world.
Table of Contents
You can translate content in a single Excel cell or translate as many text cells as you want. The translated content will be displayed in a separate interface for you to use. Below are instructions for translating languages in Excel.
How to use the document translation feature in Excel
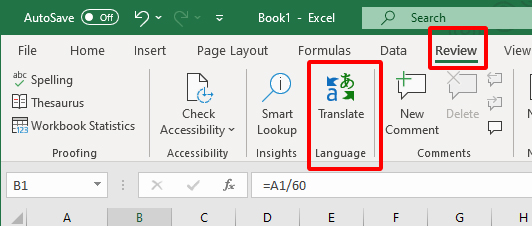
Step 1:
You highlight the content you want to translate in Excel, then click on the Review tab above, then look down below and click on the Translate tool to perform language translation.
Step 2:
On the right edge of the Excel interface you will see a language translation column. The From section is the language that Excel has recognized, or you can also choose the language manually. If you set Auto-detect, the tool will automatically detect the language entered by Excel's default.
In the To section, we choose the language we want to translate into.

Immediately after that, users will see the translated content from the original in Excel in the To section. Users can highlight the content in the To section to use for data tables in Excel.

Currently, the language translation feature in Excel is being used for Office 2019 and later versions.
Was this article helpful?
Your feedback helps us improve.
Related Articles
 Instructions on how to translate languages on Excel spreadsheets2 minutes read
 Instructions on how to print text, print documents Word, Excel, PDF details5 minutes read
 Instructions for alignment in Excel - Adjust the margins for Excel before printing2 minutes read
 How to fix the error of printing missing documents in an Excel sheet3 minutes read
 How to create notes for documents in Excel2 minutes read
 Instructions on how to insert links into Excel filel5 minutes read
Reader Comments 0
Sign in with email or Google to join the discussion.