Instructions for managing Facebook Timeline
The new Facebook Timeline interface has been around for a while. Like it or not, users must use it. However, it will be safer and more neat when we can control this new interface. Therefore, in this article, we will provide 7 ways you can manage it easily.
The new Facebook Timeline interface has been around for a while. Like it or not, users must use it. However, it will be safer and more neat when we can control this new interface. Therefore, in this article, we will provide 7 ways you can manage it easily.
Step 1 . Currently, the new Facebook Timeline interface is not required - but Facebook has not given up the idea of forcing all its users to use this new interface in the near future. When this happens, there will be a message appear at the top of the Facebook home page: it means that you only have 7 days to review everything on the Timeline before everyone sees it.

Obviously, if this happens at the right time when users cannot check their Facebook account, while on vacation, when you come back you will feel uncomfortable. Suppose that Timeline activation is required and suppose you want to keep your Facebook account (if not, see the last paragraph), then it is better to manage everything immediately. To do this, we will start by visiting Facebook's Timeline Introduction page.
Step 2 . We recommend users to scroll through this page to understand what Timeline is. Besides, you should also pay attention to the Get Timeline blue button at the end (but don't click it in a hurry). If you're in a hurry, just understand that basically the Timeline is just a new way to display content that has been posted on Facebook. But maybe so - unnoticed - so the Timeline will contain everything posted publicly. By choosing, users can now review what was available before the Timeline officially went live. Get into work and you quickly forget the 7-day deadline Facebook offers to edit. When ready, click the Get Timeline button but remember this will also immediately set up a 7-day countdown timer.
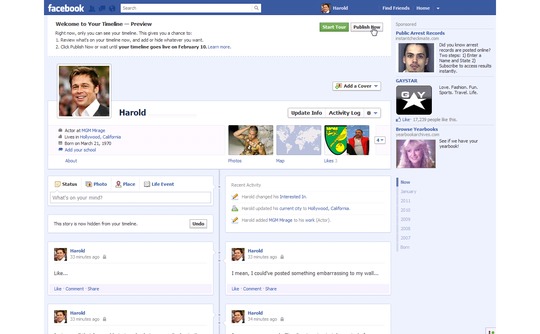
Step 3 . Now you have 7 days to review and edit the data available on Facebook Timeline. At the top of the Facebook page there is a day when the Timeline is officially posted. If you click the Publish Now button (at the top right), the countdown timer will disappear and the Timeline will immediately be visible to everyone. So, if you're not ready, don't click on it. Instead, scroll through the entire Timeline to see its contents. Remember, some or all of the things that appear here appear on the public Timeline when completed. We will not provide instructions on how to build a beautiful Timeline, but only explain how to remove what you do not want them to appear. If you want to create an attractive Timeline, click the Start Tour button in the top right corner (remember not to click Publish Now button).
Step 4 . To return to the review page, click on the profile name at the top. Scroll down to see the contents of the Timeline. Each post contains a small green icon next to its time stamp. A lock means that the item is marked only for you to see, no one can see it when the Timeline goes live. If this icon describes two small heads in portraits, it means that Facebook friends can see that item; and if the icon is a small globe, it means that everyone who visits your Facebook page can see it. For this field, Timeline's security options are no different than those that apply to Facebook's wall: to change what others can see, click on the icon and choose different settings. .
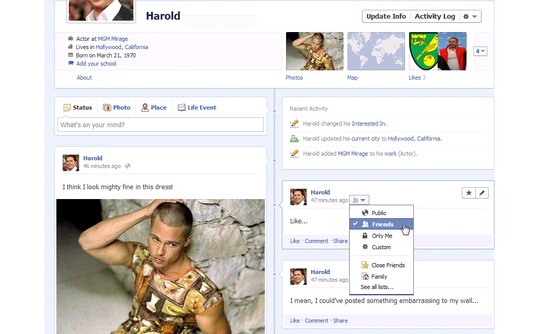
Step 5 . However, if there are posts you want to remove from the Timeline, move the mouse pointer to the top right corner of the item and there will be 2 icons appear - click on the pencil image (representing Edit or Remove ). To completely remove a news item, select Delete Post (and confirm it by clicking Delete Post ). In addition, to prevent an item from being uploaded to the Timeline, you can still retrieve it or view it later, select Hide from Timeline . If an error occurs, click the Undo button and the item will reappear on the Timeline.
Step 6 . Next, review the rest of the Timeline, repeat the above two steps as needed. When you're ready - remember carefully because Facebook doesn't show any confirmation messages so you can't go back - go back to the home page and click the Publish Now and Timeline button that officially went live. If you want to restore the previously hidden items to the Timeline, click the Activity Log button, click the ' no entry ' sign next to the related item, then select Allowed on Timeline .
Step 7 . If you consider introducing Facebook's Timeline and want to close your account, start by clicking on the downward-pointing arrow in the right corner of the profile page and select Account Settings . Next, click Security on the left border to see the ' Deactivate your account ' link: click on it and follow the instructions to disable the profile without deleting existing data. The option to delete the account is obviously hidden: click on the first post, named ' How do I permanently delete my account? 'It will provide a link to the delete form. It will take about 2 weeks to delete a Facebook account and if you log in to it at this time, the removal request will be invalidated. So remember not to log in when you decide to delete the account.
Was this article helpful?
Your feedback helps us improve.
Related Articles
 Comprehensive guide for Facebook Timeline13 minutes read
 Facebook 'squeezes' using the Timeline interface: things you need to know6 minutes read
 Things to do when switching to Facebook's Timeline interface6 minutes read
 Find anything on Facebook Timeline with the following 5 tools5 minutes read
 How to lock Wall Facebook, prevent others from posting on Facebook wall4 minutes read
 Instructions on how to use the Timeline feature on Windows 103 minutes read
Reader Comments 0
Sign in with email or Google to join the discussion.