Table of Contents
This updated guide examines How to Configuring Pfsense 2.0 Cluster Using Carp and organizes the essential facts, background, and practical takeaways in clear American English.
System requirements
To accomplish this process we need two identical computers, with a minimum of 3 network cards and a subnet dedicated to network traffic synchronization.
For example, the IP address will be used in the article:
Network configuration:
Firewall 1 WAN IP: 192.168.100.1 SYNC IP: 10.155.0.1 LAN IP: 192.168.1.252 Firewall 2 WAN IP: 192.168.100.2 SYNC IP: 10.155.0.2 LAN IP: 192.168.1.253
The following two IP addresses are used for sharing between firewalls:
- IP virtual WAN: 192.168.100.200
- Virtual LAN IP: 192.168.1.254
This tutorial assumes that you have pfSense preinstalled on both computers and network cards configured with IP addresses. and experienced users work with pfSense (mostly around interfaces). Webmasters).
Illustrative example of the model we build:

Building Cluster
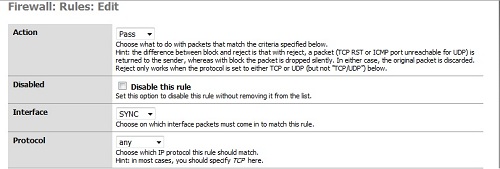
First you need to configure a firewall rule on both boxes to allow firewalls to communicate with each other on the SYNC card.
To do this, click on " Firewall | Rules ', select SYNC at Interface . Click the Plus button to add a new firewall rule entry. Set" Protocol "for" any ", add a description to be able to identify Click Save , then click Apply Changes if necessary.
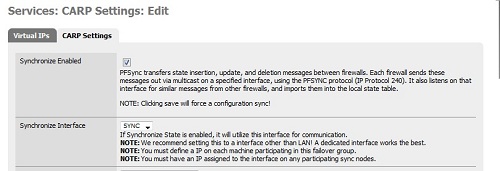
Still on the firewall backup, here we need to configure CARP synchronization and configure it to be just a copy. Click " Firewall | Vitrual IPs "> " Firewall | Vitrual Ips ", check the box " Synchronize Enabled ". Select " Synchronize Interface to SYNC ", then save this change.
Completing the configuration of the firewall backup, we now proceed to configure CARP synchronization on the main firewall.
Log in to your main firewall, click " Firewall | Virtual Ips ", switch to the " CARP Settings " tab and check the " Synchronize Enabled " box. In the Synchronize Interface section, select " SYNC " as the default, check the boxes under "Synchronize Rules", "Synchronize NAT", "Synchronize Virtual IPs".
Then enter the SYNC IP address of the firewall copy into the " Synchronize to IP " box and set the password at the " Remote System Password " box.
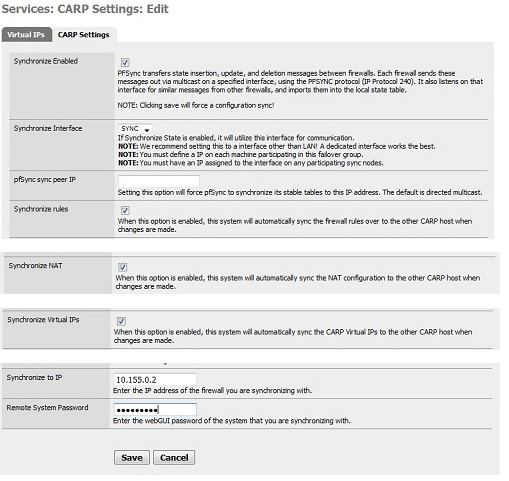
Click Save to save the changes.
Next we configure Virtual IP address for both firewalls to use. To do this go to " Firewall | Virtual IPs " and switch to the " Virtual Ips " tab.
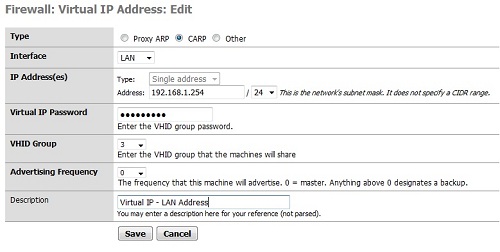
First, set the IP address for the WAN of Interface section, click the Plus button to add a new IP IP, make sure the IP type is set at CARP . This WAN address will be used throughout your system regardless of whether the primary firewall or replica is enabled.
Next create a password in the " Virtual IP Password " box, keep the value of " VHID Group " and the " Advertising Frequency " value 0 , add a little description in the Description and click Save to save.
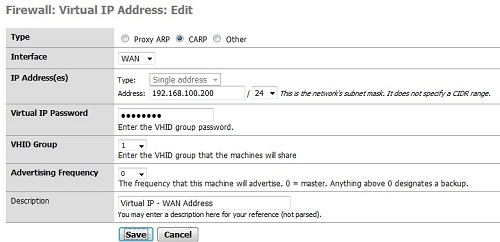
Similarly, we configure Virtual IP address for LAN in Interface section. The steps are not different from the above instructions for the WAN, the ' VHID Group ' instead of 3 , put another description and click Save to save the changes.
And now you will see in the " Firewall | Virtual IPs " section a list of two virtual IPs appears in the type of CARP .
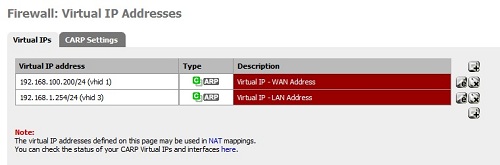
If you log into the backup site's web interface and click on " Firewall | Virtual IPs " you will see virtual IPs in sync with the backup firewall.
Now is the time to see how it works. Two pfSense firewalls will continuously synchronize their rules, NAT, virtual IPs and any other settings you've selected in the Synchronize option. For some reason the main firewall is deactivated, its copy still works continuously.
Under test conditions, copies of the firewall will receive for a minimum of 10 seconds, because the freeBSD operating system will apply virtual IP addresses to the interface once it is disconnected from the main firewall.
Test Failover
You can test it by unplugging the network cable or turning off the main firewall while continuously pinging the IP address of the LAN or WAN. You will see the IPs drop to a few seconds in other firewalls.
FAQ
What is How to Configuring Pfsense 2.0 Cluster Using Carp about?
It provides a structured overview of CARP, explains the main context, and highlights practical takeaways for readers.
Why does this topic matter?
Understanding the main concepts helps readers evaluate the issue, avoid common mistakes, and make better-informed decisions.
How should readers use this information?
Use the guidance as a practical starting point, confirm details that may have changed, and follow current product, safety, or security recommendations.
Related Articles
 What Is pfSense? Benefits and How to Use It10 minutes read
 How to Choose Carp to Worship Mr. Cong Mr. Tao the Most Standard4 minutes read
 Security: Protect Your Network with Pfsense12 minutes read
 The Most Special Lake in the World - Where the Riding Duck3 minutes read
 Why Worship Mr. Cong to Only Release Carp?3 minutes read
 Instructions for Configuring Ldplayer for Each Game Type6 minutes read
Reader Comments 0
Sign in with email or Google to join the discussion.