Instructions for alignment in Excel - Adjust the margins for Excel before printing

You need to print Excel documents, so the printed documents are beautiful and not skewed, you need to align the margins before printing. But many of you do not know how to align margins in Excel because there is less work with Excel.

The following article shows you how to align margins in Excel that you may want to know.

Step 1: First, to align the margins, you need to change the default measurement unit of Excel to cm.

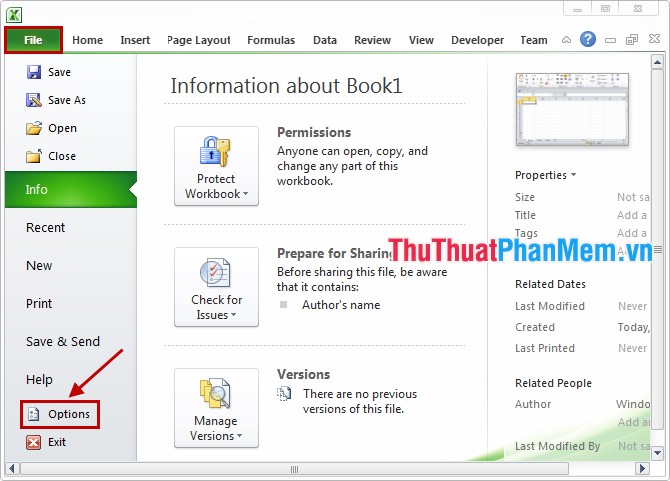
Select File -> Options .

Instructions for alignment in Excel - Adjust the margins for Excel before printing Picture 1

In the Excel Options dialog box, select the Advanced tab , then drag the scroll bar to find the Display section . In the Display section, you change the units from inches to centimeters. In the Ruler units section, select Centimeters . Then select OK to save changes.

Instructions for alignment in Excel - Adjust the margins for Excel before printing Picture 2

Step 2: Next to align the margins you choose tab Page Layout -> Margins -> Custom Margins .

Instructions for alignment in Excel - Adjust the margins for Excel before printing Picture 3

Or you choose the extended icon of the Page Setup item in the Page Layout tab .

Instructions for alignment in Excel - Adjust the margins for Excel before printing Picture 4

Step 3: The Page Setup dialog box appears, select the Margins tab , then you format the alignment in the sections: Left (left), Right (right), Top (top), Bottom (bottom), Header (target) Header), Footer (last heading) at will. Finally click OK to save.

Instructions for alignment in Excel - Adjust the margins for Excel before printing Picture 5

Thus the article has guided you how to align in Excel, hopefully with the guidance in the above article, surely you have easy alignment in Excel. Good luck!

5 ★ | 2 Vote

May be interested

  • How to create automatic table of contents in Word 2013Photo of How to create automatic table of contents in Word 2013
    each document needs to have a table of contents for readers to understand and quickly grasp the content of a hundreds-page document when looking at the index. i will introduce how to create the fastest automatic table of contents in word 2013.
  • Convert documents from Word 2007, 2010 to 2003Photo of Convert documents from Word 2007, 2010 to 2003
    so i introduce to you how to switch from word 2007, 2010 to word 2003 in the fastest and most convenient way. there are 3 ways that you can choose: - method 1: transfer word 2007 files to computers with word 2007 and save as again into word 2003.
  • Create table of contents automatically in Word 2007 and 2010Photo of Create table of contents automatically in Word 2007 and 2010
    to create an automatic table of contents in word 2010 there are 3 basic steps as follows: - 1. mark all the items in the table of contents. - 2. create the table of contents automatically. - 3. if the content of your article changes in the table of contents you should update the table of contents.
  • Create dotted lines (......) in WordPhoto of Create dotted lines (......) in Word
    while editing you need to have the lines are put by the dotted line, instead of you press the dot from the beginning to the end of the line, you just need to install tab to quickly create dotted lines with tab key.
  • Instructions to insert Texbox in WordPhoto of Instructions to insert Texbox in Word
    the text box in word is one of the many useful features that are being used more widely in your word documents and documents. this article guides you to insert texbox in word easily.
  • Create a password for a PDF file with Word 2013Photo of Create a password for a PDF file with Word 2013
    if your computer has microsoft office 2010, 2013 installed, you can create files and create passwords for pdf files directly with word 2010 and 2013.