How to turn on and off function keys FN + F1, F2, F3, ... F12 on Laptop
Fn key stands for Function which is understood as function key when combined with F1, F2, F3 . Numlock key to activate Wifi, increase or decrease volume, screen brightness.
How to turn on and off function keys FN + F1, F2, F3,. F12 on Laptop
Depending on each model, their combination performs different functions. The picture below summarizes the functions when using Fn + . for your reference.

Through the picture above, we can see many functions that this device brand has that other device brands do not. You can read more about the functions of the F1 to F12 keys to know more about their functions and you can also change the functions between the keys. . Hope you are succesful !
Some customizations use the FN key
The Fn key is often combined with the key sequence from F1 to F12 to turn on/off other functions according to the system's default settings. You can use the Fn key and press the F1 button to mute or F2 to decrease the volume, etc. And you can also turn off the FN key on the laptop to use the keyboard better.
Download Easy DriverPack
1. Enable/Disable Fn Function Key on Dell Laptop
The simplest way to change the function keys is to edit the settings in Windows Mobility Center. However, this method will only work for those using Dell laptops. To do this, you can follow these steps:
Step 1 : Click Start and enter Control Panel to open to view and change system settings.

Step 2 : In the Control Panel menu, click Hardware and Sound.

Step 3: Click the Windows Mobility Center tab.

Step 4: Or you can press the Windows + X key combination and select Mobility Center on the pop-up menu to open Windows Mobility Center.

Step 5: In Windows Mobility Center, you can choose to enable/disable by switching between Function Key or Multimedia key in the Function Key Row section.

In there:
- Function key : is the default feature that we often use, meaning we have to press the function key Fn + with a key from F1 => F12 to use it.
- Multimedia key : If you choose this feature, you will no longer need to press the Fn key in combination with the keys from F1 => F12. For example, when you press F2, the system will immediately decrease the sound, or when you press F3, it will increase the sound, etc.
Note : In case you cannot find the Windows Mobility Center section, it is likely that you have not fully installed the driver for the device. Therefore, you need to visit Dell's driver installation support home page, download and install the Dell Quickset application package.
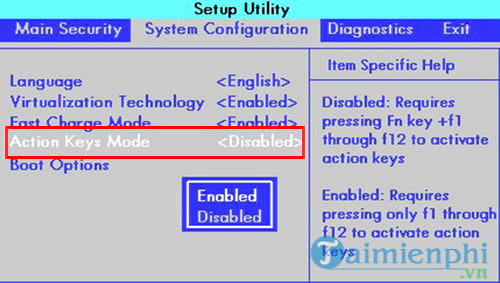
2. Turn on/off the Fn function key on HP Laptop
To enable/disable the Fn function on HP Laptops, first you need to reset the computer and while booting, press F10 to enter BIOS settings > select System Configuration tab > Action KeysMode [ Enable ] or [ Disabled ].
3. Turn on/off the Fn function key on Lenovo Laptop
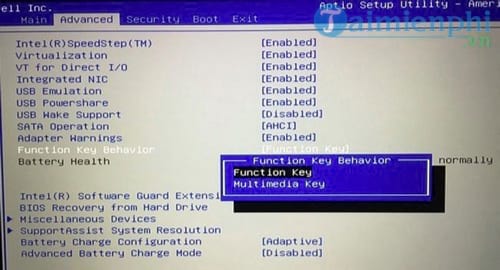
Similar to an HP laptop, you restart the computer and press the F1 key (some machines do F2 ) to enter the BIOS settings then do as shown below.
4. Turn on/off the Fn function key on some other laptops
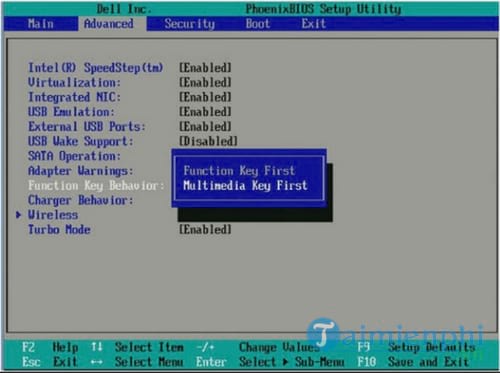
Boot into BIOS, go to the Advanced tab and find the Function Keys section . to turn on or off the Function function key.
In addition, readers can also quickly turn on and off the FN function key on the laptop via the FN + Esc key combination. Fn Lock has the same function as Caps Lock, when you turn on Fn Lock you don't need to use the Fn key anymore, you just need to press the key containing that function just like Caps Lock is turned on, it will always capitalize letters. So.
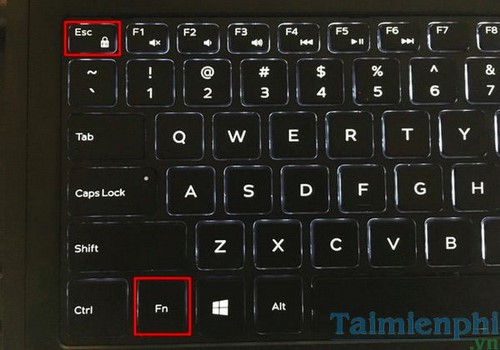
In the example above, the Fn Lock key is the Esc key . To activate Fn Lock , press the Fn + ESC key at the same time and to turn off Fn Lock, do the same.
5. Change options on Control Panel.
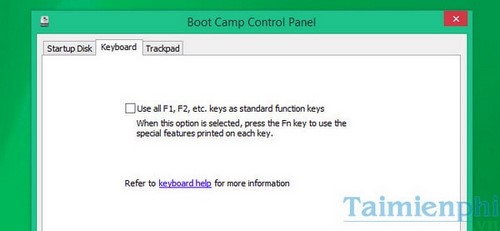
If you use Windows via Boot Camp on your Mac, you can open the Boot Camp Configuration Panel on the System Tray and look for the option 'Use all F1,F2, etc. keys as standard function keys' under the Keyboard tab
6. Turn on and off the FN key on Mac OS X
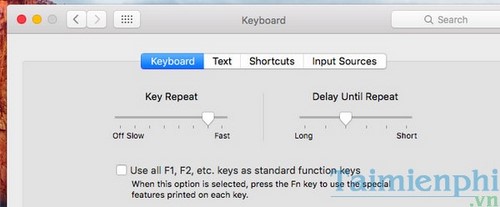
On Mac OS X , you can look for this option on System Preferences . Click on the Apple Menu and select ' System Preferences' to open. Then click on the "Keyboard" icon (keyboard icon) and click on the option 'Use all F1, F2, etc. keys as standard function keys' to customize how the Fn key is used on your Mac
7. Change Fn function key settings using UEFI settings
If you can't boot into BIOS for some reason, try changing the Fn keys function using UEFI settings. To do this, you can follow these steps:
Step 1: Start UEFI settings.
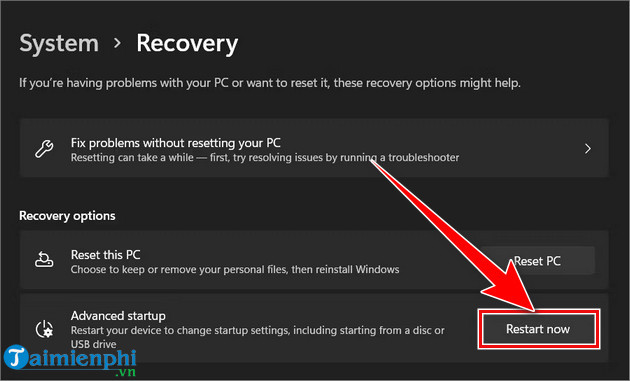
- On Windows 10: Press the Win + I key combination and select Update & Security => Recovery. Then, click Restart now to open UEFI settings.

- On Windows 11: Press the Win + S key combination to open the Windows Search utility , enter Recovery and click the Recovery option , then select Restart now in the Advanced startup section.
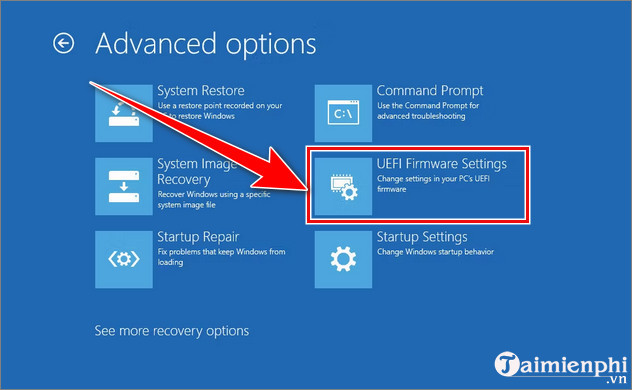
Step 2 : Once you have started the Windows Recovery Environment , click T roubleshoot => Advanced options

Step 3: Select UEFI Firmware Settings => Restart.
Step 4 : After the computer restarts, you will access the UEFI settings , select the Configuration tab . In the HotKey Mode section , you can choose Enabled or Disabled to enable or disable the Fn function key.

Additionally, you can use Windows Mobility Center on Windows 7/8 to set up settings and use the Fn key. Furthermore, you can refer to the article Summary of keyboard shortcuts on Windows 8 which is also very useful to help you save a lot of time while using the computer.
 Laptop Sleep won't turn on, fix the error of computer in hibernation mode not starting
 Common wifi errors, wifi network errors and how to fix them
 The most effective way to fix errors in computers and laptops that cannot connect to wifi
 8 Ways to Restart a Windows computer, restart when it crashes or freezes
 2 quick and simple ways to turn off Gadgets on Windows 7
 How to create USB boot using Hiren's Boot, ghost Win 10, 8.1, 7