How to set up automatic emptying of the recycle bin in Windows 11
Recycle Bin is an area familiar to Windows users in general. This is where the files and folders you delete (accidentally or on purpose) are stored, and allows you to undo files and folders to use again when needed.
Therefore, if you want to completely delete files that are no longer needed from the system, you will have to do one more operation, which is emptying the recycle bin.
If you find that task tedious, you can set the Recycle Bin to automatically be emptied after a certain period of time. This article will show you how to do that in Windows 11.
Schedule Recycle Bin in Windows 11
To automatically delete files in the Recycle Bin, you use Windows 11's Storage Sense feature. This feature will help set up the deletion of various files on your PC, including downloaded and trashed files.
To get started, first open the Settings Windows application by pressing the Windows + i key combination.
In the Settings interface that appears, click on the 'System' item.

On the 'System' page, scroll down and click 'Storage'.

On the 'Storage' screen, under 'Storage Management', click 'Storage Sense'.

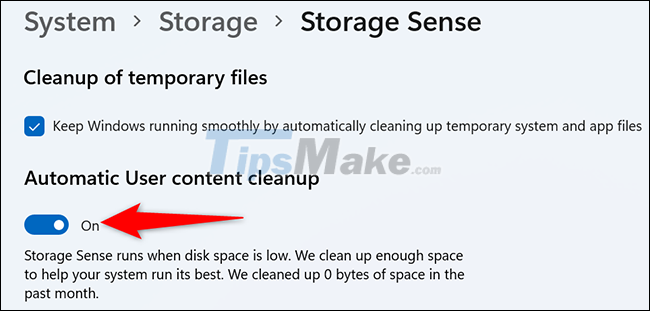
On 'Storage Sense', there is an option called 'Automatic User Content Cleanup'. Enable this option to enable the Storage Sense feature.
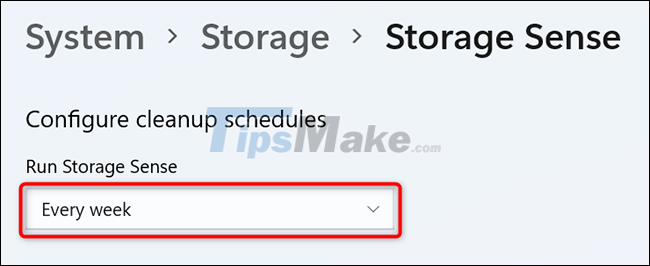
Also on this page, click the 'Run Storage Sense' drop-down menu and select the timeline you want the feature to run for. Choose from available options including 'Every Day' 'Every Week' 'Every Month' or 'During Low Free Disk Space' option.
Then, choose how long a file will stay in the Recycle Bin before Storage Sense deletes it, click the 'Delete Files in My Recycle Bin if They Have Been There for Over' drop-down menu and select an option. Available options include 'Never' '1 Day' '14 Days' '30 Days' and '60 Days'.
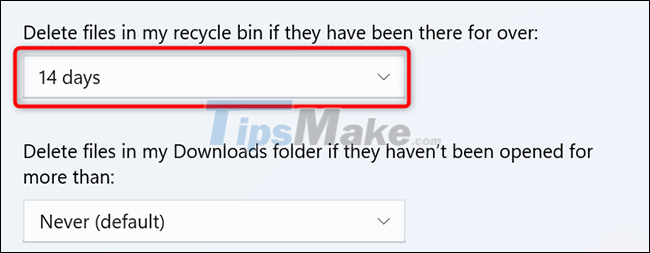
(Note: Storage Sense affects other files on your PC, such as downloaded files. On the Storage Sense page, make sure you adjust how Storage Sense handles files accordingly.)
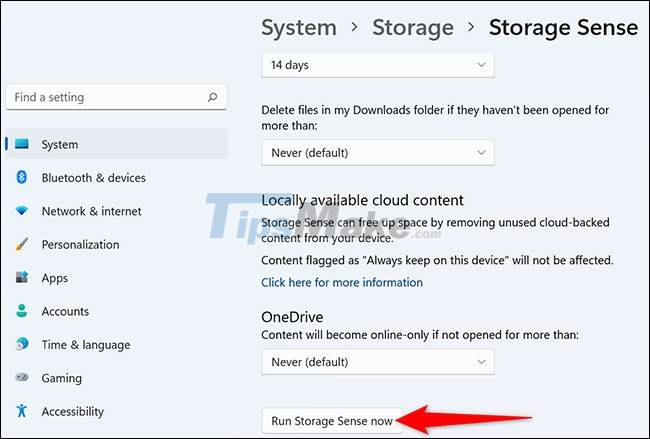
To activate Storage Sense immediately, scroll to the bottom of the 'Storage Sense' page and click 'Run Storage Sense Now'.
Accomplished! Storage Sense will automatically empty the trash at the interval you specify.
- 11 ways to open the Recycle Bin on Windows
- 9 ways to open Recycle Bin on Windows 10
- 5 Recycle Bin settings on Windows 11 you should know
- Automatically 'clean up' the Recycle Bin on Windows 10
- How to fix Recycle Bin not self-cleaning on Windows 10
- Tips for using Recycle Bin more effectively
- How to change the Windows 11 Recycle Bin icon
- How to Pin the Recycle Bin in Windows 10
- Useful AI features in Windows 11
- 11 ways to open the Recycle Bin on Windows
- Delete these temporary Windows folders to reclaim precious storage space
- How to fix Recycle Bin not working
- How to View Recently Deleted Files on Windows 10/11?
- How to Add Recycle Bin to File Explorer
- How to create a shortcut to clean the Recycle Bin on Windows 10/11
- Simple tips to clean Recycle Bin on Windows 10
- 5 Recycle Bin settings on Windows 11 you should know
- How to add Recycle Bin to Windows 11 system tray


-
 How to check laptop storage capacity on Windows and MacBook
-
Why should you stop paying for Google Drive and switch to Copyparty?
-
How to manage storage in Perplexity AI
-
How to set SD card as default storage on Android
-
Microsoft wants users to stop caring about local files
-
How to use Storage sense Windows to free up disk space
 How to check laptop storage capacity on Windows and MacBook
 Why should you stop paying for Google Drive and switch to Copyparty?
 How to manage storage in Perplexity AI
 How to set SD card as default storage on Android
 Microsoft wants users to stop caring about local files
 How to use Storage sense Windows to free up disk space