Table of Contents
This guide provides a clear overview of windows 11, including 1. How to Increase or Decrease the Storage Space in the Recycle Bin, 2. How to Permanently Delete Files Without Putting Them in the Recycle Bin. Use it to understand the topic, compare the available options, and make a more informed decision.
1. How to Increase or Decrease the Storage Space in the Recycle Bin
Recycle Bin does not store your files forever. The Recycle Bin is automatically configured to have a certain percentage of the partition size to storing files you delete while running Windows. Older files are automatically deleted when the reserved space is used up to accommodate new files.
If you regularly delete files in the hope that you can always recover them from the Recycle Bin if needed, you should be careful with the size of the files you delete. In addition, you can increase (or decrease) the dedicated storage space for deleted files in case you often need to recover files from the Recycle Bin.
You can change the amount of reserved storage from the Recycle Bin properties. Right-click the Recycle Bin and select Properties. Click on the C drive and find the Maximize size field.
Now define a specific size in MB to accommodate the reserve. Remember that 1GB is equivalent to 1024MB, so you'll need to do some math if you want your Recycle Bin to store files in gigabytes.

When you're done, click OK to save and exit.
You can also change the storage size for other drives on your PC, but not external hard drives. With older versions of Windows, you can refer to the article: How to change the storage capacity for Recycle Bin in Windows 10/8/7 for more details.
2. How to Permanently Delete Files Without Putting Them in the Recycle Bin
If you are someone who never needs to recover deleted files, you can skip the extra step and set the file to be deleted directly. There are two ways to do this.
First, you can simply use the Shift + Delete keyboard shortcut to delete files permanently without putting them in the Recycle Bin.
Second, you can change the Recycle Bin settings so that even if you delete files without using keyboard shortcuts, the files will be deleted forever.
You can do this from the Recycle Bin properties section. Right-click the Recycle Bin and select Properties. Check the option next to the text that says Don't move files to the Recycle Bin. Remove files immediately when deleted.
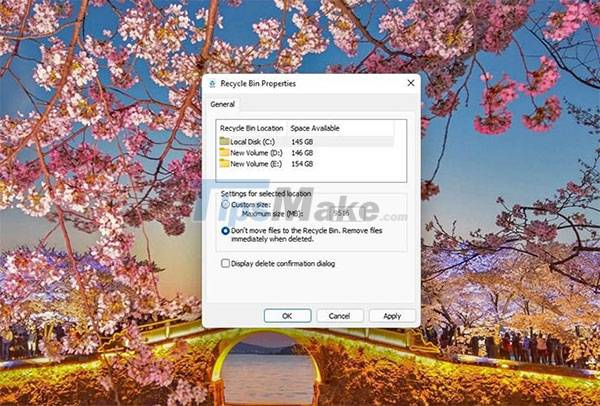
Click OK to save and exit. Now, when you delete an item, it's permanently removed immediately instead of going to the trash.
3. Enable Confirmation Before Deleting Files
If you tend to delete files by mistake when using your PC, you can turn on confirmation to not delete important files. This is especially true if you have changed your Recycle Bin settings so that files are permanently deleted without ever being placed in the Recycle Bin.
You can enable validation from the Recycle Bin properties section. Right-click the Recycle Bin and select Properties. Check the box next to the text that says Display delete confirmation dialog.
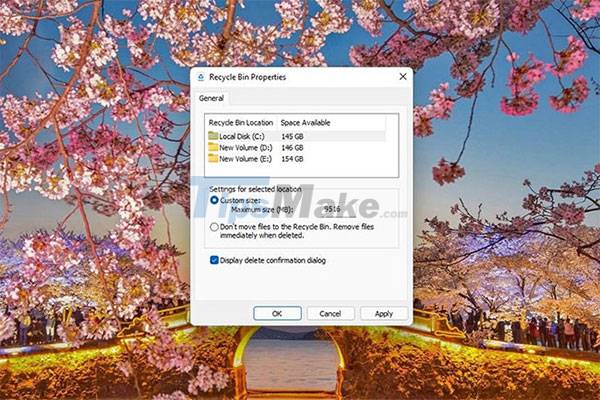
Select OK to save and exit.
Note that you can still permanently delete files with keyboard shortcuts whenever you need to.
4. How to Empty the Recycle Bin on a Schedule
Windows 10 brought a great feature called Storage Sense. You can leave your Windows cleaning to Storage Sense. It basically acts as an alternative to third-party tools like CCleaner to a certain extent.
If you're using Windows 10 or 11, you'll be able to use Storage Sense to automatically empty the Recycle Bin after a certain number of days. You can set up Storage Sense to delete files in the Recycle Bin after 1, 14, 30 or 60 days.
It is not possible to set a separate number of days for each file. All files in the bucket will be deleted every 30 days. For example, if the last cleanup was 29 days ago, all files in the recycle bin the next day will be emptied, including those you deleted today.
You can set up Storage Sense from the Settings app. Press Win + I to launch Settings and navigate to System > Storage > Storage Sense.
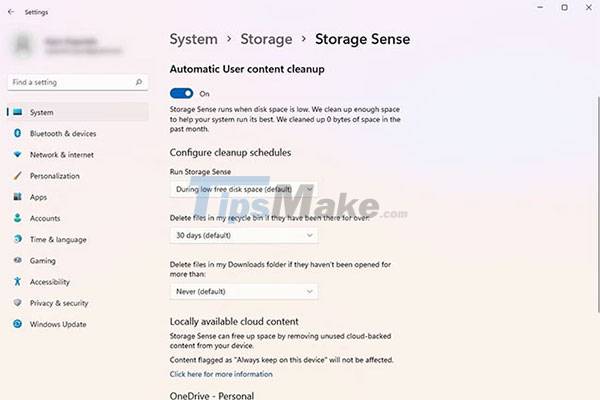
Find the option called Delete files in my recycle bin if they have been there for over and choose the number of days. The default value is set to 30.
5. How to Add Recycle Bin to System Tray
If you're a heavy Recycle Bin user, accessing the desktop or searching for the Recycle Bin in the Start Menu every time you want to open it can be frustrating. Luckily, you can put the Recycle Bin in your system tray and access it directly, eliminating unnecessary clutter.
There is no built-in option to add the Recycle Bin to the system tray on Windows. You will need to rely on third-party tools like TrayBin or MiniBin.
Conclusion
Understanding Windows 11 makes it easier to compare options, avoid common mistakes, and apply the information in this guide more effectively. Review the relevant requirements before making changes or choosing a solution.
FAQ
What is Windows 11?
The Recycle Bin is automatically configured to have a certain percentage of the partition size to storing files you delete while running Windows.
Why is Windows 11 important?
Understanding Windows 11 helps you evaluate features, compatibility, performance, and potential limitations before you choose a product or follow a procedure.
What should you consider when using or choosing Windows 11?
Consider your specific goal, compatibility requirements, available features, cost, security, and the practical recommendations described in this guide.
Related Articles
 How to Restore the Recycle Bin Icon Lost in Windows 105 minutes read
 Automatically 'Clean Up' the Recycle Bin on Windows 102 minutes read
 11 Ways to Open the Recycle Bin on Windows12 minutes read
 Click: How to Restore the Recycle Bin4 minutes read
 9 Ways to Open Recycle Bin on Windows 108 minutes read
 How to Fix Recycle Bin Not Self-cleaning on Windows 106 minutes read
Reader Comments 0
Sign in with email or Google to join the discussion.