How to prevent Windows from automatically locking
To prevent users from locking their Windows 10 computer, follow the steps below to turn off the Lock Screen in Windows 10..
Both Windows 10 and 11 automatically lock the screen after a period of inactivity to protect user data and prevent unauthorized access. However, if you want to keep your PC accessible without constantly logging in, there are ways to turn off the automatic locking feature on Windows.
1. Modify login options
Turning off Windows' login requirement is an effective way to prevent Windows from locking itself when inactive. You also need to turn off the Dynamic Lock feature, which automatically locks your PC when a connected Bluetooth device, such as a smartphone, is out of range. Here's how to do both:
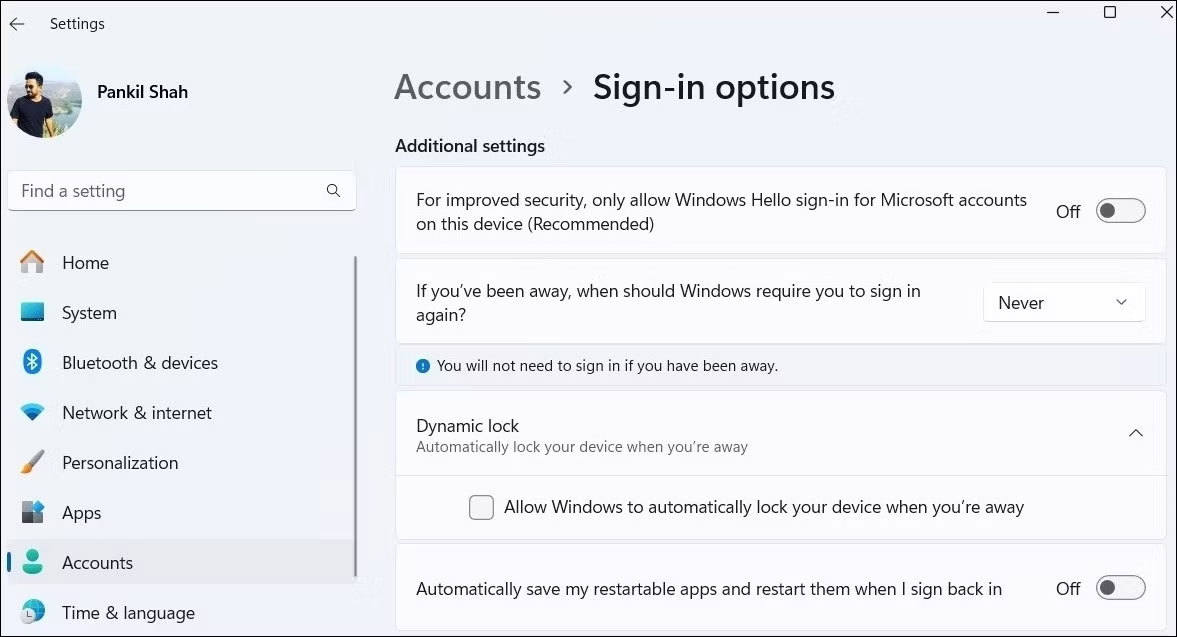
- Press Win + I to and go to Accounts > Sign-in options .
- In the Additional settings section , select Never from the drop-down menu.
- In the same menu, turn off the Dynamic Lock feature by unchecking the Allow Windows to automatically lock your device when you're away option .
2. Turn off Sleep mode and screensavers
By default, Windows automatically locks when entering Sleep mode. To prevent this, you can prevent Windows from automatically going into Sleep mode when inactive. This way, it won't lock itself.
To turn off Sleep mode on Windows, follow these steps:
- Open the Settings app and go to System > Power & battery .
- Click Screen and sleep to expand.
- Click the drop-down menu next to "On battery power, put my device to sleep after" and "When plugged in, put my device to sleep after" and select Never .

You should also turn off screensaver mode because it can sometimes cause Windows to automatically lock. Here's how:
- Press Win + S to open Windows Search.
- Enter Turn screen saver on or off and select the first result that appears.
- In the Screen Saver Settings window, set Screen saver to None and uncheck On resume, display the logon screen .

3. Edit Windows Registry
Another way to prevent Windows from automatically locking is to edit some registry files. However, it is important to understand that editing the Windows Registry can be dangerous. Therefore, only use this method if other methods do not work.
Even if you are familiar with editing registry files, make sure you back up all registry files or create a restore point first, just in case something goes wrong.
- Click the search icon on the taskbar, type registry editor and select Run as administrator .
- In the Registry Editor window, navigate to HKEY_LOCAL_MACHINE > Software > Policies > Microsoft from the left pane.
- Right-click Windows and select New > Key . Name the new key "DisableAutoLock".
- Right click on the newly created key, go to New and select DWORD (32-bit) Value . Rename this new DWORD to "NoLockScreen".
- Open NoLockScreen and set Value data to 1 . Click OK and to apply the changes.

Unlocking your PC is extremely convenient if it supports Windows Hello, whether it's through facial recognition or fingerprint scanning. However, if your computer lacks these features, you can prevent your Windows 10 or 11 computer from automatically locking using any of the methods listed above.
Good luck!