Table of Contents
This practical guide walks through how to open Virtual Keyboard on Windows 10, 11, 7. It organizes the required steps, settings, and checks so you can complete the task with fewer mistakes.
When the external keyboard is paralyzed, The virtual keyboard Will be a lifesaver for anyone. How to open the virtual keyboard on Windows is straightforward as follows:
Tips for Opening Virtual Keyboard on Windows 11, 10, 8.1, 7
Tip When you can't find the virtual keyboard icon, or want to open it quickly, when the key is disabled
When you can't select, or Don't have a keyboard To type on, or when you ca N't find theOn-Screen Keyboard Icon (virtual keyboard icon) in the Program menu, do the following:
Use the mouse to select Computer then Open drive C: => Find The Windows folder , find System32 And then find the OSK. exe file ( Virtual keyboard path is the program located at: C: WindowsSystem32osk. exe )
To easily open it again next time, just Right-select OSK. exe, Open the Send To Menu, then choose Desktop (Short cut).
- select the key combination then enter to display the virtual keyboard immediately

Article content: 1. Open virtual keyboard on Windows 11. 2. Open virtual keyboard on Windows 10. 3. Open virtual keyboard on Windows 8.1. 4. Open the virtual keyboard on Windows 7. 5. Open the virtual keyboard on Windows XP.
How to Open Virtual Keyboard on Windows 11, 10, 8.1, 7
Open the Virtual Keyboard on Windows 11
As you know, Windows 11 is the current operating system that Microsoft released, with many new functions and designs, so the operation of opening the virtual keyboard on Win 11 is also a bit different, for more information. About how to do it, please review the detailed instructions article here
Open the Virtual Keyboard on Windows 10
Method 1: Turn on Virtual Keyboard on Windows 10 Using Settings
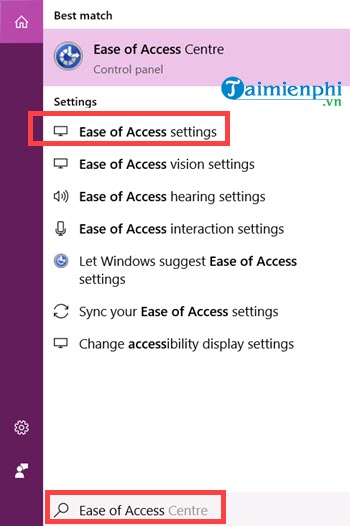
Step 1: To open the virtual keyboard Keyboard on Windows 10, we just need to open StartMenu And type Ease of Access settings .
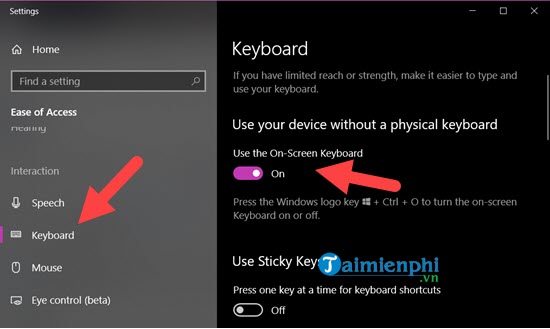
Step 2: Next, open Keyboard > select Use On-Screen Keyboard To activate the virtual keyboard Keyboard. Note: In addition to clicking use On-Screen Keyboard, we can also select The shortcut Windows key + Ctrl + O To quickly activate.
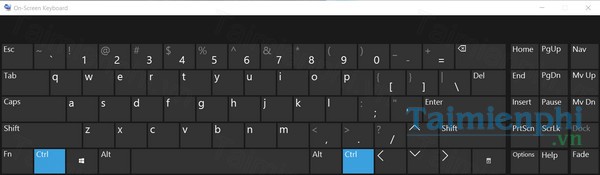
Immediately the virtual keyboard on Windows 10 appears.

Method 2: Turn on the Virtual Keyboard on Windows 10 with the On-screen Keyboard Shortcut
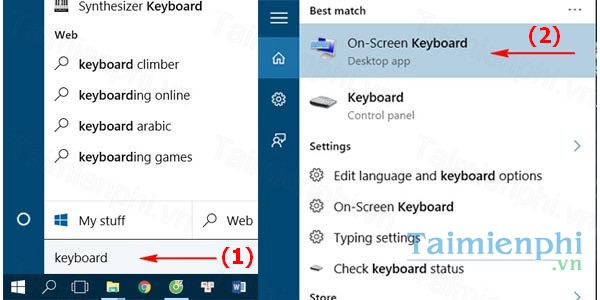
Open the search window -> type Keyboard -> select On-Screen Keyboard
Then, the Windows 10 virtual keyboard will automatically pop up
You can set up many of your get settings.
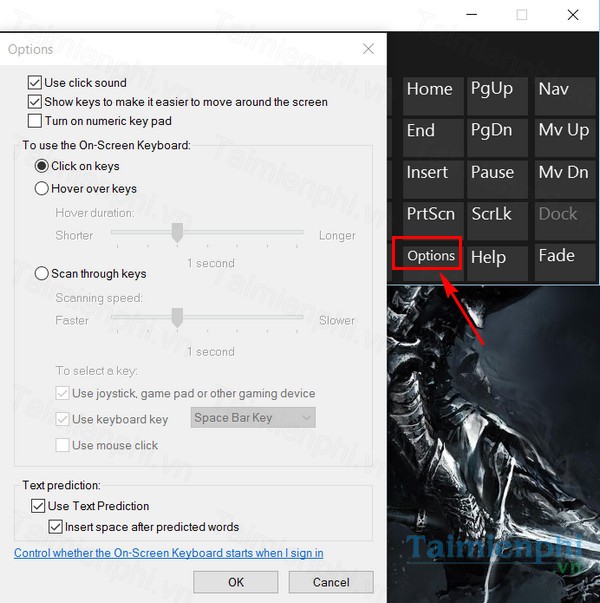
* Activate the row of function keys (Function: F1-F12) on the virtual keyboard
Just like the function keys (Function: F1-F12) on the physical keyboard, the virtual keyboard can also activate the Fn key row. By default, this row of keys was previously hidden because the user had not activated the function key row.
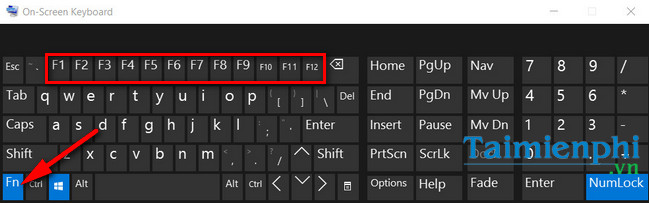
To activate the row of function keys on the virtual keyboard, Simply select the Fn key on the virtual keyboard to display the row of function keys on the virtual keyboard.
How to Open the Virtual Keyboard on Windows 8/8.1
This latest operating system from Micosoft also has a built-in virtual keyboard, the opening method is similar to Windows XP and Windows 7. However, you can open the virtual keyboard on Windows 8 with the new interface. can perform the following operations:
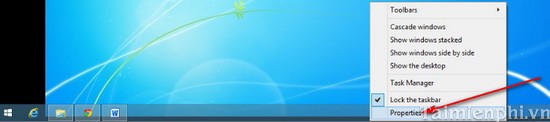
Step 1: Move the mouse down to The Toolbar, Right-select and select Properties
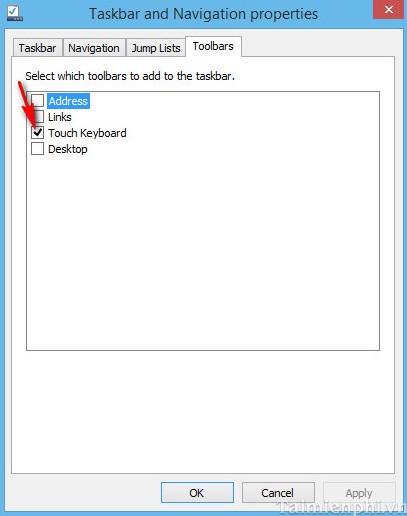
Step 2: A new window appears, switch to the Toolbars Tab and tick Touch Keyboad As below
Step 3: Now observe the virtual keyboard icon under the toolbar.
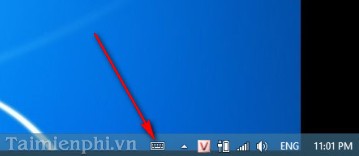
Simply select it to call the virtual keyboard.
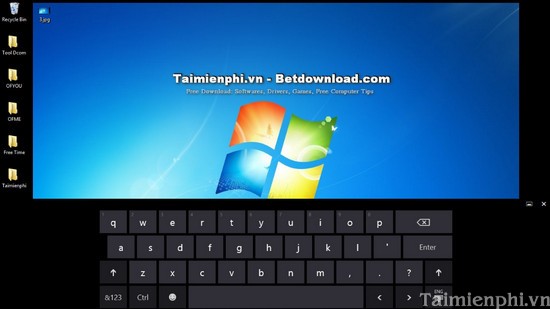
How to Call the Virtual Keyboard in Windows 7
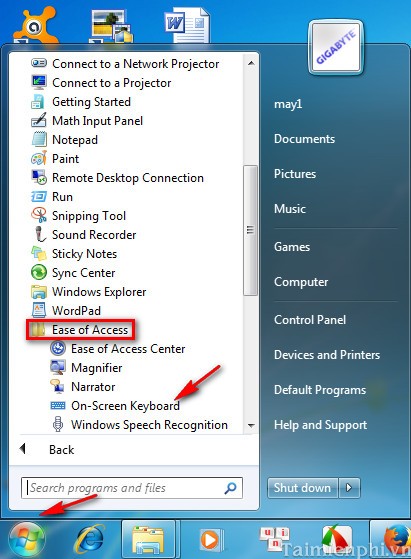
Windows 7, the most popular operating system today, is no stranger to you like Windows XP Microsoft also has a built-in virtual keyboard application. To open the virtual keyboard on Windows 7, do the following:
Method 1: Same as on Windows XP, select Windows to access All Programs , then open Accessories , open Ease of Access, And finally select On-Screen Keyboard.
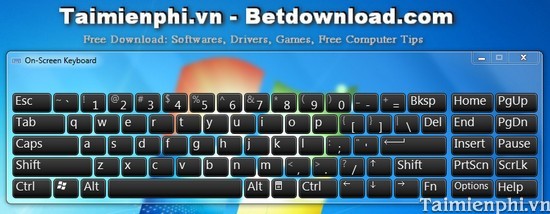
Immediately the virtual keyboard appears
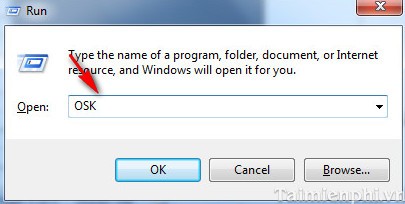
Method 2: Select the key combination Windows + R, Type in the phrase 'OSK' Then choose OK
How to Open the Virtual Keyboard on Windows XP
Win XP was a popular operating system for a while. However, Microsoft has stopped providing services for this operating system, but it is still popular and used by many people. To open the virtual keyboard on Windows XP, do one of the following two ways:
Method 1: Select the Windows Key to Start > All Programs > Accessories > Accessibility Then find and select to select On-Screen Keyboard As shown below.

Immediately after that the virtual keyboard appears, check Do not show this. In the dialog box above to not display such a message in the future.

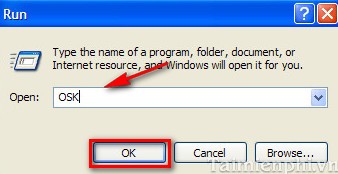
Method 2: select theWindows + R Key combination then type in the phrase 'OSK' And select OK . The virtual keyboard appears immediately afterwards.
Above, we have just shown you how to open the virtual keyboard on Windows XP/7/8, so you can continue your work when you find errors with your computer's physical keyboard. In addition, you can use how to use the computer to use the virtual keyboard on the computer effectively.
FAQ
What do I need before I open Virtual Keyboard on Windows 10, 11, 7?
Prepare the required device, software, account access, and any files mentioned in the steps. Back up important data before changing system settings.
Why does the process look different on my device?
Menus and options can vary by operating system, app version, device model, or region. Use the closest matching setting and check the official documentation when needed.
What should I do if a step does not work?
Restart the app or device, confirm permissions and connectivity, update the software, and repeat the step carefully. Avoid unofficial downloads or tools.
Related Articles
 6 Ways to Open Virtual Keyboard on Windows 109 minutes read
 Summary of Several Ways to Open Virtual Keyboard on Windows XP //8 minutes read
 How to Open the Virtual Keyboard on Windows 103 minutes read
 Here Are 4 Ways to Open the Virtual Keyboard on Windows 7/8/8.1/10/1110 minutes read
 How to Fix the Virtual Keyboard Automatically Opens on Windows 105 minutes read
 How to Open Virtual Keyboard on Windows 10 for Laptop and PC5 minutes read
Reader Comments 0
Sign in with email or Google to join the discussion.