How to master the photo rotation function on smartphones
Even if you're just an amateur photographer, properly rotating your photos is a skill that can help you give your photos a professional look. However, if done incorrectly, this editing trick can make your photos look amateurish and unbalanced.
Types of image rotation

There are different types of image rotation, each allowing you to achieve a certain effect or orientation. Here are the most common types:
1. Rotate 90 degrees or 180 degrees
Rotating a photo 90 degrees is a good option if you take a photo in a different orientation, such as portrait or landscape. This type of rotation is useful not only if you want the photo to appear in a specific orientation, but also for social media if the photo appears better in a certain format.
Additionally, if you take a photo upside down, rotating it 180 degrees will straighten it up, ensuring it displays correctly when you view or share it with others.
2. Custom angle
On the other hand, if you're not trying to completely change the orientation and just want to correct minor misalignments, rotating the image a few degrees can be helpful.
Sometimes even a small adjustment, like tilting 10 or 15 degrees, can help straighten a photo or change the perspective just enough to make the image more unique and eye-catching.
3. Flip horizontally
If you're trying to fix the way reflections and selfies appear, to make them look more realistic, then flipping horizontally might be your best option. This essentially reorients the photo so that it looks as if someone were looking directly at it.
How to Rotate Photos on iPhone or Android Device
Rotating photos on your Android or iPhone device is relatively simple, thanks to built-in photo editing tools. Here's what you need to do:
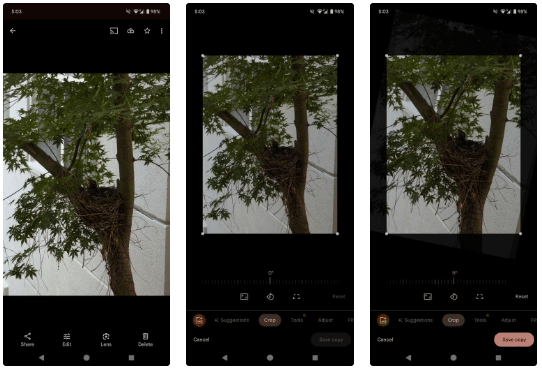
- On your Android phone, open the Photos app and select the photo you want to rotate.
- Tap the Edit icon near the bottom of the screen.
- Select Crop .
- Tap the Rotate option (usually represented by a circular arrow icon) to rotate the photo 90 degrees with each tap. Alternatively, drag the slider above the Rotate option to rotate the photo to a custom angle.

The default Photos app on Android devices doesn't let you flip photos; however, third-party photo editing apps often include this functionality, so consider downloading a third-party photo editing app if you want to flip photos.
If you are an iPhone user, here is what you need to do:
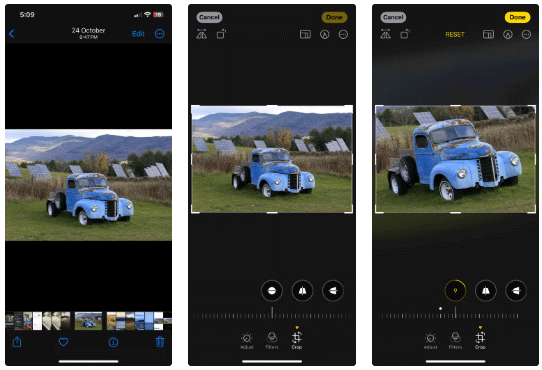
- Open the Photos app and select the photo you want to rotate.
- Select the Edit option in the upper right corner of the screen.
- Tap the Crop icon at the bottom of the screen.
- In the upper left corner of the screen, you'll find options to rotate the photo in 90-degree increments as well as flip the photo. You can also drag the slider at the bottom to rotate the photo to a custom angle.

If the default photo editing app on your phone or tablet doesn't offer the exact rotation options you need, third-party apps can help. While there are plenty of photo editing apps for Android and iPhone in their respective app stores, some standouts include Canva, Lightroom, and PhotoGrid. Canva and Lightroom let you rotate images using the Crop option, while PhotoGrid has a Rotate function in its general editor.
If you're using another third-party photo editing app for editing, be sure to check the edit menu as well as the options in the Crop or Adjust tool to find the appropriate option to rotate the image.
Image rotation mistakes to avoid
Like any other type of photo editing, rotating an image has its own pitfalls if you don't do it right. Here are some mistakes to watch out for and avoid if you want your edit to look professional:
- Over-rotating a photo : Changing the angle slightly can help straighten a photo and add a unique perspective. However, if done too much, the photo can become unbalanced.
- Ignore text in the background : If you're trying to flip or rotate a photo, take a few seconds to check if there's any text or logo in the background that might be misaligned due to the photo rotation.
- Leave the photo uncropped : Rotating a photo can sometimes change the framing of the photo. Not cropping a photo after rotating it can distract the viewer from the subject, reducing the visual appeal of the photo.
While rotating an image is usually straightforward, at least in terms of the actual process, how you do it can have a significant impact on the final result. Keeping these tips, steps, and common mistakes in mind when rotating an image next time will help you get better results.