How to limit Wi-Fi bandwidth
Limiting Wi-Fi and internet bandwidth at your workplace or home will help stabilize your network connection. Instead of using maximum bandwidth, users sharing your Wi-Fi network will also have their upload and download speeds restricted, so you won't have to worry about buffering or lag while watching movies or playing games..
Why should we limit Wi-Fi bandwidth when running at maximum speed is better? It's true that running at maximum speed feels great, but that should only be for you. For those using your internet connection, you should limit their bandwidth to prevent them from overusing it and impacting your overall usage. More practically, in a company, limiting bandwidth would prevent employees from watching videos or downloading large game files during work hours.

How to limit Wi-Fi bandwidth at home or work.
How to limit Wi-Fi bandwidth
There are many types of Wi-Fi modems from different manufacturers, but basically, they all have a common feature that allows you to limit Wi-Fi bandwidth. In this article, TipsMake will guide you on how to limit Wi-Fi bandwidth on the TP-Link WR845N modem, the most popular device currently available.
- To access the admin page, the address you set can be 192.168.1.1 , 192.168.0.1 , or any other address you previously configured.
>> Then enter the default username and password. As a network administrator, you probably already know how to do this, right?
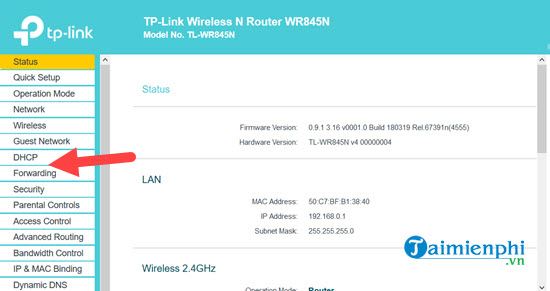
Step 1: On the modem's administration interface (in this case, a TP-Link WR845N modem), first go to DHCP to reconfigure it.
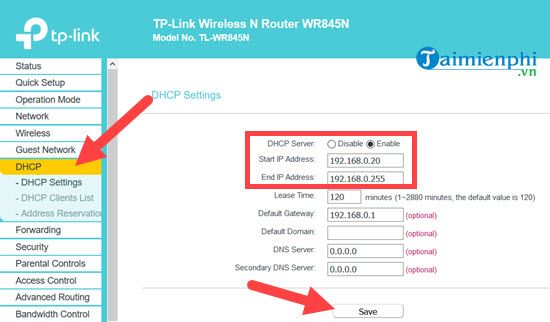
Step 2: Here, reactivate DHCP and configure it to only allow IP addresses from 20 to 255. This setting will help you re-allocate IP addresses, a feature available on all modems. Of course, creating "Rules" will be much easier with more advanced modems.
Step 3: Next, go to the Bandwidth Control section , where you can limit your Wi-Fi bandwidth.
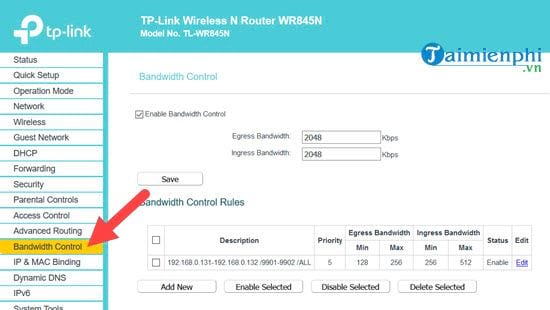
Step 4: Here, check the box for Enable Bandwidth Control and adjust the download and upload values as follows:
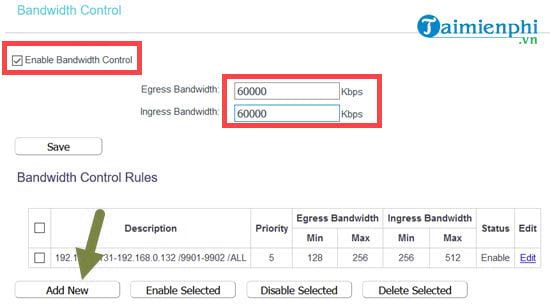
- As shown in the image, we set the Egress Bandwidth and Ingress Bandwidth to 60,000 Kbps because the network we are using is 60 Mbps. If converted, the speed after conversion will be 7.5 MB , and this will be the speed for all Wifi users before any limits are applied.
Now click on Add new to set up additional Wifi bandwidth limit commands.
Step 5: Here, you just need to click on Enable so that it can be applied immediately.
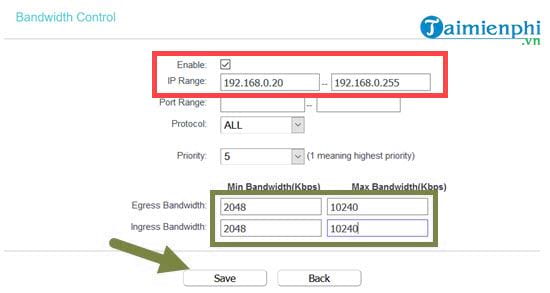
- In the IP Range section, leave it between 20 and 255 as you set earlier (and leave your IP address between 1 and 19).
- In the Egress Bandwidth and Ingress Bandwidth sections, depending on your choice, you can set it from 2048 kbps to a maximum of 10240 kbps, which is only 256 kbps to 1 Mbps , seven times lower than the maximum speed.
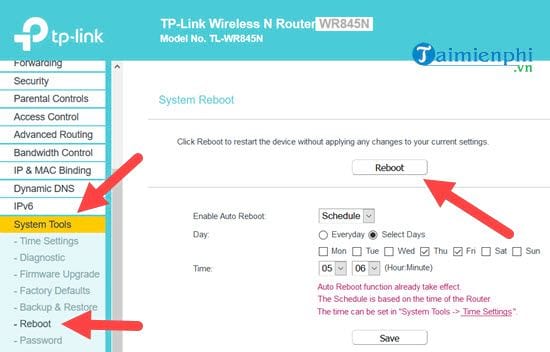
And the final thing you need to do is reboot your Wi-Fi modem to restore all settings and configurations to their original state.
The above is a guide on how to limit Wi-Fi bandwidth, applicable to small businesses or home networks. Adjusting bandwidth limits is the best way to manage your Wi-Fi network. This prevents you from downloading movies and large files indiscriminately, which could affect other users.
Besides limiting Wi-Fi bandwidth, changing your Wi-Fi password is also a way to restrict users, especially your neighbors. To change your Wi-Fi password , you need to access the system management section as described in this article.
Currently, there are many software programs available online that can crack Wi-Fi on laptops . However, such software poses many potential risks that can harm your computer. Therefore, readers should not use illegal software just to crack Wi-Fi on their laptops.