Table of Contents
This updated guide examines How to Kill W32. Kavo Virus and organizes the essential facts, background, and practical takeaways in clear American English.
How to kill Kavo virus with ClamWin Free Antivirus software
Download ClamWin Free Antivirus and install it on your computer, go to the Select Components screen, if you don't want to integrate the software into Outlook and Widows Explorer, you can uncheck it, then click Next.
After installing, click on the software icon on the desktop to open, you will be prompted to download the latest virus data when entering the main interface of the software.
You press Shift and select all available drives and press Scan.
The software will conduct computer scans, detect and remove Kado viruses, as well as other malware on the computer.
How to delete the Kavo virus manually
1. Run Task Manager Right-click on the Taskbar at the bottom right of the screen, select Task Manager, and you will see the Task Manager window appear
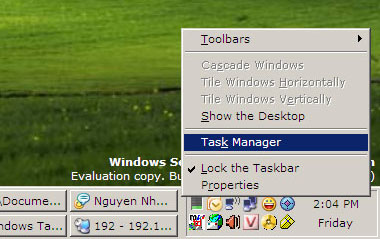 Figure 1: Running Task Manager
Turn off WScript.exe & Explorer.exe if these two programs are running
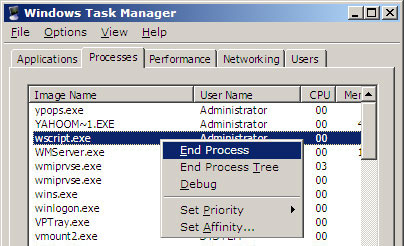 Figure 2: Close wscript.exe
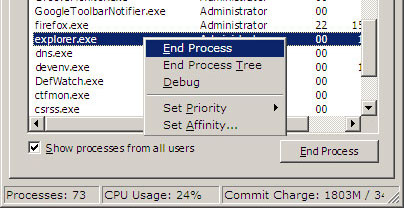 Figure 3: Close explorer.exe
2. Remove the Autorun.inf files The feature of this Kavo is to generate Autorun files located in the root directory of hard drives. These files make the virus active when the victim double clicks the hard drive. To avoid re-activating the virus, one of the first things you have to do is remove the Autorun files in the root directory of the drives (on my machine are C, D, E drives).
In the Task Manager window, select File > New Task (Run.)
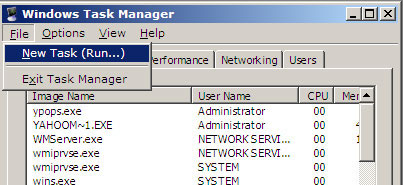 Figure 4: Opening the run dialog to execute a program
The screen will display the Run command, type cmd to open the console screen, execute DOS commands
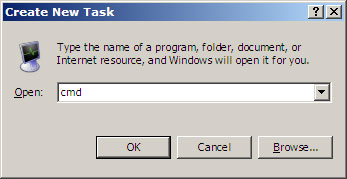 Figure 5: Running CMD command
In the console, in turn, execute the following commands:
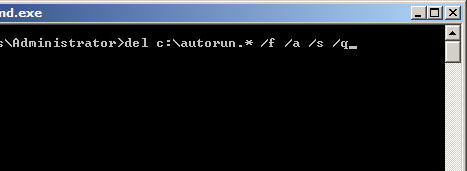 Figure 6: Consonle screen to execute the command line
DEL c: autorun. * / F / a / s / q DEL d: autorun. * / F / a / s / q DEL e: autorun. * / F / a / s / q
3. Remove the virus In the console window, type the following commands:
CD c: windowssystem32 DIR / a avp *. *
You will see the files avpo.exe or avpo0.dll Keep typing
ATTRIB -r -s -h avpo.exe DEL avpo.exe
or
ATTRIB -r -s -h avpo0.dll DEL avp0.dll
Keep typing
DIR / a kavo *. *
If appears 1 or the files kavo.exe and kavo0.dll or kavo1.dll Perform deletion commands
ATTRIB -r -s -h kavo.exe DEL kavo.exe
ATTRIB -r -s -h kavo.dll DEL kavo.dll
ATTRIB -r -s -h kavo1.dll DEL kavo1.dll
Continue typing in the console
CD ATTRIB -r -s -h ntde1ect.com DEL ntde1ect.com
4. Edit Regedit In the Task Manager window, select File > New Task (Run.) (Figure 4) Display the Run box, type regedit
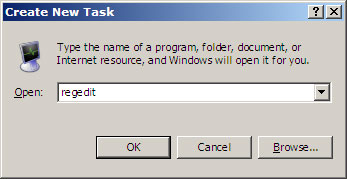 Figure 7: Executing the program Regedit
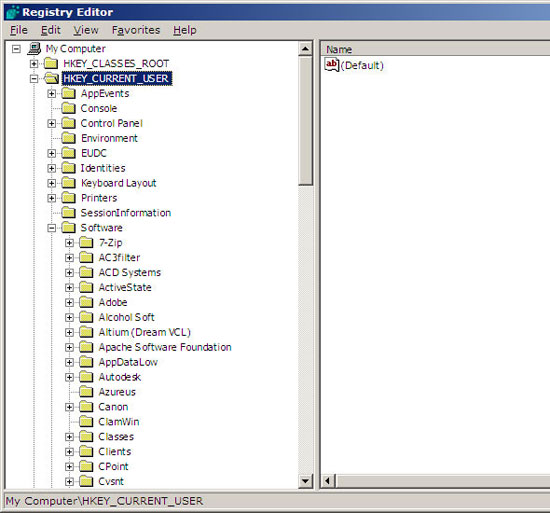 Figure 8: Window regedit
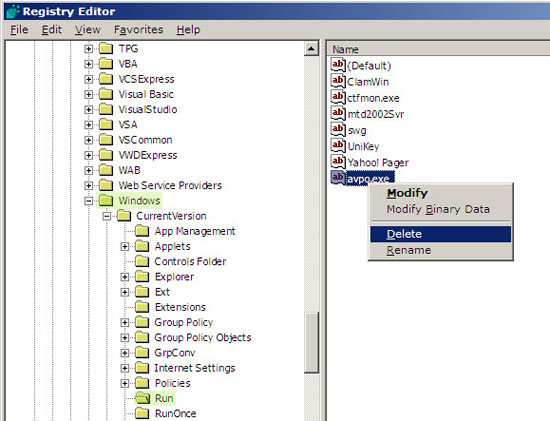 Figure 9: Delete avpo.exe
Go to HKEY_CURRENT_USER> SOFTWARE> Microsoft> Windows> CurrentVersion> Run In the left pane of Regedit window, if there is a stream of avpo.exe , right-click and delete the text.
At the end of the process, restart the computer. Go back to windows, if you don't see any hidden files (due to viruses) you can download the following Windows Registry file and run it https://tipsmake.com/data/fixHiddenFiles.reg Go to Statup by going to Run > type msconfig
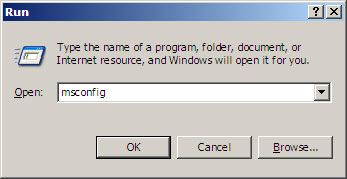 Figure 10: Run MsConfig
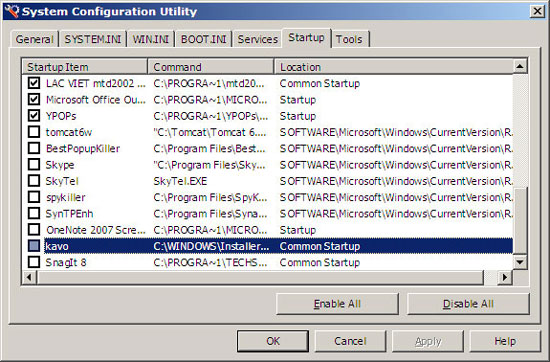 Figure 11: Uncheck Kavo, or Avpo
Restart your computer again.
FAQ
What is How to Kill W32. Kavo Virus about?
It provides a structured overview of Kavo, explains the main context, and highlights practical takeaways for readers.
Why does this topic matter?
Understanding the main concepts helps readers evaluate the issue, avoid common mistakes, and make better-informed decisions.
How should readers use this information?
Use the guidance as a practical starting point, confirm details that may have changed, and follow current product, safety, or security recommendations.
Related Articles
 The Good News: Finding Antibodies Can Kill 99% of the HIV Virus Strain3 minutes read
 Destroy the Autorun Virus in USB or on PC with 4 Simple Ways7 minutes read
 How to Kill Kido: How to Kill Net-worm. Win32. Kido Virus6 minutes read
 No Need to Use an Antivirus Program, This Is How to Get Rid of4 minutes read
 How to Fix When Facebook Is Infected with Virus4 minutes read
 How to Wash Dry Hands: Alcoholic Anti-virus Like?3 minutes read
Reader Comments 0
Sign in with email or Google to join the discussion.