How to Install Skype in Ubuntu
The Skype developers have made the latest version of their popular video & audio chat client available for 64-bit Linux. They've published it in the snap store which makes it easy to install on all currently supported releases of Ubuntu....
Table of Contents
Method 1 of 5:
Installing Skype Snap
-
 Open Ubuntu Software. On Ubuntu 16.04 and above it's super easy to install Skype from Ubuntu Software - the app store shipped in Ubuntu. On 14.04 you will need to use the terminal which is covered below.
 -
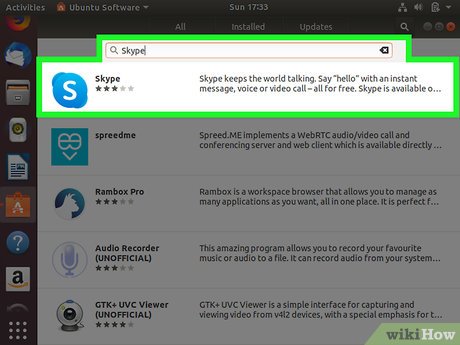 Search for Skype. In Ubuntu Software, click the search icon in the top right, then type "Skype" in the search box.
 -
 Click Skype in the results. A list of applications will appear. Click the familiar Skype icon.
 -
 Install the snap. Click the "Install" button at the top of the window. You may get prompted to type your password, because Ubuntu Software is making changes to your system.
 -
 Wait for the install to complete. Depending on your network connection, this may take a few moments. Wait for it to finish.
 -
 Launch Skype in Ubuntu Software. Once installed, you can launch Skype immediately from Ubuntu Software by clicking the "Launch" button.
 -
 Launch Skype. Once you close Ubuntu Software, you should find Skype in the Ubuntu launcher.
Method 2 of 5:
Install Skype Snap in a Terminal
-
 Open your Terminal. In Ubuntu 14.04 and above, you can use the terminal to install the Skype snap. This only requires a couple of commands and a few moments to do.
- You can quickly open the Terminal by pressing Ctrl+Alt+T or by searching for "terminal" in the dash
-
 Update the package list. The first command refreshes the list of packages available. Type sudo apt-get update. Enter your password if prompted.
 -
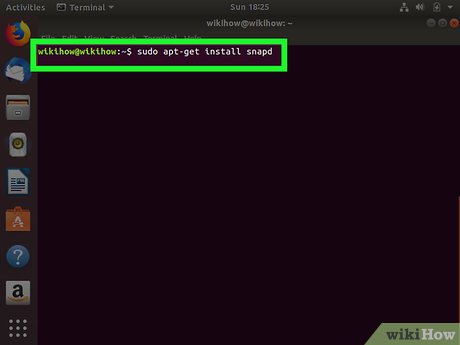 Install snapd. In order to install snaps, you need to install the "Snap Daemon" which manages the installation & upgrades of snaps. In Ubuntu 14.04 it needs installing manually. In later releases of Ubuntu (from 16.04 onwards) it's already installed. Type sudo apt-get install snapd. Enter your password if prompted. Press "Y" when asked if you want to continue.
 -
 Install Skype snap. Finally, in the terminal, type sudo snap install skype --classic which will install the Skype snap. Once finished, close the terminal window.
 -
 Launch Skype. Click the Ubuntu button (or press the 'Super/Windows' key on the keyboard) and search for Skype. Click the familiar Skype icon when found.
Method 3 of 5:
Installing Legacy Skype
-
 Open your Terminal. Ubuntu previously recommended installing Skype using the Canonical (Ubuntu developer) repository instead of the packages from the Skype website. This will ensure that you get the proper version for your system. The Terminal may be intimidating, but you'll just need to enter a couple different commands.
- You can quickly open the Terminal by pressing Ctrl+Alt+T or by opening "Applications" → "Accessories" → "Terminal".
-
 Determine if you're running the 32- or 64-bit version of Ubuntu. You'll need to know this before proceeding so that you can install the correct software.
- Type sudo uname --m and press ↵ Enter. Type in your administrator password.
- If the Terminal returns i686, you are running the 32-bit version.
- If the Terminal returns x86_64, you are running the 64-bit version.
-
 Enable MultiArch if you are running 64-bit Linux. This allows for better compatibility with programs compiled for other computers.
- Type sudo dpkg --add-architecture i386 and press ↵ Enter. Type in your administrator password to download the package.
-
 Add the Canonical partner repository. This will give you the ability to install any of the programs hosted on this repository, which includes the latest versions of Skype.
- Type or paste sudo add-apt-repository "deb http://archive.canonical.com/ $(lsb_release -sc) partner" and press ↵ Enter.
-
 Install Skype. Now that you have the proper dependencies and the Canonical partner repository, you can download and install the Skype software.[1]
- Type sudo apt-get update && sudo apt-get install skype and press ↵ Enter to install Skype. The installation process may take a few minutes to complete.
- You can also install Skype using the Software Center since you've added the Canonical partner repository. Open the Software Center, search for "Skype", and then click the "Install" button to download and install it.
Method 4 of 5:
Running Skype
-
 Open Skype. It may not be immediately obvious that Skype has been installed, as no icon will appear on your desktop or Launcher bar. There are a couple of different ways you can find it.
- Click the Dash and search for "Skype". After opening Skype, you'll see the Skype icon appear in your launcher bar. Right-click it and select "Lock to Launcher" to keep the Skype icon on your Launcher after it is closed.
- Navigate to "Applications" → "Internet" → "Skype". You can use this to create a shortcut on your desktop for Skype.
-
 Wait for Skype to load. The first time you run Skype, it will likely take a minute or two to start. During this time, it will appear as if nothing is happening. Be patient and it should start after a little while. When you start it again in the future, it should start immediately.
 -
 Log in using your Skype username or Microsoft account. You can also create an account for free if you don't have one. Click here for more details on Skype accounts.
 -
 Test your microphone. When you first start Skype, you'll see a contact named "Echo / Sound Test Service". Select it and then click the call button. This will allow you to test your microphone and speakers to ensure that you are sending and receiving sound.
- If your speakers or microphone are not working, see the Troubleshooting section below.
-
 Test your webcam. If you have a webcam connected, you can test it to ensure that it is working. Click the "Tools" menu and select "Options". Click the "Video settings" option in the "General" section. The image from your webcam should appear in the Skype window.
- If your webcam is not appearing, see the Troubleshooting section below.
-
 Start using Skype. Once you've confirmed that your devices are working properly, you can start using Skype to chat via text, voice, and video. Click here for details on using the Skype client.
Method 5 of 5:
Troubleshooting
-
 Fix a microphone that is not working. For most newer versions of Ubuntu, you can handle all of microphone settings from the Speaker button in your toolbar. Ensure that your microphone is properly connected, enabled, and that the levels are set correctly.[2]
- Skype will sometimes override your system mixer settings and cause the microphone to not work. You can prevent Skype from taking control of your system mixer by clicking "Tools" → "Options" → "Audio settings" and unchecking the "Allow Skype to automatically adjust my mixer levels" box.
-
 Fix a webcam that is not working. For many webcams that don't work, installing the "v4lcompat" driver will fix the problem. If this doesn't solve your issue, you'll need to check for instructions for your specific webcam. Not all webcam models work with Skype on Linux.
- Make sure that there are no other programs running that may be using your webcam. The webcam video feed can only be used by one program at a time.
- Open the Terminal, type sudo bash apt-get install libv4l-0:i386, and press ↵ Enter.
- Right-click on Applications and select "Properties". Click "Edit menu" and then select "Internet". Right-click on Skype and select "Properties".
- Change the command to env PULSE_LATENCY_MSEC=30 LD_PRELOAD=/usr/lib/i386-linux-gnu/libv4l/v4l1compat.so skype.
- Check this Ubuntu support page if the above steps don't work. The page contains a list of webcams that should "just work", webcams that need specific tweaks to get working, and webcams that don't work at all or require a significant amount of effort to get running.
-
 Fix a Skype video that has low resolution. Skype for Linux does not officially support 640 x 480 video, which can make the image look blurry. There is a hack you can use to force 640 x 480, but it isn't guaranteed to work for everyone:
- Make sure Skype is functioning properly and then close it completely before proceeding.
- Navigate to User/.Skype/SkypeName/.
- Open config.xml in a text editor.
- Add the following lines between the tags:
- 480
- 640
- Save and close the file. Skype should now transmit in 640 x 480 resolution. It may take a minute or two for it to "warm up" to this resolution.
Was this article helpful?
Your feedback helps us improve.
Related Articles
 How to Install Skype Using Terminal on Ubuntu4 minutes read
 How to install Skye on Ubuntu4 minutes read
 How to install Ubuntu 26.04 LTS on a PC or laptop9 minutes read
 Skype is available for Linux users, download and experience2 minutes read
 How to install Ubuntu in parallel with Windows using USB9 minutes read
 How to install Putty SSH Client on Ubuntu 20.04 LTS4 minutes read
Reader Comments 0
Sign in with email or Google to join the discussion.