How to Install Retropie
This wikiHow teaches you how to install RetroPie, a video game emulator portal, on your Raspberry Pi. RetroPie can be installed on any Raspberry Pi model, but the developers recommend using a Raspberry Pi 3 Model B+ or better for best...
Table of Contents
Part 1 of 3:
Installing the Image
-
 Install Etcher on your computer. Installing RetroPie involves flashing an image to an SD card. Etcher is recommended for flashing by Raspberry Pi developers and is free for Windows, macOS, and Linux.[1] You can get Etcher from https://www.balena.io/etcher.
- If you prefer a different disk imager, such as Win32DiskImager or Apple Pi Baker, you can use that instead.
-
 Download the SD image from https://retropie.org.uk/download. There are two images available—one for Raspberry Pi 0/1 and one for 2/3.[2]
- If you're not sure which version you have, count the number of raspberries that appear at boot time. If you see one raspberry, download the Raspberry Pi 0/1 version. If you see 4 raspberries, download Raspberry Pi 2/3.
-
 Unzip the file. The steps to do this vary by operating system:
- Linux or macOS: Open a Terminal window and cd to the directory to which you downloaded the image file. Run the command gunzip retropie-4.x.x.x-rpi2_rpi3.img.gz, but replace the file name with that of the downloaded file.
- Windows: Download 7-Zip from https://www.7-zip.org and install it, then use it to select an extract the content from the downloaded file.
-
 Insert the SD card into the computer. If your computer doesn't have an SD slot, insert the card into an SD card reader and attach that to the computer.
 -
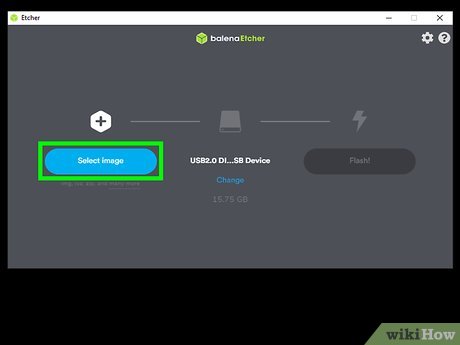 Install the image onto the SD card. Open Etcher and follow these steps:[3]
- Click Select image.
- Select the unzipped image (the file ending in *.img).
- Click Select drive.
- Select the SD card drive.
- Click Flash! to begin writing.
- Once the write is complete, eject your SD card.
Part 2 of 3:
Setting up RetroPie
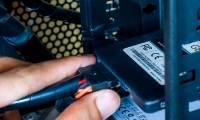
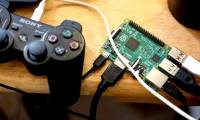
- Connect the SD card and all components to your Raspberry Pi. With your Raspberry Pi off, insert the SD card, and ensure that your USB gamepads, keyboard and mouse, Wi-Fi dongle or Ethernet cable, and TV or monitor are all connected to the system.
- Boot up your Raspberry Pi. Once the Raspberry Pi boots from the SD card, you'll see a "Welcome" screen. The number of gamepads detected will appear on this screen.
- Press and hold a button on your gamepad to configure it. Once your button-press is detected, you'll see the "Configuring" menu.
- Follow the on-screen instructions to customize the controller. The options you'll see and choose vary by controller. When you get to the end of the configuration list, use the button you set up as A to select the OK option.
- To see some images of different controllers for reference, click here and scroll down to the controller images (about halfway down the page).
- If you don't want to configure a specific button when you get to it, press and hold the button for 1 second to skip it.
- Select the Configuration menu and press A. You'll do this on the main RetroPie screen that appears after setting up the game controller. Use the button you configured as A to make your selection.
- If you're not able to choose this menu (or subsequent menus) with your gamepad, switch back to the keyboard for now.
- Select Audio to choose the audio output. It's the first option in the configuration menu. Follow the on-screen instructions to make your selection.
- If you're using a TV connected via HDMI, choose the HDMI option unless you have some other audio preference.
- If you're just using a computer monitor, choose the jack 3.5 option and connect your headphones or speakers.
- Select Raspi-config to set up location and network preferences. This is where you'll choose a keyboard layout, choose a Wi-Fi country, and specify your IP information if you have a static IP.
- Return to the Configuration menu when you're finished in this area.
- Select WIFI to get online. If you want to be able to use Wi-Fi, select this option at the bottom of the Configuration menu and enter your network details as prompted. Return to the Configuration menu when you're done.
- Select RetroPie Setup to install additional components. On this menu, perform the following steps:
- Navigate to Manage Packages > Manage experimental packages.
- Select RetroPie Manager and install it from source.
- Once installed, go to Configuration / tools on the RetroPie Setup screen.
- Select Autostart.
- Select Start Emulation Station at boot.
- Exit the menu and reboot your Raspberry Pi.
Part 3 of 3:
Playing Games
- Expand the partition on your SD card. To make room for ROMs (games) on your SD card, you'll need to extend the RetroPie partition, which was created to only accommodate RetroPie (and no other data) during setup. Here's how to do that:[4]
- Open the RetroPie Configuration menu. Now that Emulation Station (the RetroPie interface) is set to start up by default, you'll see this option at boot time.
- Select the Raspi-config menu.
- Select Expand Filesystem and confirm.
- When the partition is finished expanding, click Finish and reboot. Once rebooted, you can use your entire SD card to store ROMs and other data.
- Download free ROMs from the web. You'll want to use your computer for this. There are many places on the web to download free, legal ROMs, which are game files for emulators like RetroPie. Some reliable places to get ROMs:
- Classic games: https://www.mamedev.org/roms
- Coleco Vision games: https://cvaddict.com/list.php
- ROMs for many different systems: https://www.freeroms.com
- Transfer the ROM files to your Raspberry Pi. You can do this in a variety of ways, but the simplest way would be to use a USB drive. Here's how to do it:
- Use the computer to format the drive to the FAT32 or NTFS file system. If you're not sure how to do that, see How to Format an External Hard Drive (Windows/macOS) or How to Format a USB Flash Drive in Ubuntu (Ubuntu Linux).
- Create a folder on the drive called retropie.
- Plug the USB drive into the Raspberry Pi for 30 seconds. This creates a new folder inside the retropie folder called roms. Pull out the drive when it stops blinking.
- Plug the drive back into the computer and copy the ROM files into the retropie/roms folder.
- Plug the drive back into the Raspberry Pi and wait a few moments for the drive to stop blinking.
- Restart RetroPie or reboot your Raspberry Pi.
- Enable game collection menus. To see a list of your games in RetroPie, follow these steps on the RetroPie startup screen:[5]
- Select Game Collection Settings.
- Select Automatic Game Collections.
- Check the box next to "All Games to ensure you see all of your ROMs. If you'd like to also see lists of favorite games or last played, check those boxes as well.
- Select Back when you're finished.
- Start playing games. Now that you've added ROMs and set up your automatic collections, all you'll need to do to start playing is select the game of your choice.
Was this article helpful?
Your feedback helps us improve.
Related Articles
 How to install a new theme on RetroPie7 minutes read
 How to install Kodi on RetroPie6 minutes read
 How to install an SSD for PC4 minutes read
 How to install Windows 8.1 from USB7 minutes read
 How to run the emulator on the Raspberry Pi 44 minutes read
 Install Windows XP from a USB Flash drive5 minutes read
Reader Comments 0
Sign in with email or Google to join the discussion.