How to run the emulator on the Raspberry Pi 4
For years, Raspberry Pi fans have been running game emulation platforms like RetroPie, Recalbox and Lakka. However, when the Raspberry Pi 4 came out, none of these platforms officially supported new hardware, and users had to look for beta versions or alternatives that didn't work very well.
Table of Contents
However, the situation has improved, but has not been completely solved. Below, TipsMake.com will show you two ways to run the emulator on Raspberry Pi 4 right now.
Run Lakka on Raspberry Pi 4
While Retropie is by far the most popular choice because of its attractive user interface (UI), Lakka is the first platform to have a non-beta version that supports the Raspberry Pi 4. Lakka has strong performance , but don't offer as many options or have as much support as a competitor.
1. Insert a microSD memory card (at least 16GB) into the PC.
2. Download the latest version of Lakka for Raspberry Pi. Note that it is currently labeled as Pi 2/3 but still works for 4. Find the latest file with the .img.gz file extension.
3. Launch Etcher on PC. Download and install Etcher if you haven't already.
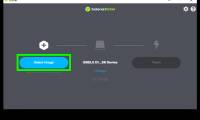
4. Click Select Image and select the file you just downloaded.
 Click on Select Image
5. Click Flash.
 Click on Flash
Once you've finished recording the microSD memory card, you can put it into your Raspberry Pi 4 and boot.
Install RetroPie on Raspberry Pi 4
To install RetroPie on Pi 4, you will not need to do too much work, but be patient. Installation will take 1 or 2 hours.
1. Install the latest version of Raspbian Buster on Pi 4, if you haven't already done so and boot into this operating system. We recommend that you install the lite version, not included with the preloaded Windows X. If you don't know how to install Raspbian, see the article: How to set up the Raspberry Pi for the first time for more details .
2. Set the Raspberry Pi 4 GPU memory to 256MB. At the Command Prompt / Terminal window, you do that by entering raspi-config , then selecting Advanced Options> Memory Split and entering 256. If you have X Windows, you do this by navigating to Preferences> Raspberry Pi Configuration , click the Performance tab , change the number to 256 and click OK. In both cases, you need to reboot later.
 Set the GPU memory of Raspberry Pi 4 to 256MB
3. Launch a Terminal window on Raspberry Pi 4 if you haven't already booted into the Command Prompt. In X Windows, you can get there by clicking on the icon Terminal or press CTRL+ ALT+ T.
 Launch a Terminal window on Raspberry Pi 4
4. Download the Retropie installation file by typing:
sudo git clone --depth=1 https://github.com/RetroPie/RetroPie-Setup.gitIf you have a good Internet connection, this will only take a few seconds.
5. Enter cd RetroPie-Setup to enter the setup directory.
cd RetroPie-Setup6. Enter git fetch && git checkout fkms_rpi4 to get the appropriate FKMS version of RetroPie (version works with Pi 4).
git fetch && git checkout fkms_rpi47. Execute the setup script by typing:
sudo ./retropie_setup.shThis process will take a few, so maybe come back later. When you return, you will see a blue screen with a menu on it.
8. Click OK by clicking Enterand click OK again if prompted.
 Click OK
9. Select Basic Install from the menu and click OK.
 Select Basic Install
10. Click Yes when asked to confirm the installation.
 Click Yes to confirm
Now the installation process will actually begin, taking at least 45 minutes or maybe longer.
11. Select Configuration / tools> autostart> Start Emulation Station at boot .
 Select Configuration / tools> autostart> Start Emulation Station at boot
12. Select Perform Reboot and click OK. Confirm if prompted.
 Select Perform Reboot
The Raspberry Pi will reboot.
Was this article helpful?
Your feedback helps us improve.
Related Articles
 How to run, Raspberry Pi emulator on computer?4 minutes read
 How to run Doom on Raspberry Pi without emulator9 minutes read
 How to transform Raspberry Pi into SNES Classic8 minutes read
 11 classic Raspberry Pi games run without emulators10 minutes read
 How to Install Retropie9 minutes read
 How to add an ADC to Raspberry Pi: What you need to know9 minutes read
Reader Comments 0
Sign in with email or Google to join the discussion.