How to install Linux operating system on Mac
Linux is an open source operating system that you can install on your computer for free. It offers several advantages over Windows and Mac, such as flexibility, privacy, better security, and ease of customization. If you have a Mac and want to explore a new open source operating system, check out the instructions on how to install Linux on a Mac below.
If you want to dual-boot Linux and macOS, you'll need to create a space for your Linux operating system to work in. To do this, you will have to partition your main hard drive. Here's how to do it:
How to split a Mac hard drive
Step 1. Open the Application folder and select Utilities.
Step 2. Next open Disk Utility.
Step 3. Next, click View in the left corner of the screen.
Step 4. Then select Show All Devices.
Step 5. Select the macOS hard drive and click Partition. You can see this button at the top of the screen. If using the new Mac model, click Partition on the message that appears.

Step 6. Set the partition size you need for your Linux operating system. You can do this by dragging the small white circles over the edge of the larger circle, or you can enter a size in the box next to Size. The gray part of the graph will be your Mac's capacity, while the blue part will be your new partition. You should spend at least 20GB for Linux. You can also add other information here, such as the partition name. Take note of the partition size, you will need this information later.
Step 7. Format the new partition as MS-DOS (FAT).
Step 8. Click Apply. Your computer will not respond when the partition is created.

Step 9. Select Partition and Continue and wait for the partitioning process to complete.
How to Create a Bootable USB Drive on Mac
1. Download the Linux distribution. An ISO file is a disc image. Some of the top options are Ubuntu, Mint, or Deepin. They are free to download from each distributor's main website.
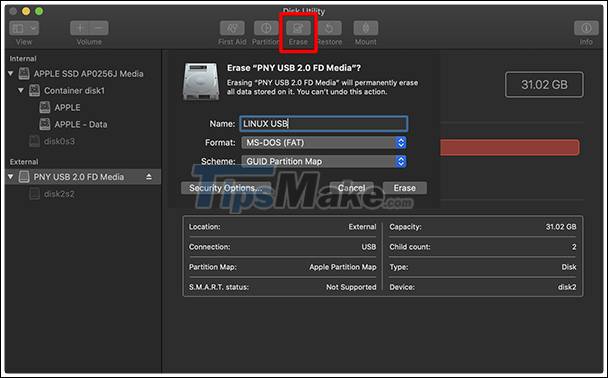
2. Open Disk Utility, select the USB drive and click Erase.
3. Then format your USB drive as MS-DOS (FAT) and the scheme as GUID Partition Map (GUID Partition Map). You can do this in Disk Utility by selecting your drive and clicking Erase.

4 Download the Etcher app. This will allow you to burn your Linux distro to a USB drive.
5. Move the Etcher application to the Applications folder. If you get a warning that you can't open the app, go to System Preferences > Security > Privacy > General. Then click the lock icon, enter your password and click Open Anyway.

6. Open the Etcher application, select Select Image. Next select Linux ISO. This is the file you downloaded earlier.
7. Select Select target and select the USB drive.
8. Then select Flash. If you get an error message and are running a new operating system, go to Applications > Utilities and open Terminal. Then type the following command and press enter:
sudo /Applications/balenaEtcher.app/Contents/MacOS/balenaEtcher
If you still get an error message saying the drive is unreadable, select Ignore.
How to Install Linux on Mac
Once you've created the partition, you can continue with the rest of the Linux installation setup below. But before you start, you'll need a USB mouse and keyboard, as Linux won't detect the driver if you're on a new Mac.
1. Turn off the machine.
2. Plug the booted USB into the Mac.
3. Turn on Mac while holding down the Option key. You will then see a boot manager with a list of available devices that you can boot from.
4. Select your USB and press Enter. This will be named EFI boot or EFI drive.

5. Then select Install from the GRUB menu. You can choose Try Without Installing.
6. Follow the on-screen installation instructions. Select Normal Installation.
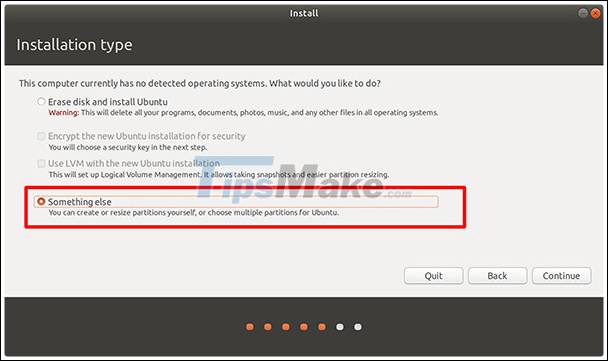
7. On the Installation Type window, select Something else. This is an option that allows you to choose the partition you created earlier to install your new Linux operating system on. If you choose other options, you run the risk of installing Linux over your current operating system, which will also delete all your files and folders.

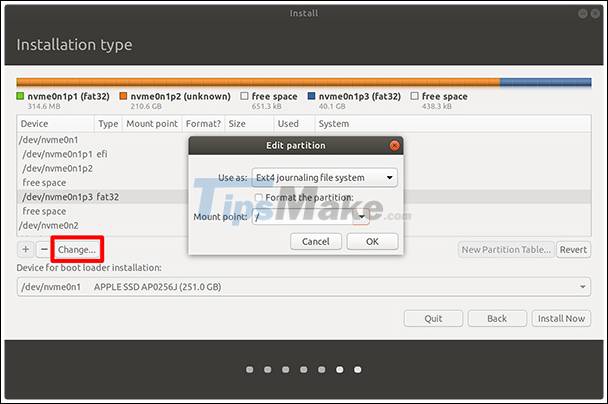
8. Select the partition you created. This is a partition the same size as the one you created earlier.
9. Then click Change below the list of devices.

10. In the Use as drop-down list, select the ext4 log file system.
11. In the Mount Point drop-down menu, select the forward slash and click OK.
12. Select Continue.
13. Select Install Now.
14. Select Continue when the warning pops up.
15. Enter the time zone, select the keyboard layout and press Continue.
16. Set up a Linux account. Enter your name, computer name, username, and password.
17. Click Continue.
18. Wait for the installation to complete.
19. Restart the Mac and simultaneously hold down the Option key.
20. Select the Linux operating system to start using.
After installing the operating system and exploring it, make sure that your applications are working properly.