How to install and use computer color inkjet printer
How to install and use computer color inkjet printer
- How to assemble a color inkjet printer
- Install driver programs and applications for color printers
- Using the printer
- Parts are usually packaged with the printer
- Remove the adhesive tapes that secure the lid and other components
- Plug the power cord and the cord connected to the computer into the printer
- Attach the ink tanks to the printer
- Connect to a computer
- How to load paper in the stacker
- Check the cord and turn on the power switch for the printer
In addition to the main machine, color inkjet printers also have a number of parts such as paper trays, ink tanks, . that are packaged separately, so before using it, they need to be assembled into the machine. In addition, because this is a computer printing device, it is necessary to connect the printer to the computer. Here's how to install and use a color inkjet printer:
How to assemble a color inkjet printer
Parts are usually packaged with the printer
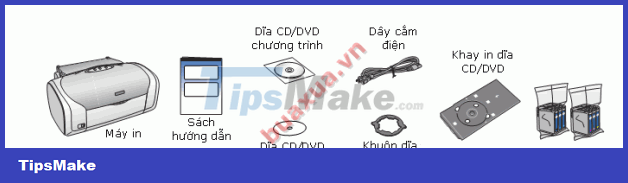
Parts are usually packaged with the printer
Remove the adhesive tapes that secure the lid and other components
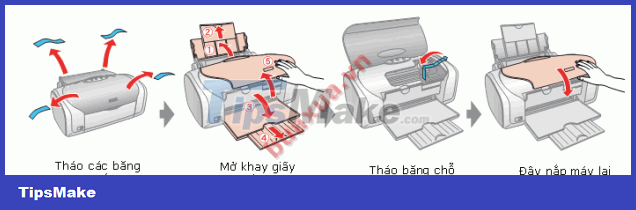
Remove the adhesive tapes that secure the lid and other components
Plug the power cord and the cord connected to the computer into the printer

Plug the power cord and the cord connected to the computer into the printer
Attach the ink tanks to the printer

Remove the cover of the ink bottles

install the ink cartridges in the correct color positions

Fixing the cartridges
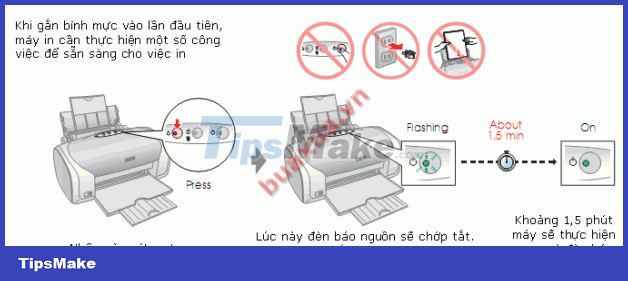
Printer checks new ink tanks
Connect to a computer
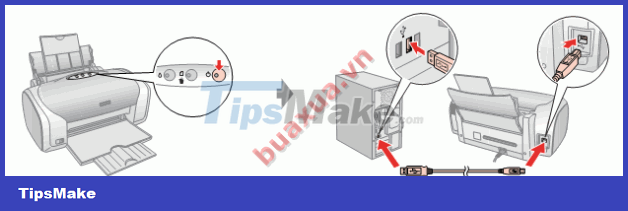
Connect to a computer
Install driver programs and applications for color printers
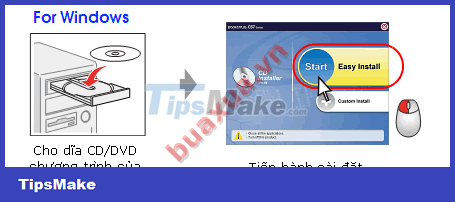
Install driver programs and applications for color printers
- Use the CD/DVD that came with the printer to install the driver and accompanying applications for the color printer. The installation is easy and fully automatic.
You must turn off the printer power before installing the driver. During the installation process, the program will ask you to open the printer.
Using the printer
How to load paper in the stacker
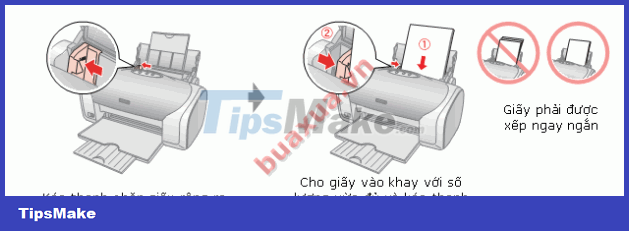
Load paper in the feed tray
Check the cord and turn on the power switch for the printer

Plug the power cord and the cord connected to the computer into the printer
Now that the printer is ready for printing, the print job is done from the File -> Print Menu of the application programs with the printing function.
- Use and maintain color inkjet printers
- Epson L310 color inkjet printer review: Should I buy it?
- How to fix print streaks, wrong colors on Canon color inkjet printers
- Set the basic parameters for the color printer
- Is the Epson L805 printer good review? Should I buy it?
- 4 of the best color printers currently available that you should buy.
- Select printer for small office
- How to fix ink shortage on Canon color printers
- Detailed instructions on how to connect a printer to a Windows laptop and MacBook.
- Fix common color inkjet printer problems
- Use and maintain color inkjet printers
- How to install the printer via LAN
- How to Install a Network Printer
- How to Print a Document
- How to Print in Office 2007
- How to Print Mirror Image
- How to Connect a USB Printer to a Network
- How to Check Printer Ink Levels in Windows


-
 Detailed instructions on how to connect a printer to a Windows laptop and MacBook.
-
How to fix error 0x0000011b when printing over the network on Windows 11
-
How to find your printer's IP address on Windows
-
The Canon 2900 printer has difficulty pulling out paper when printing.
-
How to fix printer errors such as printing strange characters or font errors.
-
Signs that your printer is running low on ink and how to handle it.
 Detailed instructions on how to connect a printer to a Windows laptop and MacBook.
 How to fix error 0x0000011b when printing over the network on Windows 11
 How to find your printer's IP address on Windows
 The Canon 2900 printer has difficulty pulling out paper when printing.
 How to fix printer errors such as printing strange characters or font errors.
 Signs that your printer is running low on ink and how to handle it.