How to insert a picture below another picture in PowerPoint
Placing images below other images in PowerPoint helps users create more beautiful slide layouts, with images displayed in a more sequential and artistic way.
Table of Contents
Understanding how to effectively layer images in a slide makes a presentation stand out. In addition, placing images below other images in PowerPoint helps users create more beautiful slide layouts, with images displayed in a more sequential and artistic way. Below are instructions for placing images below other images in PowerPoint.
Using Send to Back and Bring to Front
This customization is very simple to change the position of the image in the slide. Right click on the image and select Send to Back to move it behind another image.

The resulting image has been moved behind another image as shown below.

If you want to move the image to the front , click Bring to Front .

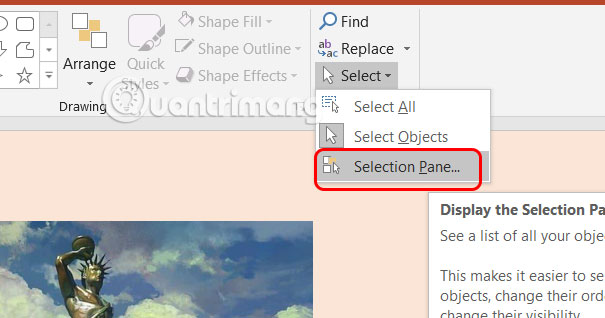
Place image below another image from Selection Pane
The Selection Pane in PowerPoint displays the elements in the slide, and from here we can change the display position of the image.
Step 1:
Click Select and then choose Selection Pane from the menu that appears.
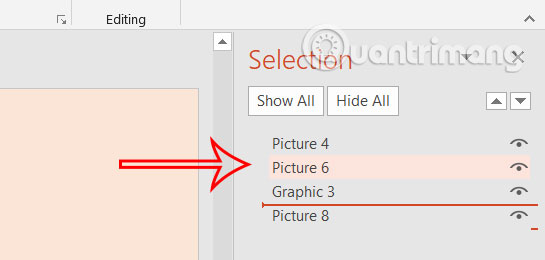
Step 2:
Displayed on the right side of the Selection Pane interface, you can rename the object in PowerPoint for easy adjustment. Then we move the position up and down of the image to place the image under another image in the slide.
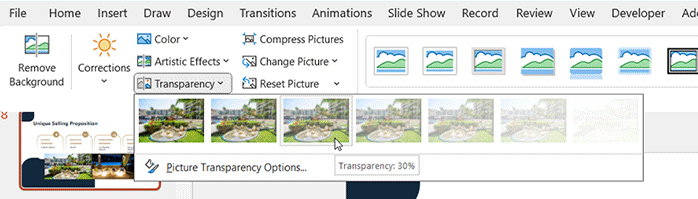
Using transparency for pictures in PowerPoint
The transparency effect helps images blend together to create a unique overlay.
Click on the image you want to blur, select Picture Format, then select Transparency to adjust the transparency of the image.
Was this article helpful?
Your feedback helps us improve.
Related Articles
 How to insert images into PowerPoint for each version3 minutes read
 How to insert images below the word on PowerPoint3 minutes read
 How to insert videos into PowerPoint 20167 minutes read
 Instructions for inserting checkmarks in PowerPoint3 minutes read
 Insert images in PowerPoint2 minutes read
 How to insert footnotes in PowerPoint2 minutes read
Reader Comments 0
Sign in with email or Google to join the discussion.