Some simple tricks to speed up Windows 7
Windows 7 operating system has been officially released, and most Windows users will choose this new operating system because of some of the features and speed that Microsoft promises to bring to users. However, as with previous operating systems, we can implement some tricks to improve Windows 7..
Windows 7 operating system has been officially released, and most Windows users will choose this new operating system because of some of the features and speed that Microsoft promises to bring to users. However, as with previous operating systems, we can perform some tricks to improve Windows 7. In this article we will do some simple tricks to speed up Windows 7.
1. Speed up switching between windows
When switching between windows in Windows 7 we will see a zoom-in effect. However, we can remove this effect so that the transition between windows is faster.
Follow these simple steps:
1. Go to Start and enter SystemPropertiesPerformance in the Search box.
2. When the dialog box appears, select the Visual Effects tab.
3. Then uncheck the box to select Animate windows when minimizing and maximising then press OK .
2. Speed up Windows 7 startup
By default, Windows 7 uses only one core to boot, but we can perform some configuration adjustments in System Configuration to increase the number of cores used to reduce boot time.
1. Click the Start menu, select Run, then enter msconfig .
2. Select the Boot tab and then click the Advanced optiopns button .
3. Select the Number of processors check box and then select the number of processor cores that you want to use during the boot process.
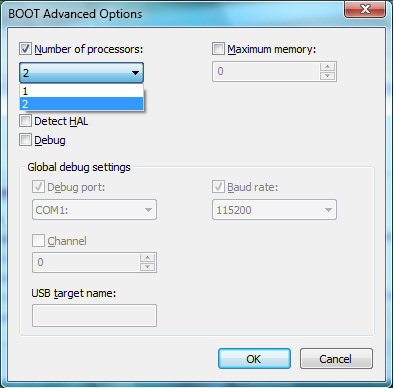
4. Click OK and Apply .
5. Reboot the machine to apply the changes.
3. Remove unused fonts
Fonts, especially True Type fonts, take up part of system resources. For an optimal performance we should only keep the commonly used fonts and fonts that the applications require. To remove the font, perform the following steps:
1. Open Control Panel .
2. Go to the Fonts folder.
3. Move unused fonts into a temporary folder. Note that it should not be removed in case a certain type of font needs to be reused. The more fonts that are removed, the greater the liberated system resources.
4. Reduce the time to turn off Windows 7
Windows 7 shuts down faster than Vista and XP, but we can further accelerate this process by making some changes in the registry to reduce the time Windows has to wait to close processes. Perform the following actions:
Note: Before performing this procedure, we should backup the system to prevent errors.
1. Click Start and then enter regedit in the Run box. Press Enter .
2. Access to HKEY_LOCAL_MACHINESYSTEMCurrentControlSetControl .
3. Right-click the WaitToKillServiceTimeOut key and select a lower value. The default value is 12000 (12 seconds) but we can choose a value lower than any.
4. When done, click OK and restart the system.
5. Remove the Search Indexing feature
If you know the file storage address, and only perform a file search when necessary, the Search Indexing feature is completely unnecessary, not only does it occupy a lot of system resources; So this is a feature that users should turn off. Perform the following actions:
1. Go to Start and enter services.msc into the Run box.
2. Go to the Windows Search service and right-click it.
3. In the Startup Type field select Disabled .
6. Taskbar Configuration Thumbnail Preview
Taskbar Thumbnail Preview (preview of a small window on the Taskbar) is one of the quite unique features of Windows 7. However, if you see the display time of these thumbnails is too long or too fast, we have can increase or decrease this time period in the registry. Perform the following actions:
Note: We need to back up the system before proceeding because the process of changing the registry can always cause problems with the system.
1. Go to Start , enter regedit in the Run box and press Enter .
2. Access the HKEY_CURRENT_USERSoftwareMicrosoftWindowsCurrentVersionExplorerAdvanced area
3. Right click on Advanced and select New | DWORD and then enter the following value: ThumbnailLivePreviewHoverTime .
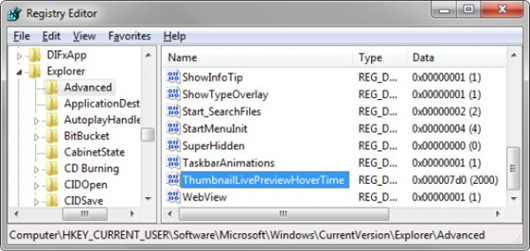
4. Right-click ThumbnailLivePreviewHoverTime and choose Modify .
5. Select Decimal Base and enter the desired duration (in milliseconds).
6. Click OK and restart the system.
7. Turn off the system sound
Usually when you click the mouse, the message appears, . there is always the sound attached. This is a very familiar feature for users. However, if you don't like to listen to these sounds, you can turn them off to increase the resource area on the system.
1. Go to Start and then enter mmsys.cpl into the Run box.
2. Click on the Sounds tab and select No Sounds in the audio dropdown.
3. Then click OK .
8. Eliminate unwanted startup applications
Many applications (when installed with a pre-selected Startup check box or will start after the initial launch) will automatically launch with the system, which increases the system's boot time and wasting system resources.
1. Go to the Start menu, enter msconfig into the Run box.
2. When the System Configuration window appears, select the Startup tab and then uncheck the unnecessary application check boxes.
3. Click Apply | OK then restart the system.
9. Remove Aero theme
Like Windows Vista, the Aero theme is one of the "burdens" of Windows 7 if your system does not have a strong enough graphics card, so turning it off will greatly speed up Windows 7.
1. Right-click the screen and select Personalize . On the dialog box that appears, select the Windows Color tab.
2. Cancel the Enable Transparency box.
3. Click the Open classic appearance properties link for more color options .
4. Select Basic or Standard theme.
5. Click Apply then OK .
10. Remove some services
Some Windows 7 services take up a lot of RAM, and it's a waste if we don't need to use those services. So we should set the manual boot mode for some unnecessary services. There is a tool that can help us create a list of services that can be turned off, namely Black Viper.
To launch or turn off service, perform the following actions:
1. Go to Control Panel | Administrative Tools and then select Services .
2. Then right-click on the services you want to turn off, choose Stop , or Start to turn on. We can choose which services to turn off in the list provided by Black Viper.