Steps to fix 'Windows Could Not Automatically Detect Network Proxy Settings' error
After asking Windows to fix your network errors for you, you may see the following message: Windows could not automatically detect this network's proxy settings..
What does this mean and how do you fix it? Let's look at the Windows proxy settings and the steps to fix this.
1. Restart the computer and router
Before starting advanced troubleshooting, you should restart your device. It is likely that this will solve your problem in just a moment.
Since this error is often related to misconfigured settings on a computer, restarting the router may not help. But it's still worth a try whenever you have network problems of any kind.
If, after restarting the computer and router, the problem is still not fixed, continue with more detailed steps.
2. Review proxy settings in Windows
Since this issue is related to Windows proxy settings, this is the first place to check. To access proxy settings in Windows 10, open Settings, select the Network & Internet category, and switch to the Proxy tab in the left sidebar.
Here, you will see a list of options related to the proxy server. If you're not using a proxy (as is the case with most home users), make sure the Use a proxy server feature near the bottom is turned off. Leave settings Automatically detect settings in state On if it is turned on.

For users who connect to a proxy, such as in a business or school environment, you may want to check with your system administrator to make sure you have the correct proxy details here.
Then try to connect to the network again. If you still get the error, disable Automatically detect settings in proxy options and try again.
3. Run the Network Adapter Troubleshooter
When you right-click the network connection icon in your system tray and select troubleshoot, it will run the Internet Connections troubleshooter . This is what leads to the "Windows could not detect proxy settings" error . But there is another network troubleshooter you can run that may provide more help.
Open Settings again and go to Update & Security > Troubleshoot . Click Additional troubleshooters , then select Network Adapter from the list and go through the steps in the troubleshooter. As seasoned Windows users know, these troubleshooters won't always fix your problem, but it's still worth a shot.
4. Automatically get IP address and DNS information
As it turns out, there aren't many proxy server-specific troubleshooting steps. The article will share more tips below, but keep in mind that the troubleshooting is similar to fixing the Windows "No Internet Access" error from this point on.
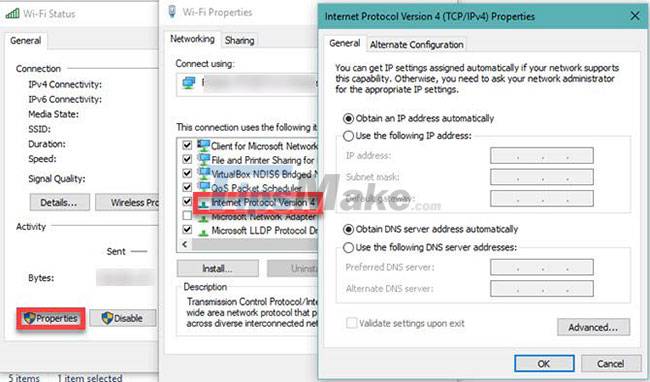
While it's not technically related to proxy settings, a misconfigured IP address or DNS settings can also cause this error. To check these, browse to Settings > Network & Internet > Status . Click the Change adapter options button in the list to see all your network connections, then double-click the one you're using.
Here, click the Properties button and double-click Internet Protocol Version 4 in the list. Make sure Obtain an IP address automatically and Obtain DNS server address automatically are selected . Misconfigured settings here will prevent you from accessing the network.
5. Update or restore network drivers
Outdated network drivers can lead to connection problems. Similarly, you may have recently installed a corrupt update for your network driver. In either case, replacing the driver can eliminate the proxy problem.
Right-click the Start button and select Device Manager to open this utility. Expand the Network adapters section and double-click the connection you use.
Then on the Driver tab , you can select Roll Back Driver to uninstall the latest update and roll back to the previous version. Use this if you started having this problem after an update - it may not be available in all cases.

Select Update Driver and you can check for new updates over the Internet. However, this probably won't help, so you'll need to update your driver manually by downloading it from the manufacturer.
6. Reset network configuration via Command Prompt
Windows offers many network troubleshooting tools through the Command Prompt. A few quick commands can usually solve your problem in no time. If you're still having issues at this point, right-click the Start button again and open Command Prompt with admin rights (or PowerShell with admin rights).
Then run the following commands, one by one. They will reset various network functions of the computer, such as deleting old connection data and obtaining a new IP address from the router:
netsh winsock reset netsh int ip reset ipconfig /release ipconfig /renew ipconfig /flushdns7. Review Firewalls, VPNs, and Antivirus Software

Next, you should make sure that you don't have a firewall, VPN, or security suite interfering with your network connection. Perhaps the software you selected had an update that changed an option without your knowledge, or you just installed a new app that changed the proxy settings for some reason.
Try disabling your firewall, VPN, and anti-virus software one by one, then see if the error goes away. If so, the problem lies with one of those apps. You will need to configure them to avoid interfering with regular network activity.
8. Scan for Malware
Some malware can constantly mess with proxy settings and prevent you from going online. If you encounter the message "Windows could not detect this network's proxy settings" every time you reboot, you may be a victim of this.
Therefore, you should scan with a reliable anti-malware application, such as Malwarebytes. This will detect any malware running on your system and remove it. If the scan finds any signs of infection, take the recommended action and see if your connection is back to normal.
9. Use a restore point
The System Restore feature in Windows allows you to go back to a previous point when the computer was operating normally. If your problem started recently, you should try this to see if you can go back in time.
To access it, go to Settings > System > About . On the right sidebar, click System protection (expand the Settings window horizontally if you don't see it).
In the resulting System Properties dialog box on the System Protection tab , click System Restore to open a new window. Windows will walk you through choosing a restore point and confirm it works. Of course, if your computer has not created any restore points, you cannot use this feature.

Note that using a restore point will delete any programs and drivers you have installed since doing that restore point. You can click Scan for affected programs on a restore point to see what it will do. System Restore will not affect any of your personal files.
10. Reset network settings
After trying everything above, you should reset your entire network configuration in Windows. You've already spent a lot of time on this and resetting will clear up any nagging issues that are blocking your connection and giving rise to this "proxy settings cannot be detected" error.
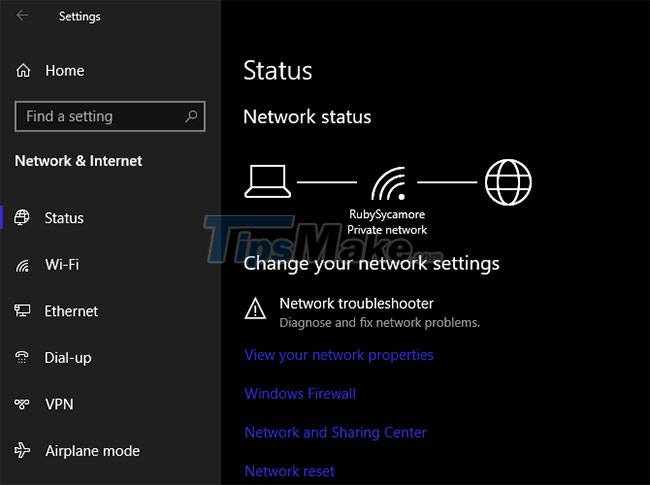
Thankfully, Windows 10 makes it easy to reset the entire configuration. Open Settings > Network & Internet . On the Status tab , find Network reset at the bottom and click it.
Note that this will delete all network information from the computer, so you will need to reconnect to the saved networks. If you agree with this, click Reset now. Your computer will do the reset, then reboot.
Hope you are succesful.