How to fix Android not connecting to Windows via ADB
The following article will show you how to get ADB working again.
ADB Can't Find Your Device? Here's How to Fix It
Sometimes, an Android USB device will not connect to a Windows system. Failed ADB connections usually have one root cause: an invalid Android USB driver is loaded. Unfortunately, Windows doesn't make it easy to remove the wrong driver.
But before you try to troubleshoot ADB connection issues, first try restarting ADB. ADB (Android Debug Bridge) is a bridge between your Android device and your Windows PC, allowing you to send commands from your computer to your device. If ADB isn't working, the best thing to do is to restart it. To do this, follow these steps:
1. Open Command Prompt on your Windows PC.
2. Type 'adb kill-server' and press Enter .
3. Type 'adb start-server' and press Enter .
4. Reconnect your Android device to your Windows PC
This will restart ADB and allow you to connect your Android device to your Windows PC.
Problems connecting your Android device to your Windows PC via ADB may be due to the USB debugging settings on your device. This setting allows your device to communicate with your Windows PC via ADB. To make sure USB debugging is enabled, do the following:
1. On your Android device, go to Settings > About phone .
2. Tap Build number 7 times to enable Developer options.
3. Go back to Settings > Developer options. Next, enable USB debugging on your phone if it isn't already enabled.
4. Reconnect your Android device to your Windows PC
If this was the cause of the problem, the device should now be able to connect to your Windows PC via ADB.
When enabled, USB debugging allows you to directly access your Android device's file system from your desktop. Without USB debugging enabled, you can only interact with your phone's media storage, such as an SD card or specially formatted media folders.
If you meet the requirements, troubleshooting takes about 5 minutes and 3 basic steps:
1. Connect your Android device to PC via USB and remove ADB driver. Then disconnect the device.
2. Run a USB driver removal utility, such as USBDeview, to remove all unnecessary Android drivers.
3. Install Universal ADB Drivers.
We'll go through each step in turn. Here's the software you'll need:
Step 1: Connect your device and uninstall the current driver
First, connect your Android device to your computer via USB. This will allow your device to appear in Windows Device Manager. Open this software by typing Device Manager into the Start menu to search for it.

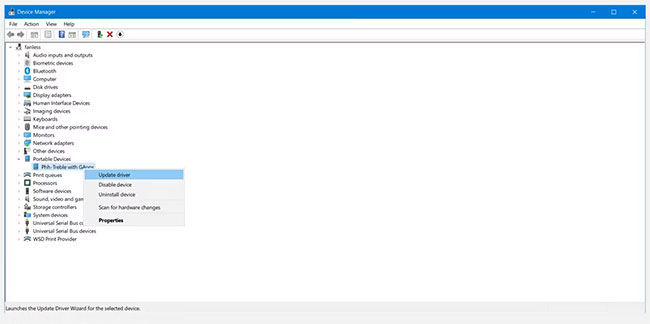
Next, in Device Manager , delete your currently displayed Android ADB driver. To delete the driver, right-click on the category that contains your phone. For example, this could be Portable Devices, LeMobile Android Device , or something similar.
Below you will see the Android Composite ADB Interface driver . Right-click on this to bring up the context menu, then select Uninstall device.

Make sure the Delete the driver software for this device checkbox is checked . However, sometimes this checkbox (especially on Windows 11) won't be available.

You can now disconnect your Android device from your PC. This will prevent the same incompatible driver from loading when you reconnect your Android device. While removing the driver is technically not required, it can identify the driver that is causing the connection issue in case it somehow reloads itself. You can always reinstall this driver from the manufacturer if it turns out to be the correct driver.
Step 2: Remove the problematic ADB driver
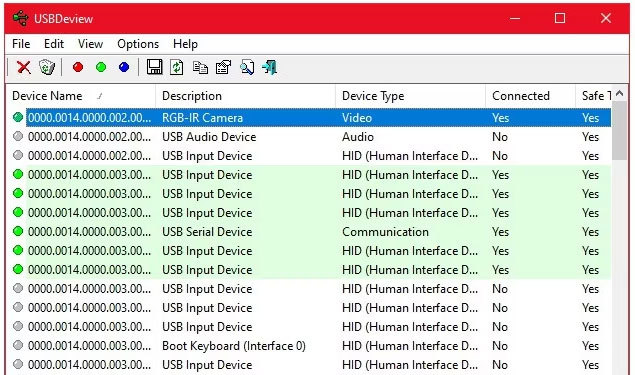
The Nirsoft USBDeview utility comes as a compressed executable file. That means you have to unzip the file, but it doesn't require installation. The utility may show up as malware during a virus scan, but rest assured, it's safe.
After extracting the file, open the extracted folder and run the executable inside it. USBDeview displays the total number of USB drivers installed on your computer, both connected and disconnected.
Look for the colored status indicator on the far left of the USBDeview window. There are 4 colors. Each represents a different status:
- Green indicates that the device is connected and working properly.
- Pink means the device is probably unplugged and functioning normally (even though it is not actually running).
- Red indicates the USB device is disabled.
- Gray means the device is installed but not connected.

Now, delete all the gray items that have the words "Google", "Linux", "ADB" , or "Android" in the title. If you're feeling extra cautious, delete all the items that aren't green.
Deleting a device driver means you'll need to reinstall the driver for that USB device if you want to use it again. Luckily, in most cases, Windows installs USB devices automatically, so deleting entries here isn't dangerous.
Step 3: Install Universal ADB Drivers
Universal ADB Drivers work for all Android devices. Installing the driver package will automatically select the appropriate driver so that Windows recognizes your phone via the ADB interface.
Optional: Install USB ADB driver manually
To perform a manual installation, first run the package for the Universal ABD Driver executable file that you downloaded earlier, which will install the driver to your computer.
Second, plug your Android device into your PC via USB. The correct USB drivers will be loaded. You can check this by going to Device Manager in Windows. If there are different drivers listed than what you saw in the first step, you probably have the correct USB drivers loaded now.

In Device Manager , find the new ADB/USB driver. It will likely be listed under your phone's name in the Portable Devices section , but Android devices may appear in different locations in Device Manager. You'll need to check each possible device type (such as Android Phone or Samsung) in Device Manager before you find yours.
If you can't find it, you'll sometimes need to check the pull-down notification drawer on your Android device for additional steps. This allows you to allow a specific computer to connect to your device for purposes other than charging.
Once you find it, right-click on your device and select Update driver. From the resulting menu, select Browse my computer for driver software > Let me pick from a list of device drivers on my computer .

Here you will see a list of compatible drivers. Select one of these (starting from the top should work). If that doesn't work, repeat the process by going down the list to find another driver that works.

Install Universal ABD Driver alternative
If you can't install the correct driver using the above method, you'll need to do it manually. Luckily, Windows Device Manager allows you to select a driver from your computer instead of browsing through a list.
Instead of selecting Let me pick from a list of device drivers on my computer in the previous step, click the Browse button and find the folder where you installed the Universal ADB Driver manually.
The location in File Explorer should look like this:
C:Program Files (x86)ClockworkModUniversal Adb DriversYou may need to search for the folder if you don't see it there. Once you've selected the correct location, hit Next and Windows will install the drivers. From now on, whenever you connect your Android device with ADB enabled, the Universal ADB Drivers will load instead of the ones that don't work.
Finally, restart your computer and try to connect via ADB again. You should be successful at this point.
Still can't connect to ADB?
If you still can't connect to ADB, your device may have a deeper problem, either at the firmware or hardware level. Common hardware issues include:
- broken on your computer or smartphone
- errors on smartphones, usually caused by custom ROMs
- The charging cable is broken or defective.
There are many potential reasons why your device may refuse to connect via ADB. Try different cables and ports on your computer to troubleshoot the issue. TipsMake's guide to fixing an Android phone that won't charge has some tips that may also help with poor connectivity.
EasyTether Issues: Cannot connect using ADB
Some people who use both Mac and Android try to share their Internet connection over the USB interface using the EasyTether app. However, this is not recommended. The app costs money, and there are free methods that are superior and easier to use. Check out our guide on how to tether USB to Android for better options.
For example, in newer versions of Android, Google offers native Bluetooth and USB tethering. If your phone has a dual-antenna design, you can even create a hotspot using your WiFi connection.
If EasyTether (or any USB tethering app) fails, the best way to fix it is to try to find the correct driver as outlined above. That means finding the incorrect ADB driver that Windows installed and replacing it with a working one.
Since this may require additional troubleshooting steps, this article only recommends these apps for older Android devices.
Now you know what to do when ADB is not working. This method of removing the problematic Android USB driver and installing the generic ADB driver package works for every Android device we have tested.
It's strange that Google has never released a universal ADB driver for Android devices, despite the problems many users continue to encounter. Fortunately, getting ADB to work with Windows 7, 8, 10, and 11 is easy: Just remove the wrong drivers and install the right ones.