How to enable RSAT for Active Directory in Windows 10
This tutorial introduces 3 methods to enable Active Directory in Windows 10. To be exact, it is not to activate Active Directory in Windows 10 because you cannot install AD in Windows 10. You can only enable RSAT for Active Directory in Windows 10 only.
1. Install RSAT for Active Directory in Windows 10 with Manage Optional Features
To enable Active Directory with this method:
Enter Optional Features in the search bar. Then select Manage Optional Features.
Then click Add features.
Move to RSAT: Active Directory Domain Services and Lighweight Directory Services Tools . Then click on it.
 Click RSAT: Active Directory Domain Services and Lighweight Directory Services Tools
Click on Install.
 Click on Install
To confirm that the feature has been installed, click the back button next to Settings.
Then click See optional feature history . The feature installation progress bar is displayed.
 The feature installation progress bar is displayed
When the installation is complete, scroll down to the Optional features list . RSAT: Active Directory Domain Services and Lighweight Directory Services Tools will be listed.
To confirm that this feature is installed, search for Active Directory. You will find all AD tools.
2. Install RSAT for Active Directory in Windows 10 with DISM
Another method to install Active Directory is to use the DISM Command.
Here are the steps to take:
Open Command Prompt with admin rights.
Then, at the User Account Control prompt , click Yes.
Finally, in the Command Prompt , type this command, then press Enter.
DISM.exe /Online /Get-Capabilities | find "Rsat.Active"The command will display the RSAT feature name for Active Directory.
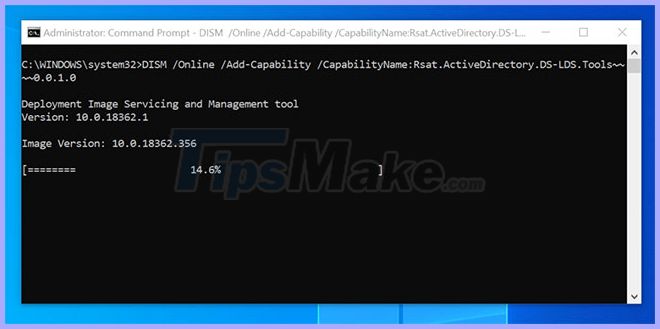
To install the Active Directory RSAT tools, type this command, then press Enter.
DISM /Online /Add-Capability /CapabilityName:Rsat.ActiveDirectory.DS-LDS.Tools~~~~0.0.1.0Copy the feature name from the / Get-Capabilities command . When you press Enter, the feature installation will begin
If the installation seems to be suspended, please wait patiently. It will eventually reach 100%.
 Installation is in progress
Once the installation process is complete, you can confirm the installation using the command below:
DISM.exe /Online /Get-CapabilityInfo /CapabilityName:Rsat.ActiveDirectory.DS-LDS.Tools~~~~0.0.1.0This is the result of the command. State (state) is displayed as Installed .
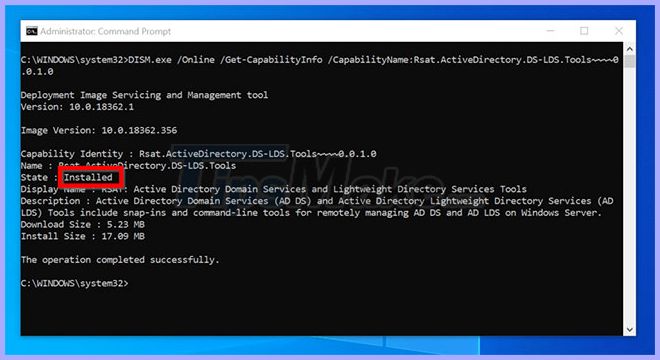 The state is displayed as Installed
3. Install RSAT for Active Directory in Windows 10 with PowerShell
You can also enable RSAT for Active Directory in Windows 10 using PowerShell.
Here are the steps to take:
Open PowerShell as admin.
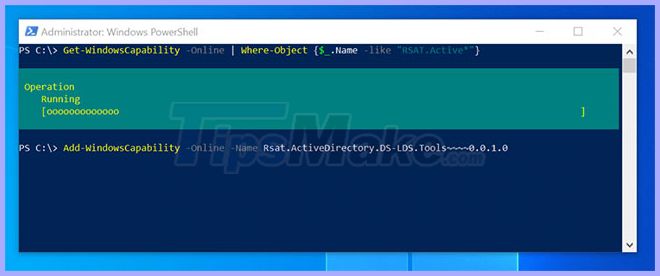
At the Powershell command prompt , type the command below, then press Enter.
Get-WindowsCapability -Online | Where-Object {$_.Name -like "RSAT.Active*"}The command will display the RSAT feature name for Active Directory.
To install the feature with PowerShell, enter this command and then press Enter. Copy the name of the feature from the result of the previous command.
Add-WindowsCapability -Online -Name Rsat.ActiveDirectory.DS-LDS.Tools~~~~0.0.1.0PowerShell will begin installing the feature, which may take a while to complete.
 PowerShell will begin installing the feature
When the installation is completed, a result similar to the one below will be returned. If you need to restart the computer, RestartNeeded will display True.
 If you need to restart the computer, RestartNeeded will display True
Finally, to confirm the installation is successful, type this command, then press Enter.
Get-WindowsCapability -Online | Where-Object {$_.Name -like "RSAT.Active*"}State displays the Installed status .
- How to Enable Active Directory in Windows 10
- Theory - What is Active Directory?
- How to Enable Active Directory in Windows 10
- How to install Active Directory on Windows Server 2019
- What is Windows Active Directory?
- Restore deleted components in Active Directory
- Instructions for installing Active Directory on Windows Server 2008
- Prevent deleting data in Windows Server 2003 Active Directory
- How to install Active Directory in Windows Server 2012
- How to install Remote Server Administration Tools (RSAT) in Windows 10
- Starbucks Key API was suddenly revealed publicly on Github
- Instructions for creating a Domain Controller - DC on Windows Server 2012
- How to install Active Directory in Windows Server 2012
- Prepare Active Directory for Exchange 2007 (Part 3)
- Transfer Exchange 2003 to Exchange 2007 (P.5)
- Prepare Active Directory for Exchange 2007 (P.4)
- Prepare Active Directory for Exchange 2007 (Part 1)
- Prepare Active Directory for Exchange 2007 (Part 2)
- Theory - What is Active Directory?
- Prevent deleting data in Windows Server 2003 Active Directory
-
 Latest Crystal of Atlan Code and How to Redeem Code
-
Full code NFL Universe Football Roblox latest and how to redeem code for rewards
-
What is Windows Active Directory?
-
Active Office 2024 is forever free using CMD
-
How to Active Windows 11, using FREE copyrighted Windows
-
How to Active Office 2016 using CMD without a license key
 Latest Crystal of Atlan Code and How to Redeem Code
 Full code NFL Universe Football Roblox latest and how to redeem code for rewards
 What is Windows Active Directory?
 Active Office 2024 is forever free using CMD
 How to Active Windows 11, using FREE copyrighted Windows
 How to Active Office 2016 using CMD without a license key