How to enable private DNS security on Android
Almost every task you do on the internet starts with a DNS query. Therefore, it is absolutely essential to establish secure communication with a DNS provider.
Table of Contents
This is where Android's Private DNS (Private DNS) feature comes into play.
What is Private DNS on Android?
It can be said that DNS is a component that builds the modern Internet structure. It acts like a yearbook, helping you access it wherever you want on the web.
For example, when you want to access TipsMake.com, you can simply type TipsMake.com in the address bar of your web browser. But unfortunately, your web browser doesn't know how to access TipsMake.com. This is where DNS comes into play. The web browser asks a DNS server, usually operated by your internet service provider (ISP) or mobile network, to convert the TipsMake.com domain name into an IP address, such as 1561.101.2.117. With the IP address in hand, the web browser can now connect to the internet resource you access.
The problem is that DNS queries and corresponding responses are often sent without any kind of security or encryption. This makes them vulnerable to eavesdropping or man-in-the-middle attacks. So, a new DNS protocol — DNS over TLS — was introduced. This protocol creates a secure channel between your web browser and the DNS server, and protects your DNS traffic from prying eyes and malicious third parties.
Of course DNS over TLS is not the only secure DNS protocol. There is also DNS over HTTPS which is also an extremely widely used protocol.
Google brought DNS over TLS support to the Android platform by introducing the private DNS feature. This feature, available in versions of Android 9 (Pie) and later, can encrypt all DNS traffic on the user's phone, including apps.
This feature is usually enabled by default and uses a secure channel to connect to a DNS server if it supports it. But if your ISP or your mobile carrier's DNS doesn't support encrypted DNS, or you're simply not sure about it, a third-party secure DNS server can be used through the calculator. private DNS feature.
How to Manage Private DNS Feature in Android
It should be noted that due to the variety of Android customizations, there will be slight differences in the title of the settings items depending on the customization. However, the basic setup operations will still be similar.
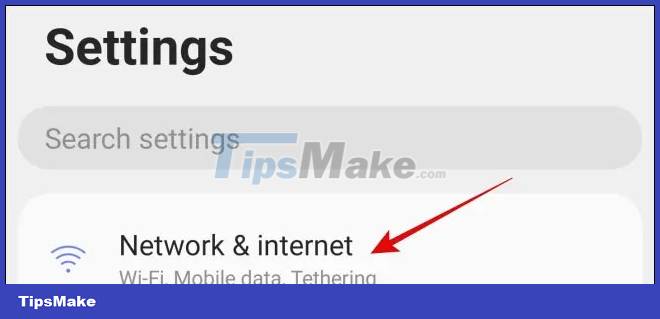
To manage private DNS options, first tap the gear icon on the home screen to access your device's Settings menu.
On the Settings menu, click 'Network & Internet'. Depending on the device and Android customization, this section may have a slightly different name, such as 'Connections'.
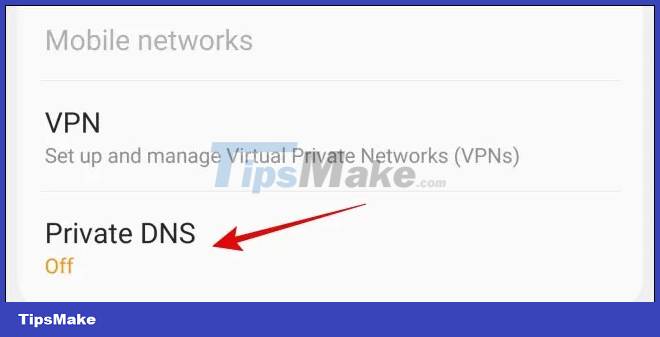
Under Network & Internet, click on 'Private DNS'. If you don't immediately see the 'Private DNS' option here, you may have to tap on 'More Connection Settings' or 'Advanced'.
You will get three options: Off, Automatic, and Private DNS Provider Hostname. You can select 'Off' to stop using DNS over TLS, 'Automatic' to use encrypted DNS when available, or a private DNS provider's server to use encrypted DNS from that provider . Remember, instead of a DNS server IP, you need a hostname.
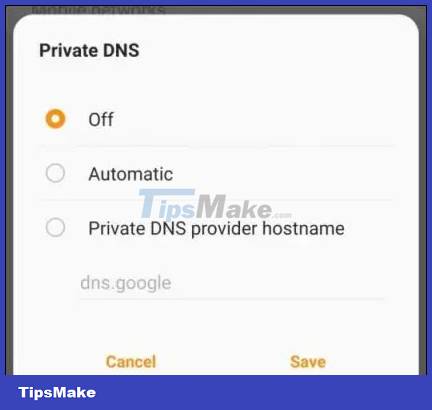
Once done, click 'Save' to apply the changes.
Hope you are succesful.
Was this article helpful?
Your feedback helps us improve.
Related Articles
 Turn on Private DNS on your phone if you haven't already!5 minutes read
 How to hide Firefox private tabs with fingerprint2 minutes read
 How to enable private Threads account2 minutes read
 How is Private Space used in Android 15?2 minutes read
 How to enable private WiFi on iPhone2 minutes read
 How to set up a private VPN with TurnKey GNU/Linux8 minutes read
Reader Comments 0
Sign in with email or Google to join the discussion.