How to display seconds on Windows system clock
Add seconds to the clock by changing system settings
One of the favorite and easiest ways to add seconds to the system tray clock is to change system settings. Here's how:
1. Open the Settings menu by pressing the Win + I hotkey .
2. Select Personalization from the left pane, then select the Taskbar option in the following window.
3. Click the drop-down icon next to Taskbar behaviors .
4. Scroll down and check the Show seconds in the system tray clock box .
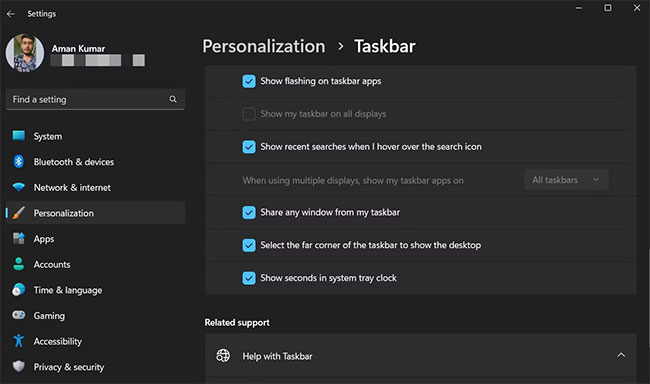
All operations have been completed. Close the settings menu and restart your computer for the changes to take effect.
Note that this method will only work with Windows 11. If you have Windows 10 or 8, you can try the other methods mentioned below.
Display seconds on the system clock using Command Prompt or Windows PowerShell
If you are a power user, you can run commands in Command Prompt or Windows PowerShell to configure the display of seconds on the system tray clock. To do this in Command Prompt, follow the instructions below:
1. Open the Start menu by pressing the Win key.
2. In the search bar, type CMD and select Run as administrator from the right pane.
3. Enter the following command into the Command Prompt window with admin rights and press Enter.
powershell.exe Set-ItemProperty -Path HKCU:SoftwareMicrosoftWindowsCurrentVersionExplorerAdvanced -Name ShowSecondsInSystemClock -Value 1 -Force 
Now, to do this in Windows PowerShell, follow the steps below:
1. In the Start menu search bar, type PowerShell and select Run as administrator from the right pane.
2. Enter the following command into the PowerShell window with admin rights and press Enter.
Set-ItemProperty -Path HKCU:SoftwareMicrosoftWindowsCurrentVersionExplorerAdvanced -Name ShowSecondsInSystemClock -Value 1 -Force 
All operations completed! Now, your system clock has displayed additional seconds.
If you want to remove seconds from the system clock, you can also do that using Command Prompt and PowerShell. To do this using Command Prompt, execute the following command in a CMD window with admin rights.
powershell.exe Set-ItemProperty -Path HKCU:SoftwareMicrosoftWindowsCurrentVersionExplorerAdvanced -Name ShowSecondsInSystemClock -Value 0 -ForceAnd to do this using PowerShell, run the following command in a PowerShell window with admin rights.
Set-ItemProperty -Path HKCU:SoftwareMicrosoftWindowsCurrentVersionExplorerAdvanced -Name ShowSecondsInSystemClock -Value 0 -ForceHow to display seconds by editing Registry
Warning:
Registry Editor is a powerful tool, and misusing it can make your system unstable or even inoperable. This is a pretty simple trick and as long as you follow the instructions, you shouldn't have any problems.
However, if you have never worked with Registry Editor before, learn how to use Registry Editor before you begin. And remember to back up the Registry (and your computer!) before making changes!
Start by opening Registry Editor. Type regedit into the Start menu and launch the utility. Accept the administrator prompt and you will access the Registry. As always, be careful here because just one wrong action can lead to a system crash.
Open the Advanced key following this link:
HKEY_CURRENT_USERSoftwareMicrosoftWindowsCurrentVersionExplorerAdvanced 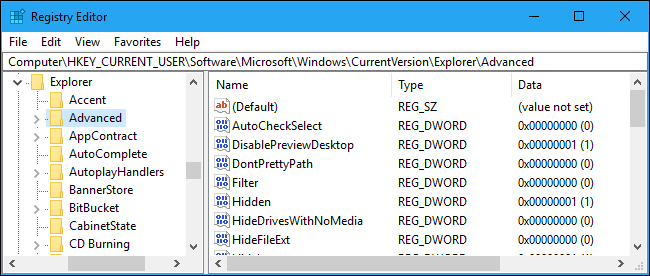
Right click on the Advanced folder in the left sidebar. Select New > DWORD (32-bit Value).

Name it ShowSecondsInSystemClock.
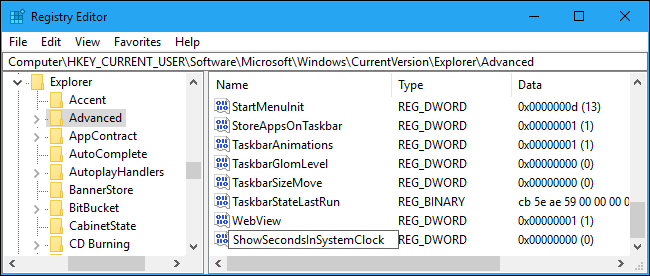
Next, double-click this value in the right panel. In the Value data field , set the value to 1 . Click OK to save changes, then close Registry Editor. After logging out and logging back into your account, you will see the number of seconds displayed on the clock.
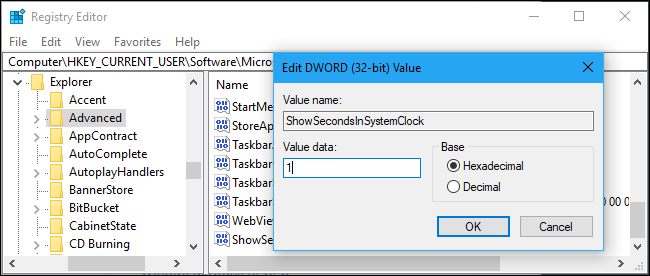
If you don't want to display the number of seconds anymore, go back to the Registry, change the value to 0 or delete it.
How to display seconds in ZIP file
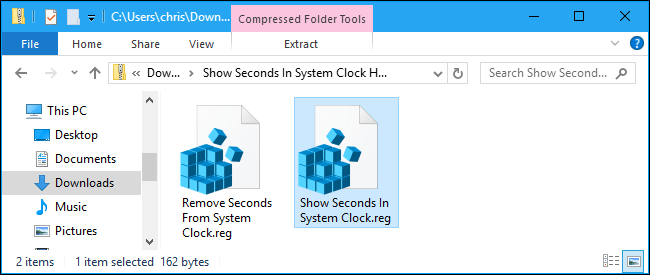
If you don't want to edit the Registry yourself, you can use the following downloadable registry hacks. There are two hacks: One that will display the number of seconds in the system clock and one that will reverse the change and hide the number of seconds from the clock. Both are included in this ZIP file. Double-click the hack you want to use, agree to the prompts, then log out and back in for the changes to take effect.
These hacks also set the ShowSecondsInSystemClock value in the same way as the article described above. Running the file "Show Seconds In System Clock" will create the value ShowSecondsInSystemClock with value data of 1 , while running the file "Remove Seconds From System Clock" will remove the value ShowSecondsInSystemClock from your Registry.
If you're curious what these or any other .reg files do, you can right-click on them and select 'Edit' to view their contents in Notepad. And, if you like experimenting with the Registry, you should learn how to create your own registry hacks.
You may also be interested in displaying the current day of the week on the taskbar clock. This can be done without accessing the Registry, as you can easily customize the date format that appears below the time from the standard Control Panel interface.
Wishing you success!
You should read it
- ★ Sense Desktop: The best clock for Windows 10 desktop
- ★ Microsoft is about to allow users to hide date and time information on the Windows 11 taskbar
- ★ How to Change the Windows Taskbar Position
- ★ 12 best free clock widgets for Android
- ★ Do you know what is the optimal location of the Windows Taskbar?