How to disable the Driver Signing check feature on Windows
If the client cannot install the virtual ethernet adapters needed to work correctly, this may be due to the Windows driver signing check feature.
Table of Contents
If the client cannot install the virtual ethernet adapters needed to work correctly, this may be due to the Windows driver signing check feature.
On some systems, Windows does not allow installing unverified drivers by Microsoft. In fact, the software's TAP-Adapter driver, as well as millions of other drivers, is not verified.
This has nothing to do with the security of these drivers. Simply, driver developers just don't confirm their drivers with Microsoft.
Here are the different ways to deactivate the driver signing check feature. Please note that not all methods work for all versions of Windows.
You can just try all the methods or start with method 4 - the method that works best for your Windows version.
Please note: If you have Windows XP, please use method 5. If you are using Windows 8, please scroll down to the specific method for Windows 8.
After doing so, uninstall the software, restart the computer, and reinstall the software again.
Note: To avoid problems due to insufficient privileges, you should reinstall and start HMA! client by right-clicking on the HMA installation file! (corresponding to HMA! -shortcut) and select " Run as Administrator ", as well as start the client in this way.

- Instructions for using Hide My Ass to hide IP
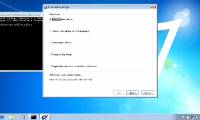
How to disable Driver Signing check on Windows in general
1. Go to Start menu and type cmd.exe in Search, then press Enter. (Remember that you must log in with admin rights. If you have not done this step, log out of your current user and log in with admin rights, or right-click on the "Command Prompt" link in the Start menu and Select "Run as Administrator").
Now type the following and press Enter:
  bcdedit.exe -set loadoptions DDISABLE_INTEGRITY_CHECKS
  bcdedit.exe -set TESTSIGNING ON
Or run this batch file by right-clicking on it and selecting " Run as Administrator ".

2. A group policy can even control this feature.
Go to Start> Run> GPEdit.msc.
Now go to User Configuration> Administrative Templates> System> Driver Installation> Code signing for drivers.
Click "Disabled", then click "OK".

3. If you cannot perform this step, change it through the Registry:
Go to Start> Run> regedit.exe
Search:
[HKEY_CURRENT_USERSoftwarePoliciesMicrosoftWindows NTDriver Signing]
Change the value of the BehaviorOnFailedVerify lock to " 0 ".

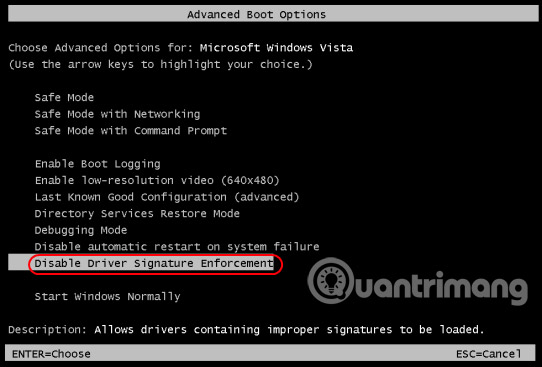
4. Reboot as usual and press F8 multiple times, during the boot process. The boot menu will appear. There, select " Disable Driver Signature Enforcement ". Then install the unverified driver.
Note that option 4 is only temporary - during the next reboot, the driver signing feature will be reactivated.
How to disable Driver Signing check on Windows XP
The above methods 1-4 often do not work for Windows XP.
Fortunately, the approach is even simpler in this section.
1. On the desktop, right-click My Computer
2. Select Properties to open System Properties .
3. In the ' System Properties ' dialog box, select the Hardware tab .
4. Click the Driver Signing button .
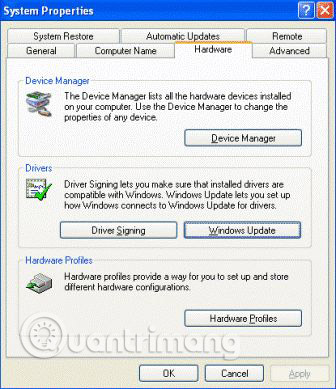
5. Select " Ignore - Install the software anyway and don't ask for my approval ".
6. Select " Make this action the system default ".
7. Click "OK".

How to disable Driver Signing check on Windows 8
1. First, select "Settings" on the right side of the screen.
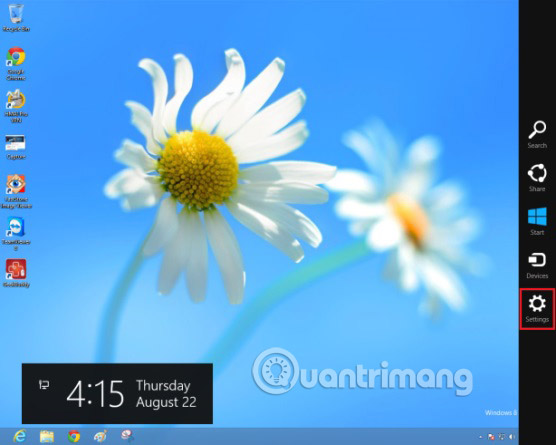
2. Select " Change PC Settings ":

3. Navigate to " General settings " and then scroll down to select " Advanced Startup ". Click "Restart".

4. Then, click "Troubleshoot".
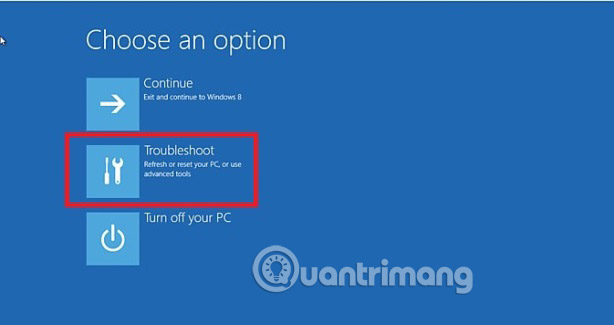
5. On the next screen, select "Advanced Options".

6. Then click " Startup Settings ".

7. Then click the "Restart" button .

8. After restarting the computer, another screen will appear, where you will be asked to press a number to select an option. So press 7 or F7.

9. When you install the driver, this prompt will appear on the screen. Select " Install this driver software anyway ".

See more:
- Improved features in Windows 7
- What are the features of Windows 10 Windows Features?
- Discover new features in Windows Server 2019
Was this article helpful?
Your feedback helps us improve.
Related Articles
 How to check the current Driver version of the computer2 minutes read
 Instructions to enable/disable Driver Verifier to avoid system errors3 minutes read
 Learn about Driver Verifier in Windows 109 minutes read
 How to check the computer driver on Windows 103 minutes read
 How to use Driver Verifier on Windows 104 minutes read
 How to disable driver updates via Windows Update3 minutes read
Reader Comments 0
Sign in with email or Google to join the discussion.