How to disable automatic screen shutdown on Windows 11/10/8/7
You may have encountered situations where, while watching a movie, listening to music, or working on your computer, the screen suddenly turns off after a certain period of time. This is a default power-saving feature of the Windows operating system; however, if you don't want the screen to turn off automatically, you can easily disable this feature. Let's find out how to turn off the automatic screen shutdown feature on your computer in the article below..
A computer screen automatically turning off after a period of inactivity can cause disruptions to work or entertainment. This not only wastes time having to manually turn the screen back on, but can also be frustrating when you're trying to concentrate on a task.

How to disable automatic screen shutdown on Windows 11
When using Windows 11 , the screen automatically turning off after a period of inactivity can be annoying for many users. To help you customize this setting, this article will guide you on how to disable the automatic screen shutdown feature simply and effectively.
Step 1: First, you need to open Settings on your computer. You can do this by pressing the Windows + I key combination on your keyboard.
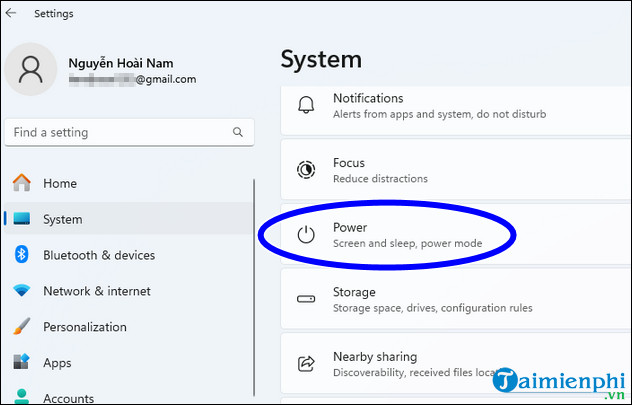
Step 2: In the Settings window , select System from the left-hand menu. Then, find and click on Power . This is where you can adjust settings related to power and display.
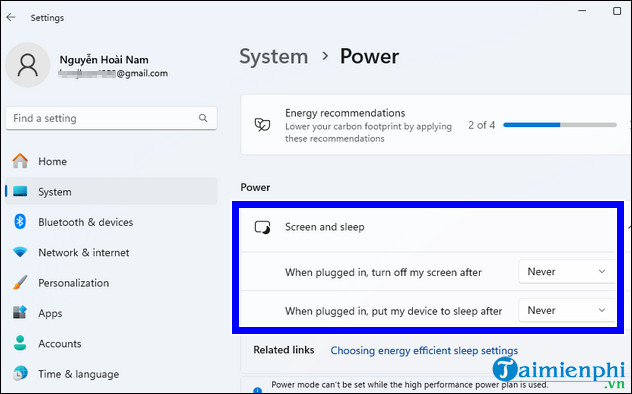
Step 3: In the Screen and Sleep section , you will see options related to the screen timeout. Depending on whether you are using your computer on battery or AC power, you will see different options:
- On battery power, turn my screen off after : Select the time period after which you want the screen to turn off automatically when the computer is running on battery power.
- When plugged in, turn my screen off after : Select the time period after which you want the screen to turn off automatically when the computer is charging.
How to disable automatic screen shutdown on Windows 10
Step 1: Press the Windows + I key combination to open the Settings window .
Step 2: Select " System ", then select " Power & sleep " from the left-hand menu.
Step 3: Under " Screen ", select " Never " from the dropdown menu under " When plugged in, turn off after " to prevent the computer from automatically turning off the screen when not in use.
Step 4: Under " Sleep ", select " Never " from the dropdown menu under " When plugged in, PC goes to sleep after " to prevent the computer from automatically going into sleep mode.
Step 5: Click " Save changes " to apply the new settings.
How to disable automatic screen shutdown on Windows 7 and 8
For computers running Windows 7 or 8, you need to go into the Control Panel to set the screen timeout. The specific steps are as follows:
Step 1: Right- click the Windows icon in the bottom left corner of the screen, then select " Control Panel ".
Step 2: In the Control Panel, select " Power Options ".
Step 3: Select " Change plan settings " next to the currently used power mode.
Step 4: In the next window, select " Never " from the drop-down menu under " Turn off the display " to turn off the screen.
Step 5: Click " Save changes " to apply the new settings.
Note that leaving the screen constantly on can affect the screen's lifespan and increase your computer's battery consumption. Therefore, you should consider setting a reasonable time interval for the screen to automatically turn off when not in use, such as 10-20 minutes.
Above is a detailed guide on how to disable the automatic screen shutdown feature on popular Windows versions. Hopefully, this article will help you customize power settings and optimize your computer usage experience. If you have any questions, please feel free to contact us for support.