Table of Contents
This updated guide explains how to Delete Recent Searches through clear steps, practical examples, and important checks that help prevent common errors.
Method 1 of 5:
Deleting Google Search History
-
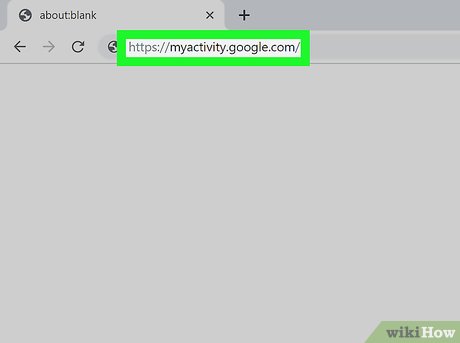 Go to https://myactivity. google. com in a web browser. This is the web page for your Google activity. Your activity includes Google searches, as well as other services associated with Google, such as YouTube, Google Assistant, and the Google Play Store.
- If you are not signed in to your Google account automatically, click Sign In in the upper-right corner. Click your account, and enter your password and click Next to sign in. If you don't see your account, click Use another account and sign in with the email address and password associated with your Google account and click Next .
- If you use Google without signing in to a Google account, you can delete your search history by clearing your browser history. This can be done using Google Chrome, Internet Explorer, Firefox, and Safari.
-
Click + Filter by Date & Product. It's below the search bar at the top of the page.
-
Select a date range. Use the drop-down menu at the top to select a date range. You can select "Today", "Yesterday", "Last 7 Days", "Last 30 Days", "All Time", or "Custom".
- If you select "Custom", use the calendar menus below the drop-down menu to select a start and end date. Click the calendar icon on the left to select a starting date. Then click the calendar icon on the right to select an ending date.
-
Click the Search tab. It's in the list of products below "Filter by Google Product" at the bottom of the window. The tabs you select will turn blue to indicate they are selected.
- You also can click additional products, such as "Video Search", "Image Search", "Assistant", etc.
-
Click Apply. It's in the lower-right corner of the window. This displays your search activity for the dates you selected.
-
Click ⋮. It's the icon with three vertical dots to the right of the search bar at the top of the page. This displays a drop-down menu.
-
Click Delete Results. It's in the drop-down menu that appears when you click the icon with three dots next to the search bar at the top of the page.
- Alternatively, you can scroll down and click the icon with three dots ( ⋮ ) next to an individual search item and then click Delete , or you can click the icon that resembles a trashcan next to a specific date in the list of searches.
-
Click Delete. It's in the lower-right corner of the pop-up alert. This deletes the search items for the time period you selected.
- You can also delete your history for Alexa, Skype, Yahoo, Pinterest,.
Method 2 of 5:
Deleting Facebook Search History
-
 Open Facebook. Facebook has a blue icon with a white "f". Tap the icon on your home screen or apps menu to open Facebook on your mobile device.
- Alternatively, you can go to https://www. facebook. com in a web browser to open Facebook on your computer.
- If you are not logged in automatically, enter the email address and password associated with your Facebook account and click or tap Log in .
-
 Tap the icon that resembles a house (mobile only). It's the first tab on the left at the top of the Facebook mobile app. Tap this icon to display your home feed.
 -
 Click or tap the magnifying glass icon. On the mobile app, it's in the upper-right corner. On a computer web browser, it's next to the search bar at the top of the page.
 -
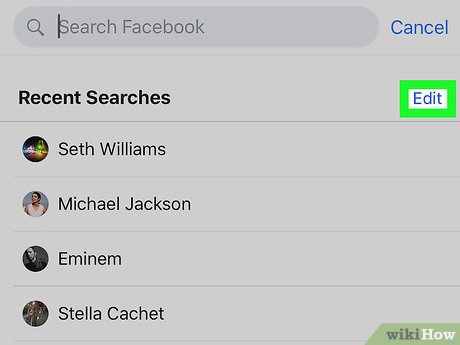 Click or tap Edit. It's at the top of your list of search results on the right. This button only appears when there is nothing in the search bar.
 -
 Click or tap Clear Searches. It's at the top of your list of recent searches. On the Facebook mobile app, this removes your list of recent searches. On a computer web browser, this displays a confirmation pop-up window.
 -
 Click Clear Searches (web browser only). This confirms that you may need to delete your recent searches and clear your search history.
Method 3 of 5:
Deleting Instagram Search History
-
 Launch Instagram. It has a colorful icon with a symbol that resembles a camera. Tap the icon on your home screen or apps menu to open Instagram.
- If you are not signed in to Instagram automatically, tap Log In and enter your username, email, or phone number and password associated with your Instagram account and tap Log In .
-
 Tap the icon that resembles a person. It's in the lower-right corner of the Instagram app. This opens your account page
 -
 Tap ☰. It's the icon with three horizontal lines in the upper-right corner of the Account page.
 -
 Tap Settings. It's next to an icon that resembles a gear at the bottom of the page. This displays the Settings menu.
 -
 Tap Security (Android) or Privacy and Security (iPhone). It's next to an icon that resembles a shield in the Settings menu.
 -
 Scroll down and tap Clear Search History. It's at the bottom of the Security page.
 -
 Tap Clear Search History. It's the blue text at the top of the page.
 -
 Tap Clear History (Android) or Yes I'm sure (iPhone). This clears your history.
Method 4 of 5:
Deleting Twitter Search History
-
 Open Twitter. Twitter has a blue icon with an image that resembles a bird. Tap the icon to open Twitter on your mobile device.
- If you aren't signed in to Twitter automatically, tap Log In at the bottom of the page. Then enter the email address and password associated with your Twitter account and tap Log In .
-
 Tap the magnifying glass icon. It's the second icon at the bottom of the screen. This displays the search page.
 -
 Tap the search bar. It's at the top of the page. This displays your recent search items.
 -
 Tap the "x" icon. It's at the top of the page across from "Recent".
 -
 Tap Clear. It's either in a pop-up window on Android devices, or across from "Recent" on iPhone and iPad. Tap Clear to clear your search history.
Method 5 of 5:
Deleting Bing Search History
-
 Go to https://account. microsoft. com/account/privacy in a web browser. This is the web page for Microsoft Privacy.
- If you are not signed in automatically, click Sign In in the upper-right corner and sign in with the email address and password associated with your Microsoft account.
- If you use Bing without signing in to a Microsoft account, you can delete your search history by deleting your browser history. This can be done using Google Chrome, Internet Explorer, and Firefox.
-
 Click Sign in with Microsoft. It's the blue button below the bold text that says "Stay in control of your privacy".
 -
 Click Email [your email address]. It's next to an icon that resembles an envelope. This sends you an confirmation email.
 -
 Check your email. Keep your web browser open and open the email app for the email address associated with your Microsoft account. Look for an email from the Microsoft account team with "Microsoft account security code" as the subject. This email contains a 6-digit security code.
 -
 Enter the security code and click Verify. After you retrieve the security code from your email, click back over the browser tab with your Microsoft account page. Enter the security code in the bar and click Verify .
 -
 Click View and clear search history. It's the grey bar below the box labeled "Search history".
- Alternatively, you can click View and clear browser history to clear your Microsoft Edge browser history.
-
 Click Clear activity. It's the blue text on the right side above your search history list. It's next to an icon that resembles a trashcan.
 -
 Click Clear. It's the grey button at the bottom of the warning page. This delete your search history.
FAQ
What is the easiest way to Delete Recent Searches?
Start with the requirements in this guide, then follow each step in order. Check the result after every major change so problems are easier to identify.
Can beginners follow these instructions?
Yes. The process is organized into practical steps, and you can repeat any step before moving forward.
What should I check if the method does not work?
Confirm your software or device version, permissions, settings, file format, and internet connection when the task depends on online services.
Related Articles
 How to Turn Off Recent Searches on Safari3 minutes read
 How to Automatically Delete Instagram Search: Practical Guide4 minutes read
 How to Delete Recent Items in Search on Windows 103 minutes read
 How to Turn Off Recent Searches on Windows 11: Step-by-Step Guide3 minutes read
 3 Ways to Delete Recent Files and Folders in Windows: Recommended Choices7 minutes read
 How to Delete Search History on Windows 11: Step-by-Step Guide4 minutes read
Reader Comments 0
Sign in with email or Google to join the discussion.