Table of Contents
This practical guide explains how to create an Apple ID, Register for an Apple ID Store IPhone in a clear sequence, including preparation, key settings, common mistakes, and troubleshooting steps.
What This Guide Covers
- Method 1: Create an Apple ID on Mac
- 1.1. Create an Apple ID through System Preferences (System Preferences)
- 1.2. Create an Apple ID through the Mac App Store
This method helps you: - Registration link - Easily create an Apple ID via iTunes, home page
Registering an Apple ID or creating an Apple ID account helps you take control of your iPhone. When you have an Apple ID account, you can access the App Store to download and install many useful free applications for your iPhone or iPad tablet.
If you own an iPhone, iPad or iPod, creating an Apple ID on your computer is a natural thing to do. Even if you don't have these devices, you should still register, because the setup is completely free and you may want to use the services that Apple provides such as iTunes, iCoud . With iTunes is familiar to you with the useful features that this software brings
Currently there are many ways to create an Apple Store account, but the simplest and most time-saving is still registering via the homepage.
Article Table of Contents: Method 1: Create an Apple ID on Mac Method 2: How to register an Apple ID on iPhone Method 3: Create an Apple ID via the homepage Method 4: Create an Apple ID via iTunes
Method 1: Create an Apple ID on Mac
1.1. Create an Apple ID through System Preferences (System Preferences)
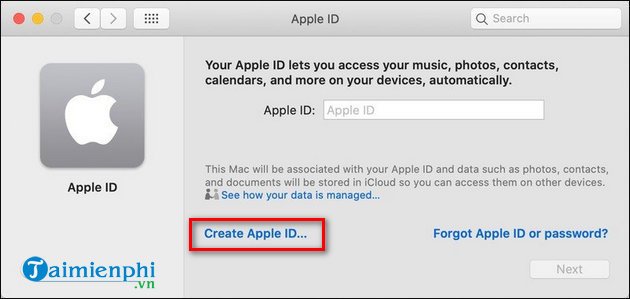
Step 1: On your Mac, click on the Apple icon located in the upper left corner of the screen and select System Preferences . Step 2: In the Apple ID interface, click Sign In > Create Apple ID . to start the Apple ID creation process.
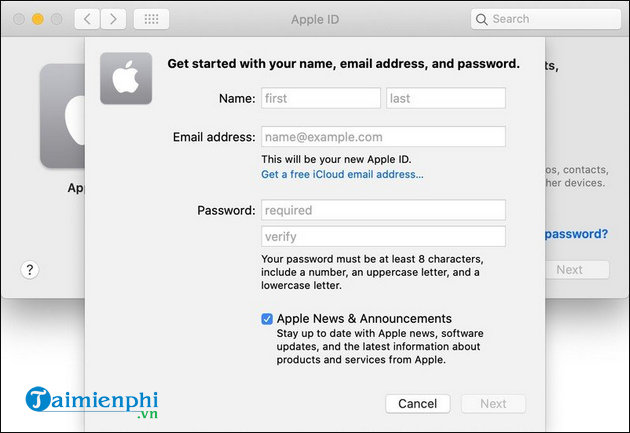
Step 3: Next, enter your date of birth, name, email address and password for your Apple ID account. When you have finished filling in this information, click Next .
Step 4: In this step, enter your phone number and choose to receive verification code via call or text message . Step 5: Enter the verification code sent to the phone number you used to register. Step 6: After completing the confirmation, read through the terms and conditions, check the I have read and agree . option and click the Agree button . Step 7: Finally, click on the Verify Email Address option . Open the Gmail app on your Mac or sign in to the email account you provided when you created your Apple ID from any browser. Apple will send a verification email and your Apple ID will be the email you registered with.
1.2. Create an Apple ID through the Mac App Store
Step 1: Open the Mac App Store and click the Sign In button located in the lower left corner of the window. Step 2: Next, click Create Apple ID to create an Apple ID account. Step 3: From here, you follow the same steps as creating an Apple ID through System Preferences as shown above.

Note: You may be asked to provide credit card and payment information when signing up through the Mac App Store, but you can select None to bypass this request.
Method 2: Create an Apple ID on iPhone
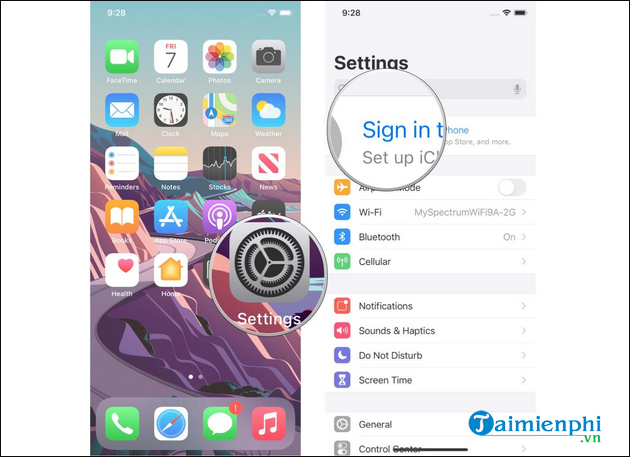
Step 1: Open Settings on iPhone and click Sign in to your iPhone at the top of the page.
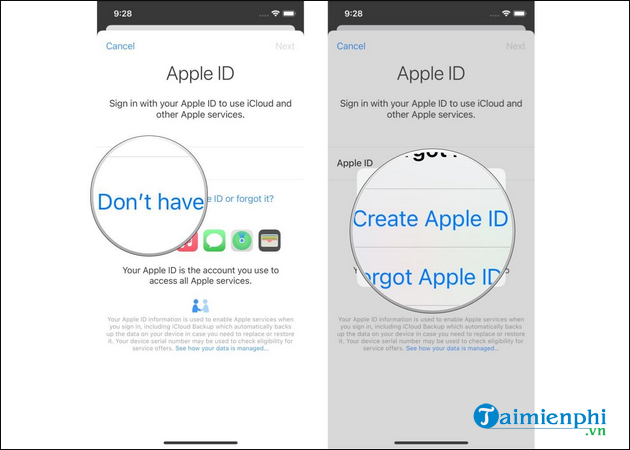
Step 2: On the next screen, select Don't have an Apple ID or forgot it? (Don't have an Apple ID or forgot it?) and click Create Apple ID .
Step 3: Enter your name, date of birth and tap the Next button to continue the Apple ID creation process.
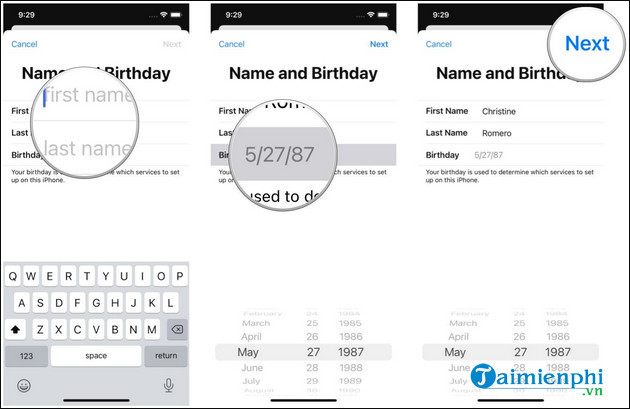
Step 4: In this step, you enter your email address . Make sure your email address is active because you will receive an email to verify your Apple ID from Apple. Additionally, this email address will be used as your new Apple ID.
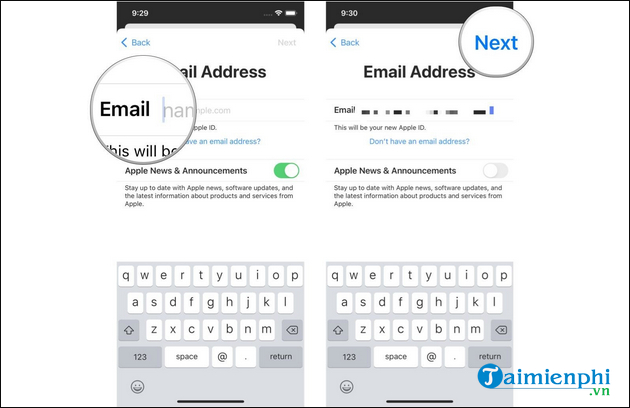
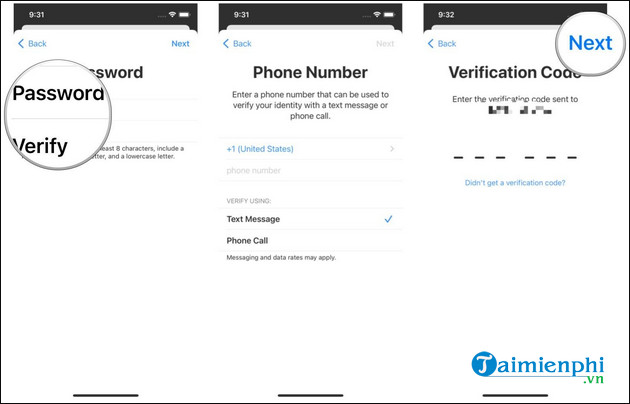
Step 5: Then, you create a password for your Apple ID. Password must have at least 8 characters, including one number, one uppercase letter, and one lowercase letter. Step 6: Enter the phone number used to verify your account and choose to receive verification code via text or call . After entering the verification code, tap Continue .
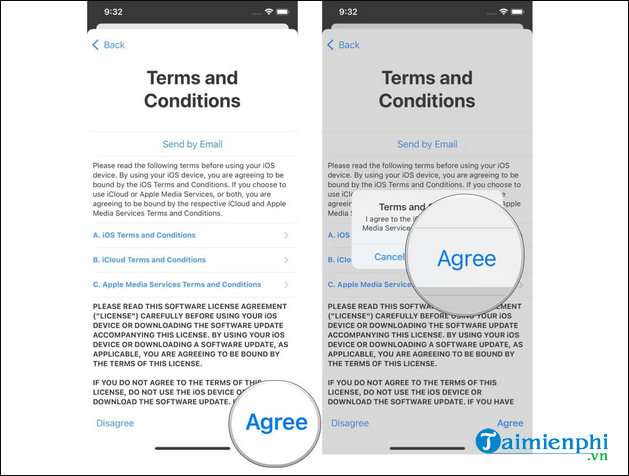
Step 7: Read and accept the terms and conditions by clicking Agree .
Step 8: And the last step will be to verify your email address. To do this, simply open the email address you used during signup, find the Apple ID Verification email , and tap Verify now .
Method 3: Create an Apple ID via the home page
Step 1: Access the following address Step 2: Fill in the information according to the form provided by Apple. Table 1: List of login names and passwords
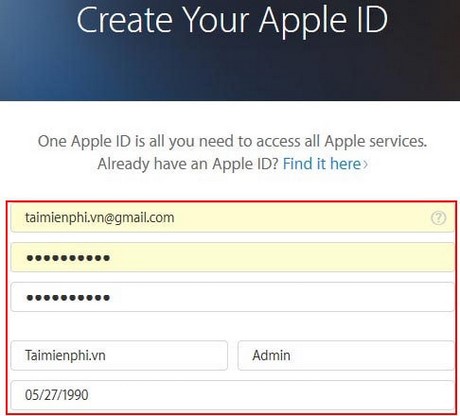
Table 2 : Fill in the answers according to the questions - These are the questions and answers you need to remember to help you retrieve your password in case you forget your Apple ID password
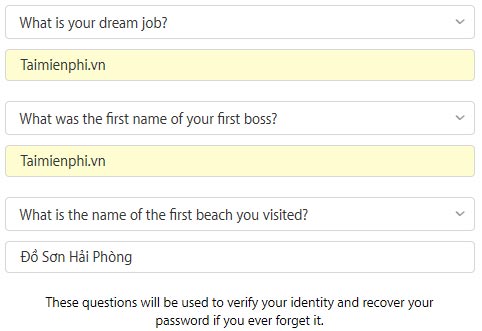
Table 3: Select Vietnam Country -> Enter Code -> Select Continue
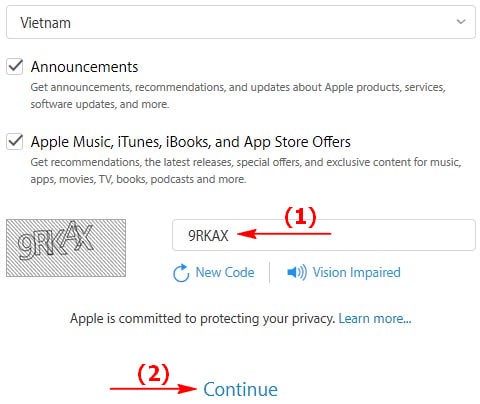
At the next web interface, leave it there -> Now access your registered email to receive the Code.

After you have the Code , enter it into the previous web interface -> select Verify
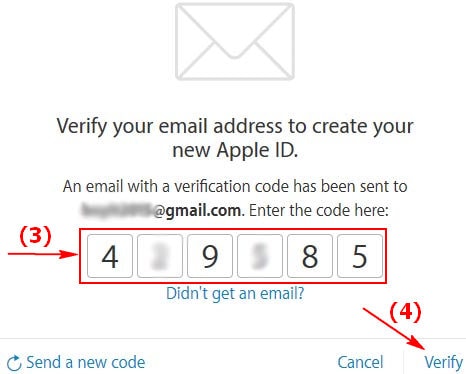
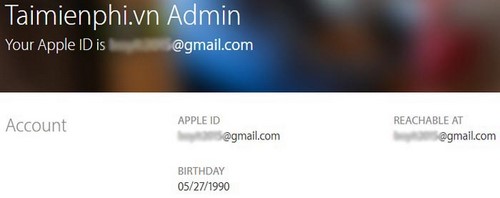
Then your Apple ID account has been created.
Method 4: Create an Apple ID via iTunes
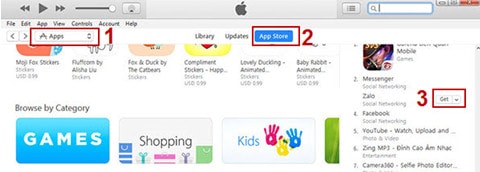
Step 1: Open iTunes software, select Apps , select App Store then drag the right bar down under App Free section and select an application, click Get
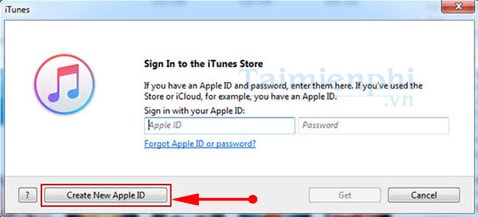
Step 2: Click Create New Apple ID
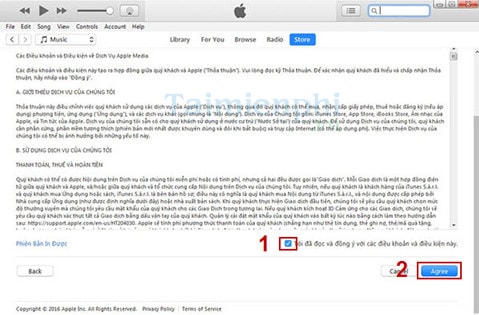
Step 3: Scroll down to the terms and conditions section, select I have read . then click Agree
Step 4: Enter information about Email, password, secret question, personal information (Note that you must enter the correct email you are using and have never registered for an Apple ID. After registering, you need to confirm via email and this is also your Apple ID login account)
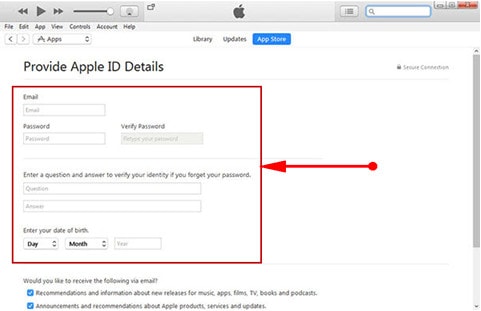
Step 5: After entering personal information, click Next , in the next step you need to enter payment and credit card information. Select None if you don't have any credit cards
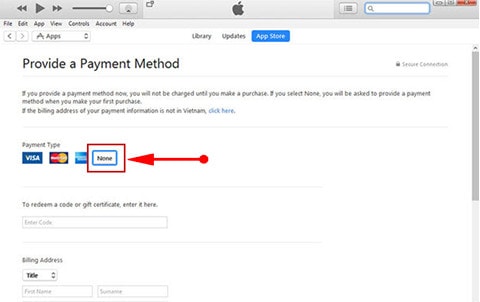
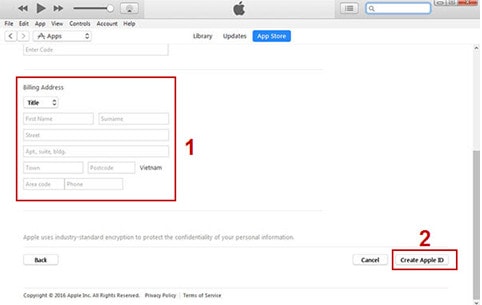
Then enter the information in the Billing Address section and click Create Apple ID to proceed with account registration
A message displays asking you to check your email and follow the instructions in the email
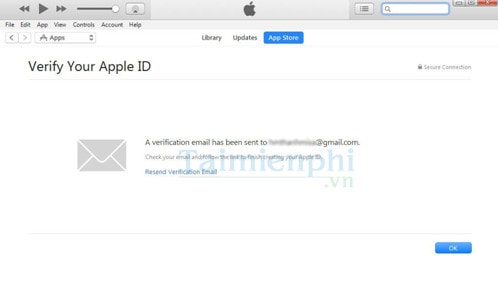
Step 6: Open the email you just used to register your Apple ID , an email will now be sent, click Verify now in the email content.
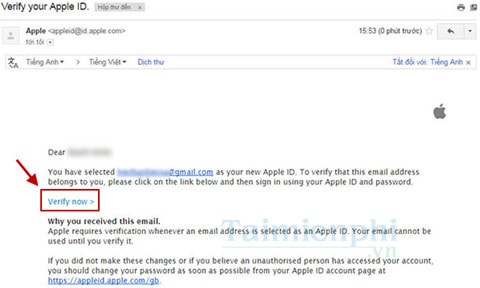
Step 7: A new tab appears asking you to re-enter the login password for the Apple ID you just created
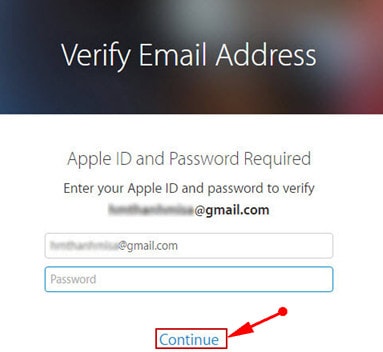
Enter the correct password you just registered and click Continue to complete the Apple ID account registration process
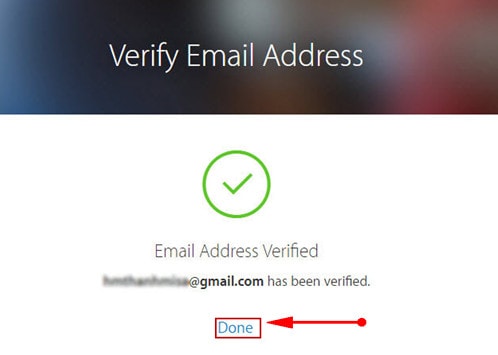
So the process of creating an Apple ID, registering an App Store account, and App ID on the computer is complete. From now on you can use this account to log in to iCloud, iTunes Store, and iChat. Interestingly, right? Download and install iTunes now, and you should also activate 2 layers of iCloud if you are storing important data on this online sharing service of Apple.
iCloud is an account that helps you synchronize and store data online effectively. If you use an iPhone without registering for iCloud to create an account, it is truly a waste. So after registering for App ID, quickly create an iCloud account for yourself.
Final Thoughts
Use the instructions and checks above in order, verify the result after each major step, and keep a backup whenever the process changes important files or system settings.
FAQ
What should I check before starting?
Confirm that your device or software version matches the instructions, save important data, and note the original settings before making changes.
What should I do if the steps do not work?
Restart the app or device, install available updates, review any error message, and repeat the steps carefully in the same order.
Can I undo the changes?
Many changes can be reversed, but the exact method depends on the feature. A backup or restore point gives you the safest way to recover.
Related Articles
 Create an Apple ID, Register an Apple ID Account for Less Than 36 minutes read
 Instructions for Registering an Apple Account Do Not Need to Enter a4 minutes read
 How to Create a New Apple ID on iPhone or iPad6 minutes read
 Instructions for Creating New Apple ID on PC or Mac Using Itunes3 minutes read
 How to Register ChatGPT, Register Chat GPT Easiest, Most Detailed3 minutes read
 How to Register for Fbang, Create an Fbang Account4 minutes read
Reader Comments 0
Sign in with email or Google to join the discussion.