Table of Contents
This updated guide examines Click: How to Convert Mp3 to Wav and organizes the essential facts, background, and practical takeaways in clear American English.
Method 1of 3:
On Audacity
 Open Audacity. Click or double-click the Audacity app icon, which resembles a pair of blue headphones on top of an orange sound wave. Audacity will open to a blank window.
- If you don't have Audacity, first download and install it for your Windows or Mac computer from the following site: http://www.audacityteam.org/download/
- If you're on a Mac, consider using iTunes instead.
 ClickFile. It's in the upper-left corner of the Audacity window (Windows) or the top-left corner of your Mac's screen (Mac). A drop-down menu will appear.
- On Mac, you may instead need to click the Audacity menu item in the top-left corner of the screen.
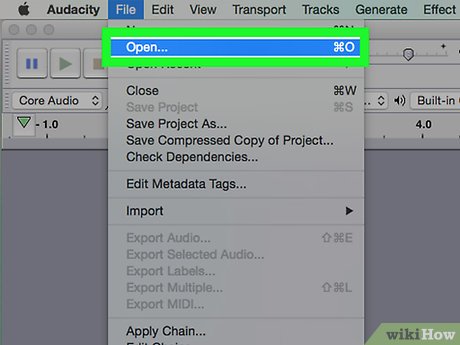 ClickOpen…. It's in the drop-down menu. Doing so opens a window for your to select music.
 Select a song. Click a song that you would like to convert from MP3 to WAV format.
- You may first have to select your music folder from the left-hand side of the window, or double-click a song's folder in the main part of the window.
 ClickOpen. Doing so will begin importing the music file into Audacity. This can take a couple of minutes.
- Once the music file is open, you'll see a blue sound wave in the middle of the Audacity window.
 ClickFileagain. The drop-down menu will re-appear.
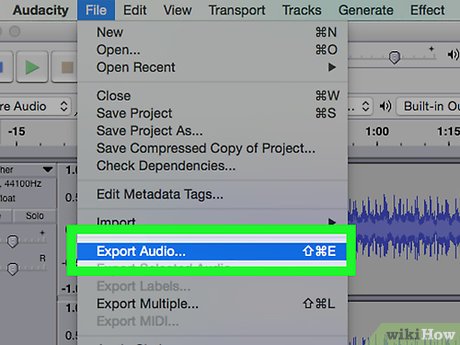 SelectExport. It's in the middle of the drop-down menu. Doing so prompts a pop-out menu.
- If your File menu has Export Audio... as an option instead, click it and then skip the next step.
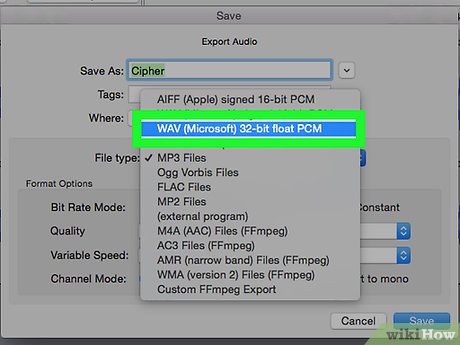 ClickExport as WAV. This is in the pop-out menu.
 Select a save location. On the left side of the window, click the folder in which you want to save the WAV copy of your file.
- On a Mac, you'll click the "Where" drop-down box and then click the folder you want to use there.
- If you clicked Export Audio... , you'll also need to click the "Save as type" (Windows) or "File type" (Mac) drop-down box and select the WAV (16-bit or 32-bit are both fine) option.
 ClickSave. It's in the bottom-right corner of the window.
 ClickOKwhen prompted. This will save the music file in your selected WAV format to your specified folder.
Method 2of 3:
On iTunes
 Open iTunes. Click or double-click the iTunes icon, which resembles a white icon with a multicolored musical note on it. The iTunes window will open.
 Make sure iTunes is up to date. Some older versions of iTunes may not allow you to convert an MP3 file into a WAV file, but modern versions of iTunes do. iTunes should automatically check for updates when it starts up, but you can manually check by clicking Help and then clicking Check for Updates .
- If prompted to update, click Download iTunes and follow any instructions. You may have to restart your computer before proceeding.
 Enable WAV encoding. By default, iTunes won't convert files into the WAV format on request. You can change this by doing the following:
- Click Edit (Windows) or iTunes (Mac) in the upper-left corner.
- Click Preferences... in the drop-down menu, then click the General tab if it doesn't open.
- Click Import Settings... .
- Click the "Import Using" drop-down box, then click WAV Encoder in the menu.
- Click OK at the bottom of the Import Settings window, then click OK at the bottom of the Preferences window.
 ClickSongs. This tab is below the "Library" heading in the upper-left side of the iTunes window. Your iTunes songs will be displayed.
 Select songs to convert. Click a single song to select it. You can also hold downCtrl(Windows) or⌘Command(Mac) and click individual songs to select them independently.
- To select a block of songs, click a song at the top of the list to select it, then hold⇧Shiftand click the bottom song in the list. The whole list will be selected.
 ClickFile. It's in the upper-left corner of the iTunes window (Windows) or in the top-left side of your Mac's screen (Mac). A drop-down menu will appear.
 SelectConvert. This option is near the bottom of the drop-down menu. You'll see a pop-out menu emerge with a few file conversion options.
 ClickCreate WAV Version. It's in the pop-out menu. Doing so will create WAV copies of your selected songs.
- Once the WAV copies are created, you can delete the original songs from your library.
- To go to the location of a converted WAV file, right-click the WAV version of the song, then click Show in Windows Explorer (Windows) or Show in Finder (Mac).
Method 3of 3:
Using OnlineConvert
 Open the OnlineConvert page. Go to https://audio.online-convert.com/convert-to-wav in your computer's web browser.
 ClickChoose file. It's a grey button near the top of the page. Doing so opens your computer's File Explorer (Windows) or Finder (Mac).
 Select your MP3 file. Go to the location of the MP3 file that you want to convert, then click it once.
 ClickOpen. It's in the bottom-right corner of the window. Doing so uploads your MP3 file to OnlineConvert.
- On a Mac, you may click Choose instead.
 Scroll down and clickConvert file. You'll find this grey button at the bottom of the page. OnlineConvert will begin converting your MP3 file into a WAV file.
 ClickDownload. It's a light-green button across from your converted WAV file's name. Doing so prompts the converted file to download onto your computer.
- Depending on your browser settings, you may have to confirm the download or select a save location before the file will download.
- Your file may automatically download once its conversion is complete.
FAQ
What is Click: How to Convert Mp3 to Wav about?
It provides a structured overview of click, explains the main context, and highlights practical takeaways for readers.
Why does this topic matter?
Understanding the main concepts helps readers evaluate the issue, avoid common mistakes, and make better-informed decisions.
How should readers use this information?
Use the guidance as a practical starting point, confirm details that may have changed, and follow current product, safety, or security recommendations.
Related Articles
 Convert PDF to Word, Convert PDF Files for Free12 minutes read
 How to Convert PNG Images to JPG Does Not Degrade Quality5 minutes read
 How to Convert a JPG File to PDF with Just One Operation3 minutes read
 How to Convert AI Files to PNG, JPG Without Software5 minutes read
 Convert Jpg to Png: How to Convert Jpg Images to Png6 minutes read
 Tools for Converting PDF to Word8 minutes read
Reader Comments 0
Sign in with email or Google to join the discussion.