How to Wire a Potentiometer
Potentiometers, or pots, are a type of resistor used to control the output signal on an electronic device, like a guitar, amplifier, or speaker. They have a small shaft on top that functions like a knob; when the user turns the shaft, it....
Selecting and Preparing a Pot
-
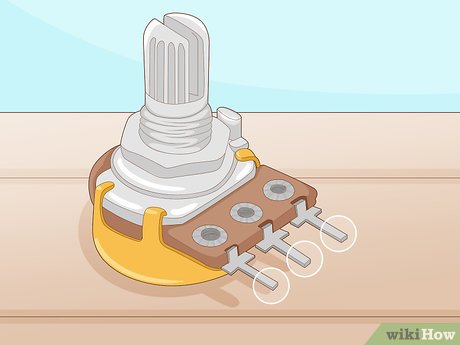 Identify the 3 main terminals sticking out of the middle of the pot. Place your pot on a flat surface with the 3 prongs that stick out facing you. These are your terminals. The first terminal, or terminal 1, is your ground. The middle terminal, or terminal 2, is the input signal for the pot. The third terminal, or terminal 3, is your output signal. The shaft on top controls a small ring attached to the second terminal. Turning it controls how low or high the input is.[1]
- If it helps, think of a potentiometer as a dimmer switch. The ground is all the way off, terminal 2 is the switch itself, and terminal 3 is the switch turned all the way up.
- A potentiometer is almost always used to throttle an input signal so that it can be adjusted. Sometimes, you can use a pot to overclock a device with a stronger signal.
-
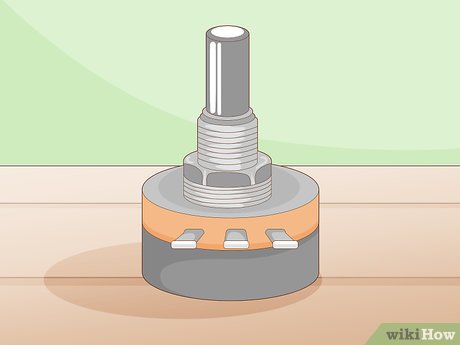
 Read the resistance numbers printed on your pot to see what range you can achieve. Pots are rarely used to control signals that are more than a couple of volts, but the amount of resistance that they provide is important. The higher the range, the more control you'll have over your device. The number on the front of the pot tells the highest level of resistance that the pot can achieve. So a 200K pot can provide a maximum of 200,000 ohms of resistance.[2]
- 100K is the most common kind of potentiometer on the market, since it has a solid range for audio equipment.
- These numbers are always printed directly on to a pot. Usually, they're right next to the shaft on the opposite side of the terminals.
Tip: You need to know how much resistance a pot provides because you need to know if a pot is appropriate for what you're trying to control. A 2,000 ohm pot won't give you the range needed for a stereo system, but it is probably just fine for a dimmer switch.
-
 Set your pot on a flat surface with the 3 terminals facing you. Place your pot down on a flat surface next to your electronic device. If you know that you're going to install the pot in a particular location, start there. Turn the 3 terminals so that they're facing you. Remove any panels on your electronic device to expose the backside of any input or output ports.[3]
- If you're working on a breadboard, set the pot on the upper-most set of rows with the terminals facing you.
Warning: Unplug your electronic device before opening any panels or soldering any connections. You don't want to get electrocuted or damage your device permanently.
-
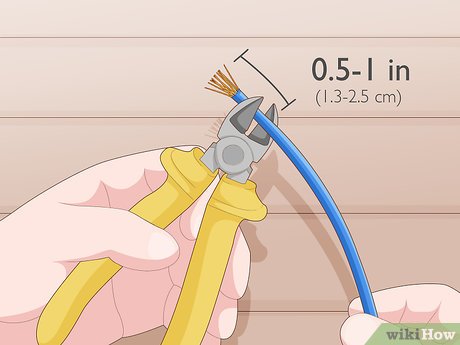 Measure and strip any wires that you're going to be using. You can use any kind of soldering wire to connect the terminals to the device so long as they aren't acid-core. If you have an installation location set up, measure each length of wire from the terminal to the device. Strip any wires to expose the copper by using wire cutters. Use the notches on the cutter's blades to cut and remove 0.5–1 in (1.3–2.5 cm) of plastic from the tip of each wire.[4]
- You'll need to solder your wires, so get your soldering iron and flux and set them out on your work surface.
- Acid-core soldering wire is used for plumbing. It won't work with your electronics.
- If you're wiring a specific kind of electronic device that uses specialized wires, go ahead and use those if the soldering wires don't work.
Soldering Your Terminals
-
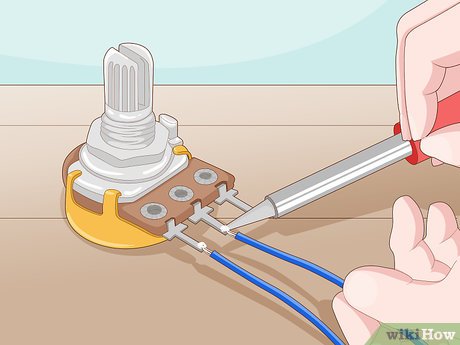
 Connect a ground wire to the chassis from terminal 1 on the left. Tin a small length of wire by tapping the exposed part with your soldering iron and flux. Once the wire soaks up some flux, lower the wire to connect it with the exposed metal part on terminal 1. Press your soldering tip to the connection to join the wire to the terminal. Solder the other end to any piece of exposed, non-painted metal surface on your electronic device.[5]
- You can use terminal 3 on the right if you want, but this means that you'll need to turn the knob clockwise to turn the signal down.
Tip: You can use a breadboard if you want to test your wires before soldering them.
-
 Wire your middle terminal to the output circuit on your device. Tin another length of wire the exact same way and connect it to the middle terminal on your pot. This terminal is where the signal comes in to the pot, so it needs to be wired to the device's output. Solder the wire to the metal connection on the back of your electronic device's output connection.[6]
- The middle terminal is the potentiometer's input. This means that the signal goes out of the electronic, into terminal 2, then back out again of terminal 3. Consequently, terminal 2 has to connect to the port that sends the original signal out of the device.
- On a guitar, this would mean wiring terminal 2 to the output jack. On an integrated audio amplifier, this would mean wiring terminal 2 to the speaker output terminal.
-
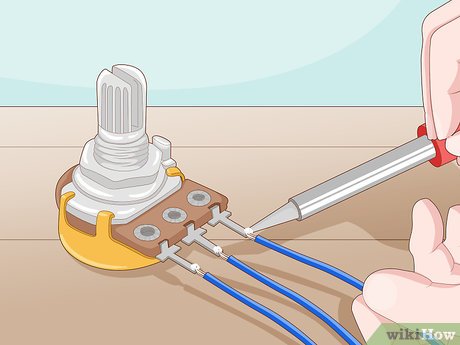 Run a wire from terminal 3 to the device's input. Terminal 3 is the pot's output. It is where the pot sends information back to the device. Tin an exposed length of soldering wire and place it directly on the terminal. Heat it with your soldering pen and connect the wire to your electronic device's input port. Go to the back of the port and look for the exposed metal opening on the back of the knob or cable connection. Solder the wire directly on to it to finish connecting the pot.[7]
- Terminal 3 is where signal comes out of your pot, which means it has to be wired to the location that you want to send the signal.
- On a guitar, this would mean wiring terminal 3 to the input jack. On an audio amplifier, terminal 3 would connect to the input channels.
Using Your Potentiometer
-
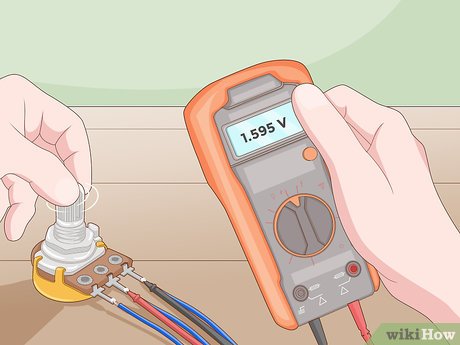 Test your pot to make sure that it's working with a voltmeter. Connect the voltmeter's terminals to the input and output terminals on the pot. Turn the voltmeter on and turn the dial to feed a signal. Turn the knob on top of your pot to adjust the signal. If the signal reading on the voltmeter goes up and down when you turn the knob, your potentiometer works.[8]
- If the voltmeter registers a signal from your pot but the device doesn't work when you turn your electronic on, then there's an issue with the connections you soldered.
-
 Adjust the signal on your device by turning the shaft. Turn your electronic device on and feed a signal to the pot by playing some music, hitting a guitar note, or turning a light on. Twist the shaft to the left to turn the audio or light down. Twist the shaft to the right to raise the volume or level of light. Twist the shaft all the way to the left to turn the output off.[9]
- You can now use your pot to modify the amount of resistance that your signal receives.
Tip: Turning the shaft all the way to the right will maximize the signal output as far as the pot allows. This output won't necessarily be the maximum signal the device would otherwise be capable of though.
-
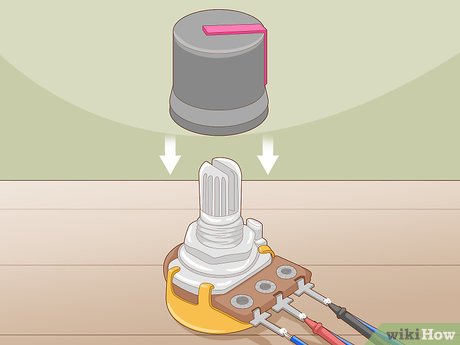 Add a knob by sliding it over the potentiometer if you want. You can install a potentiometer with the shaft bare and exposed if you want. But if you want to upgrade the aesthetic of your potentiometer, you can always get a knob. There are tons of knobs on the market designed to slide over the shaft of a pot and make them look better.[10]
- Search online or take you pot to an electronics store to see what options are available for your make and model.