How to configure network on Ubuntu using Netplan
Netplan is the Ubuntu network configuration tool in all recent Ubuntu versions. Netplan relies on a YAML-based configuration system that simplifies the configuration process.
Table of Contents
Netplan is the Ubuntu network configuration tool in all recent Ubuntu versions. Netplan relies on a YAML-based configuration system that simplifies the configuration process. It has replaced the old /etc/network/interfaces configuration file used to configure network interfaces in Ubuntu and other Linux distributions.
In this tutorial, you will learn how to configure networking in Ubuntu using Netplan. We will look at both static and dynamic IP configurations. The article will use Ubuntu 22.04 LTS to describe the process in this article, but the same steps apply to older Ubuntu 20.04.
Configure the network using Netplan
You can find the new configuration files at /etc/netplan/*.yaml. Ubuntu Server creates a Netplan configuration file for the system network named 01-netcfg.yaml, while Ubuntu desktop creates a Netplan configuration file for Network-Manager named 01-network-manager-all.yaml.
While working on the Ubuntu desktop, the author of the article has the file 01-network-manager-all.yaml in the /etc/netplan directory to configure the network. 01-network-manager-all.yaml is used to configure the first interface. If you have multiple interfaces, use 02-network-manager-all.yaml for the second interface. Netplan applies configurations in numerical order. That means file 01 will be applied before file 02.
Now, let's move on to network configuration. Follow the steps below to configure a static or dynamic IP address in Ubuntu:
1. First, find the names of the active network interfaces you want to configure. To do so run the following command:
$ip a

Note the interface name you want to configure with Netplan.
2. Netplan's default configuration file is located in the /etc/netplan directory. You can find that using the following command:
$ ls /etc/netplan/

3. To view the contents of the Netplan network configuration file, run the following command:
$ cat /etc/netplan/*.yaml

4. Now, you will need to open the configuration file in any editor: Because the article is using the Nano editor to edit the configuration file, the command that will be run is:
$ sudo nano /etc/netplan/*.yaml

5. Update the configuration file according to your network connection needs. For static IP address, add IP address, Gateway, DNS information while for dynamic IP address, there is no need to add this information as it will get this information from DHCP server. Use the following syntax to edit the configuration file.
network: Version: 2 Renderer: NetworkManager/ networkd ethernets: DEVICE_NAME: Dhcp4: yes/no Addresses: [IP_ADDRESS/NETMASK] Gateway: GATEWAY Nameservers: Addresses: [NAMESERVER_1, NAMESERVER_2]
In there
- DEVICE_NAME: Name of the interface.
- Dhcp4: yes or no depending on dynamic or static IP address
- Addresses: The device's IP address in prefix notation. Do not use netmasks.
- Gateway: Gateway IP address to connect to the external network
- Nameservers: Addresses of DNS name servers
Note that YAML files are quite strict in indentation. Use spaces to indent rather than pressing tab. Otherwise, you will get an error.
Configure static IP address in Ubuntu
To manually configure the IP address, use the configuration file syntax above and add the IP address, gateway, and DNS server information. Here, you can see an example configuration file for a static IP address:

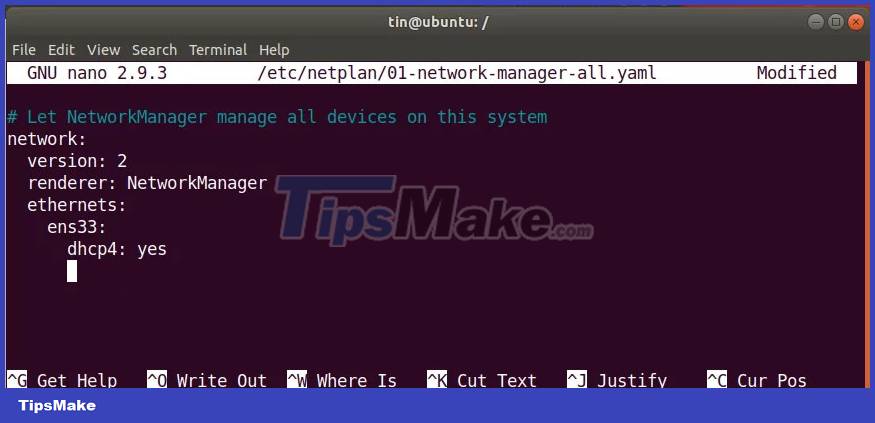
Configure dynamic IP address in Ubuntu
To get the IP address from the DHCP server, use the same configuration file syntax above. But do not add IP address, Gateway and DNS server information.
Here, you can see an example configuration file for a dynamic IP address:
Once you have completed the static or dynamic IP configuration, save and exit the configuration file.
Test configuration
Before applying any changes, check the configuration file. Run the following command as sudo to test the configuration:
$ sudo netplan try

If there are no problems, it will return a message accepting the configuration. If the configuration file does not pass the test, it will be reverted to the previous active configuration.
Apply configuration
Now apply the new configurations by running the following command as sudo:
$ sudo netplan apply

In case you see any errors, try debugging to investigate the problem. To run debugging, use the following command under sudo:
$ sudo netplan –d apply
Restart the network service
Once all configurations are applied successfully, restart the Network-Manager service by running the following command:
$ sudo systemctl restart network-manager
If you are using Ubuntu Server, use the following command instead:
$sudo systemctl restart system-networkd
Verify IP address
Now to verify if the new configuration was applied successfully, run the following command to verify the IP address:
$ip a
Whether you have an Ubuntu server or desktop, you can simply use Netplan to configure a static or dynamic IP address without any complicated configuration.
Was this article helpful?
Your feedback helps us improve.
Related Articles
 How to configure DNS Server on Ubuntu Server 11.043 minutes read
 How to configure static IP address on Ubuntu 22.04 LTS and 22.105 minutes read
 What's New in Ubuntu 21.10?6 minutes read
 Configure IP network address with MS-DOS command5 minutes read
 How to set DNS nameserver in Ubuntu Server 18.045 minutes read
 Why is Ubuntu LTS preferred over regular distros?5 minutes read
Reader Comments 0
Sign in with email or Google to join the discussion.