How to compress videos with Handbrake
If you like video storage, you'll soon find yourself running out of space on your device. The solution to this problem is to compress videos using Handbrake..
If you like video storage, you'll soon find yourself running out of space on your device. In this case, you have three options: purchase additional hard drives to expand capacity, delete files or compress to reduce file size.
The final solution seems to be the best option because you can still keep videos without buying a new hard drive. The ideal way to do this is to treat each video as a separate entity, assigning different parameters to encode it. There is a simple way to help you do this.
You can create different compression profiles with Handbrake, then encode the video by uploading it to the app, selecting the desired quality setting and clicking Encode .
- How to compress files on YouCompress online
- How to compress video size without software
- How to compress video size with Format Factory
Install Handbrake
If using Linux, most distributions today have Handbrake in the software repository for users to easily install. On a Debian / Ubuntu-based distribution, use the following command:
sudo apt-get install handbrake
Or you can use the Software Center / App Store / Package Manager Front-End of the distribution, look for the name Handbrake and click on Install .
For Windows or Mac users, download the link below.
- Download Handbrake for Windows
- Download Handbrake for Mac
Upload the test video to Handbrake
To set it up, you should use video files of good image quality and short duration. Each compression will also reduce quality, so a good quality master will help preserve the details.

Image settings
Switch to the Picture tab of Handbrake encoding setting. Here you will find parameters that affect the shape and frame size. Set according to the following parameters:
- Auto Crop : On
- Loose Crop : Off
- Filters : Turn off all the filters
- Storage Geometry :
- Width & Height : Ignore this option
- Optimal for source : Off
- Anamorphic : Loose
- Alignment : 2
- Display Geometry : Ignore this option (everything is on by default)

Video settings
Continue with the Video tab to change the algorithm used for encryption and some other important options. We will start with the High-Quality setting.
Step 1 . Change Video Encoder to H.265 .
Step 2 . Pay attention to the Tune option. If the video has a grainy noise, you should pay attention to this option and turn it on after importing the file into Handbrake and choose the available settings to encode it.
Step 3 . Keep the frame rate the same as the source video and set it to variable .
Step 4 . Drag the Preset slider to Normal or Slower . The Slower option will take longer but create higher quality videos.
Step 5 . Leave Constant Quality selected by default instead of Bitrate mode . Change RF settings to 20.

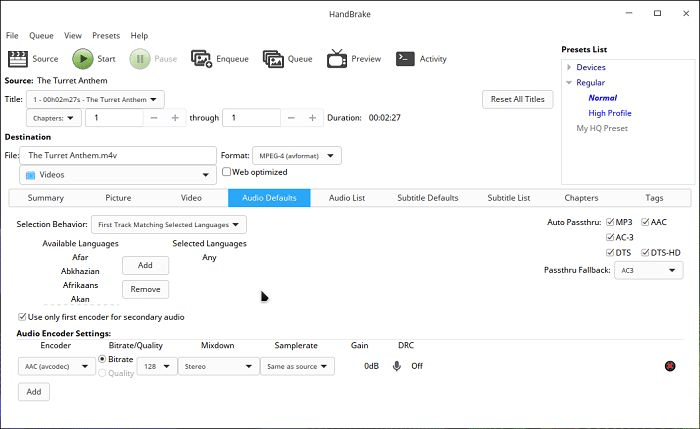
Set parameters in the Audio Defaults tab
As with video, the audio portion of a video file can also be encoded in several ways. For the best compression quality, switch to the Audio Defaults tab and set Audio Encoder Settings to:
- AAC (avcodec)
- Bitrate : 160 or even better (but bigger), 192
- Mixdown : 5.1 channels if you have a 5.1 sound system and Dolby Surround if you have a regular two speaker setup.

The preset
These are the most important options, you don't need to change anything (if you don't want to). Now, try encrypting the file and checking the results.
- If the quality is good, you can increase the level of compression. Change RF to 21 in the Video tab and re-encode. Repeat until the quality is noticeably reduced.
- If the quality is not good, you should reduce the RF to 19.
To save your High Quality settings, select Presets -> Save . Name and note the video resolution options. You should skip the resolution setting in the Picture tab because this setting will override it. Enter the Maximum Width of the screen, usually 1920 for Full HD screen and uncheck Maximum Height , click Ok to save the settings.

Medium Quality quality settings
To create average quality settings, follow these steps:
- Go back to the Video tab and change RF to 23. If you think H.265 is too slow for your CPU, change the old but faster H.264 encoder.
- Switch to the Audio tab and change Bitrate to 128 and Mixdown to Stereo .
- Do some test coding for this setting as you would for High-Quality settings.
- Choose to save your presets but enter half of the screen width into Maximum Width . For example, a 1920 x 1080 Full HD screen would be 960.
Low Quality setting but fast
The final profile provides the lowest quality and creates larger files but less compression time. Set up this profile as follows:
- In the Video tab, set Video Encoder to MPEG-4 .
- Set Framerate to Constant .
- Change the encoding type to Bitrate and enter the value of 1200 kbps .
- Turn on 2-Pass Encoding and Turbo First Pass.
- Set Audio Settings as in the average sound quality settings but change Samplerate to 44.1 for maximum compatibility with standalone media players. Turn off all the Passthru options at the top right.
- You do not need to experiment with MPEG4 because the results are highly dependent on video content. For best results, you should change the Bitrate settings for each video individually. 1200 is a great size, suitable for all coding needs.
- Save the settings as above, but enter a resolution of 640 for Maximum Width .

With preset settings, now when you want to encode videos, you just need to enter them into Handbrake, select one of the profiles from the Presets List at the top right and click Start . This way is easier and faster than changing the manual options every time you compress a video.
It is worth noting that you can queue up many videos. You can download a file, select a high quality profile and click on Enqueue , then repeat the process with the Medium Quality profile for the next two files and Low Quality for the following file.
I wish you successful implementation!