Table of Contents
This updated guide explains how to Choose Power Plan in Windows 10 through clear steps, practical examples, and important checks that help prevent common errors.
All users (standard and administrator) can make changes to any power plan settings. Changes made to the power plan will affect all users who have the same options.
This tutorial will show you how to choose a power plan to use by default in Windows 10.
Select the Power Plan in Power Options
1. Follow step 2, step 3 or step 4 below, depending on how you may need to open Power Options.
2. Right-click or press and hold the Power icon in the notification area, click Power Options and go to step 5 below.
 click Power Options
3. Open Control Panel (icon view), click the Power Options icon and go to step 5 below.
4. Open the Power User Tasks menu Win + X , click Power Options and go to step 5 below.
5. Select the power plan (for example, High performance ) you may need to use by default for your account.
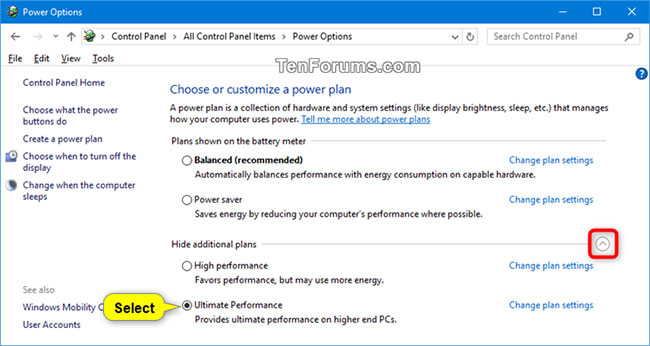 Select power plan
6. You can now close Power Options if desired.
Select the Power Plan in Windows Mobility Center
1. Right-click or press and hold the Power icon in the notification area and click Windows Mobility Center (mblctr. exe) .
 click Windows Mobility Center
2. In the Power drop-down menu, select the power plan (for example, High performance ) you may need to use by default for your account.
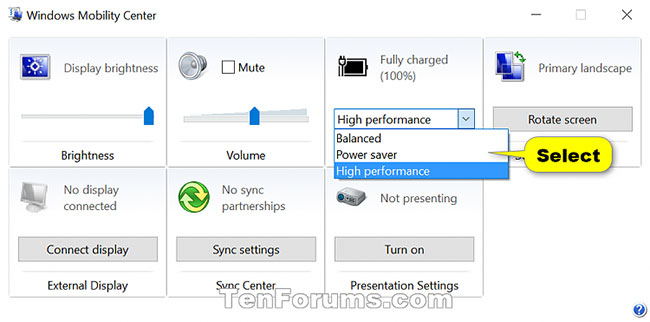 In the Power drop-down menu, select power plan
3. You can now close Windows Mobility Center if you like.
Select the Power Plan in the Command Prompt
1. Open Command Prompt.
2. Copy and paste the command:
powercfg /ListOr:
powercfg /L. go to Command Prompt and press Enter. This will give you a list of all the power plans available on your PC along with their GUIDs. Please write down the GUID of the power plan you may need to select.
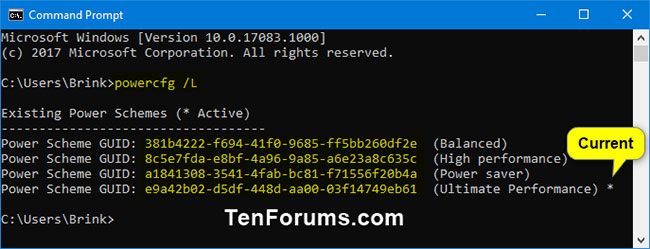 List of all power plans available on the PC with the GUID
Note : Power plans with an asterisk * on the right are the current activity options.
3. Enter one of the two commands below into the Command Prompt and press Enter.
powercfg /S GUIDOr:
powercfg /setactive GUIDReplace the GUID in the above command with the actual GUID from step 2 for the power plan you may need to select.
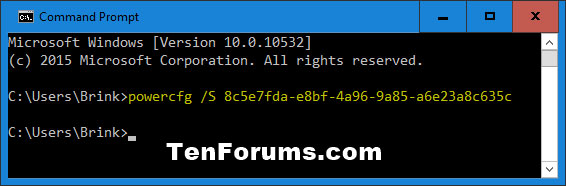 Enter the command in the Command Prompt
Example
(Balanced)
powercfg /S 381b4222-f694-41f0-9685-ff5bb260df2e(High performance)
powercfg /S 8c5e7fda-e8bf-4a96-9a85-a6e23a8c635c(Power saver)
powercfg /S a1841308-3541-4fab-bc81-f71556f20b4a(Ultimate Performance)
powercfg /S e9a42b02-d5df-448d-aa00-03f14749eb614. You can now close the Command Prompt if you like.
FAQ
What is the easiest way to Choose Power Plan in Windows 10?
Start with the requirements in this guide, then follow each step in order. Check the result after every major change so problems are easier to identify.
Can beginners follow these instructions?
Yes. The process is organized into practical steps, and you can repeat any step before moving forward.
What should I check if the method does not work?
Confirm your software or device version, permissions, settings, file format, and internet connection when the task depends on online services.
Related Articles
 How to Adjust Power Settings in a Windows Vista Laptop3 minutes read
 How to Restore Missing Default Power Plans in Windows 104 minutes read
 How to Reset Power Plan to Default in Windows5 minutes read
 How to Adjust Power Option on Windows 10 for the Most3 minutes read
 Microsoft Restarted the Power Toys Project for Windows 10 Users7 minutes read
 5 Things to Know When Buying Computer Power Supplies9 minutes read
Reader Comments 0
Sign in with email or Google to join the discussion.