How to change the Maximum processor frequency setting in Windows 10
Processor frequency specifies the operating frequency of the core (s) in the CPU, in MHz. The higher the CPU frequency, the faster the processor. This guide will show you how to change the Maximum processor frequency setting in Windows 10.
Table of Contents
Processor frequency specifies the operating frequency of the core (s) in the CPU, in MHz. The higher the CPU frequency, the faster the processor.
You can specify the approximate maximum frequency (in MHz) of the processor in Windows 10 to limit the frequency if needed, for example, to save energy or the CPU is overheating at high frequencies. By default, the maximum processor frequency is set to 0 (unlimited), allowing the processor to run at maximum power.
This guide will show you how to change the maximum processor frequency setting in Windows 10.
Note : Any change to the maximum processor frequency setting will affect all users on the PC using the same power plan.
Change the "Maximum processor frequency" setting in Power Options
1. If not, first need to add the "Maximum processor frequency" setting to Power Options.
2. Open advanced source settings for the current power plan.
3. Expand the Processor power management setting, set the Maximum processor frequency to the number of MHz you want and click OK.
 Change the "Maximum processor frequency" setting in Power Options
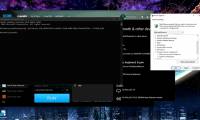
Change the "Maximum processor frequency" setting in the Command Prompt
1. Open Command Prompt.
2. Enter the command (s) below you want to use into the Command Prompt and press Enter. You can close the Command Prompt when finished.
(If using battery)
powercfg -setdcvalueindex SCHEME_CURRENT 54533251-82be-4824-96c1-47b60b740d00 75b0ae3f-bce0-45a7-8c89-c9611c25e100 (If the charger is plugged in)
powercfg -setacvalueindex SCHEME_CURRENT 54533251-82be-4824-96c1-47b60b740d00 75b0ae3f-bce0-45a7-8c89-c9611c25e100 Replace in the above commands with the maximum processor frequency you want.
For example:
powercfg -setdcvalueindex SCHEME_CURRENT 54533251-82be-4824-96c1-47b60b740d00 75b0ae3f-bce0-45a7-8c89-c9611c25e100 0powercfg -setacvalueindex SCHEME_CURRENT 54533251-82be-4824-96c1-47b60b740d00 75b0ae3f-bce0-45a7-8c89-c9611c25e100 0 Change the "Maximum processor frequency" setting in the Command Prompt
Was this article helpful?
Your feedback helps us improve.
Related Articles
 Steps to add/remove 'Maximum processor state' from Power Options in Windows3 minutes read
 How to use the maximum screen scan frequency in Windows 101 minutes read
 How to create a frequency chart in Excel2 minutes read
 How to choose a CPU with the right TDP level8 minutes read
 How to change your computer password for the most popular operating systems.5 minutes read
 How to speed up Windows 10, optimize Windows 10 for maximum performance6 minutes read
Reader Comments 0
Sign in with email or Google to join the discussion.