Table of Contents
To identify a laptop hardware problem, start with non-destructive checks: record the exact symptom, inspect the chassis and display, run the manufacturer's built-in diagnostics, review battery and storage health, and test memory. Stress the CPU or GPU only after temperatures, fans, power, and data backups are in order. No single utility can certify an entire laptop.
If you are buying a used laptop, perform the tests before payment and confirm that the serial number, firmware password state, operating-system activation, charger, and advertised specifications match the listing. Do not sign in to sensitive accounts on a seller's unknown Windows installation; plan to erase and reinstall the operating system after purchase.
Start with a physical and functional inspection
- Check the chassis for cracks, swollen areas, missing screws, liquid marks, damaged vents, or a bent lid.
- Open and close the hinge slowly; the display should not flicker and the hinge mounts should not lift from the case.
- Test every keyboard key, the touchpad, both buttons, touchscreen, webcam, microphone, speakers, headphone jack, Wi-Fi, Bluetooth, and fingerprint reader.
- Connect a known-good device to every USB, video, network, and charging port.
- Verify that the supplied charger is the correct wattage and that the connector does not cut in and out when moved gently.
- Restart several times and confirm that BIOS/UEFI opens without an unknown administrator password.
Check the screen for dead pixels and panel faults
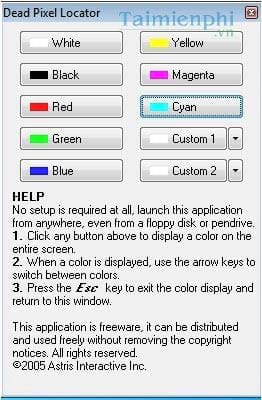
Clean the display, set a comfortable brightness, and show full-screen fields of black, white, red, green, blue, and gray. Look for pixels that remain one color, bright spots, pressure marks, uneven backlight, flicker, image retention, or lines.

Move the lid through its normal range while a static image is displayed. Intermittent lines or flicker with hinge movement can indicate a panel cable or connector problem rather than the GPU. Test an external display: if the external image is stable while the internal panel fails, the panel or cable is more likely; if both show artifacts, investigate the graphics path.
TipsMake's laptop screen test tools provide uniform-color and pattern tests. A software test cannot repair a dead pixel; check the seller's or manufacturer's pixel policy.
Review SSD or HDD health
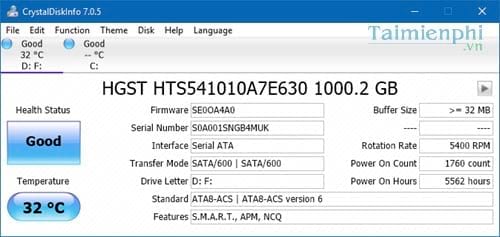
Use Disk Management to confirm the expected storage capacity, then run CrystalDiskInfo or the drive manufacturer's diagnostic.
Review the exact model, firmware, temperature, overall status, and SMART or NVMe attributes. On an HDD, reallocated, pending, and uncorrectable sectors matter. On an NVMe SSD, examine Critical Warning, Percentage Used, Available Spare, and Media and Data Integrity Errors.
Power-on hours describe how long that storage device has been powered, not how long the laptop itself has been used. A replacement drive can have far fewer hours than the computer, and there is no universal hour count at which a healthy drive must fail. Any active hardware warning or failed manufacturer test is more important than an arbitrary age threshold. See three reliable drive-health checks for details.
Test system memory
First run the laptop manufacturer's UEFI memory diagnostic, if available. Windows Memory Diagnostic is another quick check: press Windows + R, run mdsched.exe, choose to restart, and let the test finish.
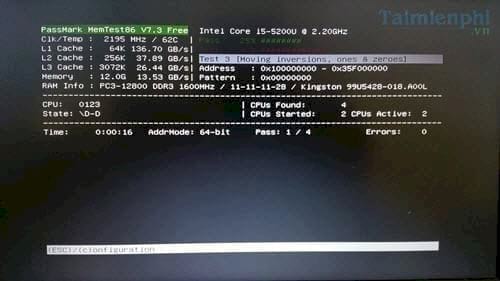
For a longer independent test, create official MemTest86 media and boot from it. Let multiple passes complete when time allows.
Even one reproducible memory error needs investigation. It can come from a DIMM, soldered memory, a slot, memory-controller settings, firmware, or the CPU. Reset overclocking or custom memory settings to defaults and retest. Reseat removable RAM only if you own the laptop, the service procedure permits it, power is disconnected, and warranty terms are understood. The RAM testing guide covers both Windows Memory Diagnostic and a bootable test.
Check the battery
Open an elevated Terminal and create Windows' battery report:
powercfg /batteryreportOpen the saved HTML file and compare Design Capacity with Full Charge Capacity. Review cycle count when the battery firmware supplies it, recent usage, and sudden drops. Battery estimates are affected by workload and calibration, so test real runtime under a repeatable light workload rather than relying only on the percentage shown by Windows.
Stop using the laptop and disconnect AC power if the battery is swollen, the touchpad or case is lifting, or there is unusual heat or odor. Do not puncture or press a swollen pack. TipsMake's battery-health tools guide explains the report fields.
Test CPU, cooling, and GPU cautiously
Use a current hardware monitor to watch CPU and GPU temperature, clock speed, fan behavior, and power while running a normal workload. There is no single “normal” temperature for every laptop; limits depend on the processor, cooling design, ambient temperature, power mode, and firmware.
Begin with a short workload rather than an extreme burn test. Stop if temperature rises uncontrollably, the system shuts down, the charger or connector becomes abnormally hot, the screen shows artifacts, or a fan makes mechanical noise. Lower clocks under sustained load may be normal thermal or power management; compare observed performance with the exact model's expected behavior.
For a used laptop, a ten-minute combined stress test is not proof of long-term reliability and can be inappropriate in a shop with poor ventilation. A vendor diagnostic, normal application workload, and several cold starts often reveal more useful information with less risk.
Motherboard and firmware warning signs
A motherboard fault is difficult to diagnose from one symptom because memory, storage, battery, charger, ports, and firmware all connect through it. Useful evidence includes:
- The same port fails with several known-good devices and operating systems.
- The laptop cannot reliably enter firmware setup or loses settings with a healthy main battery.
- It fails power-on self-test with a documented LED or beep code.
- Multiple unrelated devices disappear together.
- Crashes persist after memory and storage pass, firmware defaults are loaded, and a clean supported OS is used.
- Visible corrosion, burnt components, or prior liquid damage is present.
Record firmware and diagnostic codes and compare them with the laptop manufacturer's service manual. Do not flash firmware on an unstable system or weak battery unless the vendor's recovery procedure specifically requires it.
Useful checks before buying a used laptop
- Verify the serial number and warranty status on the manufacturer's site.
- Confirm CPU, RAM, storage, display resolution, GPU, and wireless hardware in both firmware and Windows.
- Check that Computrace/Absolute, device-management enrollment, Activation Lock, or an unknown firmware password will not prevent legitimate ownership.
- Inspect Windows activation, but budget for a clean installation from official media.
- Confirm that recovery keys and seller accounts are removed through the manufacturer's documented ownership-transfer process.
- Get a written receipt with the device serial number.
If the laptop produces repeatable crashes, memory errors, storage warnings, swelling, liquid damage, or unexplained firmware locks, do not assume a software reinstall will solve it. The safest purchase decision is often to walk away or have the device inspected by an authorized technician.
Related Articles
 2 Ways to Check RAM and Check RAM Errors on the Computer with the Highest Accuracy Rate7 minutes read
 Experience Handling Errors Difficult to Identify Causes11 minutes read
 How to View Computer ID, Check Hardware ID3 minutes read
 How Do I Know If My Laptop Battery Is Bottled or Broken?25 minutes read
 How to Check If Your Laptop Supports an M.2 SSD8 minutes read
 Identify Hardware Errors in the Computer6 minutes read
Reader Comments 0
Sign in with email or Google to join the discussion.