How to Change the Screensaver in Windows 8
Changing a screensaver in Windows 8 is a fun task easily accomplished from the desktop. You can even customize it by making a slideshow with personal photos and adjustable speeds. Just right click to get started! Click on 'Desktop'. It's...
Table of Contents
Method 1 of 2:
Changing The Screensaver
-
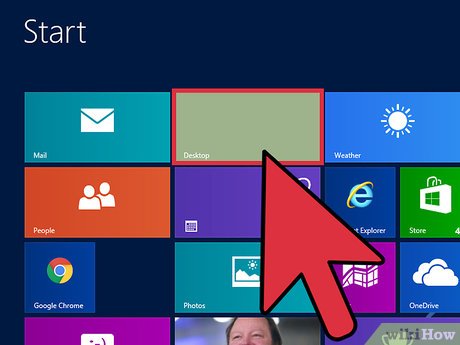 Click on 'Desktop'. It's located at the bottom-left corner of the start screen.
- If already on desktop view, skip to next step.
-
 Right click on the desktop.
 -
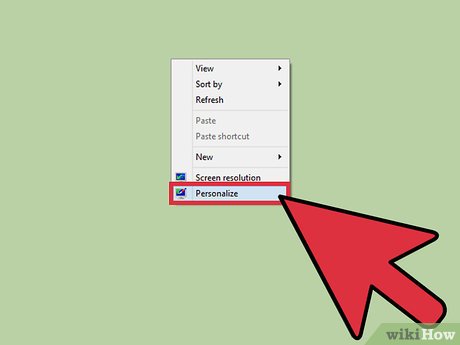 Click on Personalize.
 -
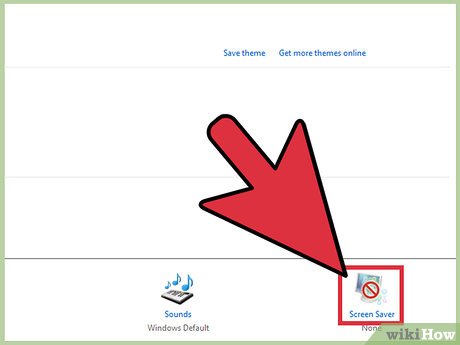 Click Screensaver. It's at the bottom-right corner of the personalization menu.
 -
 Click the dropdown menu under 'Screensaver'.
 -
 Click on the screensaver you want to use.
 -
 Set the idle time for your screensaver. This done by clicking on the arrows below the dropdown menu.
- You can also type the idle time into the small box on the left.
-
 Check the box next to 'On resume, display logon screen' (Optional). This will prompt you to enter a password when resuming once the screensaver has been displayed.
 -
 Click OK. This updates the settings, making your new screensaver visible after your computer is idle for the timeframe entered in Step 7.
Method 2 of 2:
Customizing The Screensaver With Photos
-
 Open the Screensaver Settings menu. This is done using steps 1 - 4 in Method 1 (Changing the Screensaver).
 -
 Click the dropdown menu under 'Screensaver'.
 -
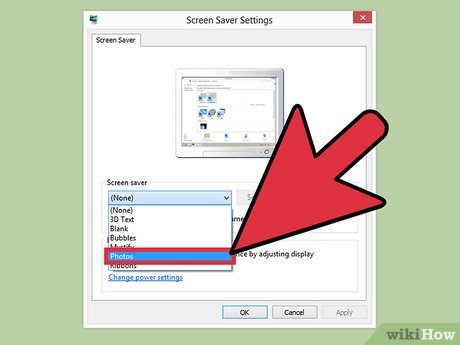 Click on Photos.
 -
 Click Settings.
 -
 Click on Browse. It's located towards the top-right of the Photos Screensaver Settings menu.
 -
 Add a folder to the Screensaver dropdown menu. This is done by clicking on the folder that contains photos you want to update your screensaver with.
 -
 Click OK.
 -
 Set the speed at which photos appear. This is done by clicking on the dropdown menu to the right of 'Select a slideshow speed'.
 -
 Click on your preferable speed.
 -
 Check the 'Shuffle pictures' box (Optional). This makes the photos appear in a random order.
 -
 Click Save. Your photos' settings will be updated.
 -
 Click OK at the bottom of the settings menu. The changes will be applied and your screen saver will be updated as a slideshow of personal photos.
Was this article helpful?
Your feedback helps us improve.
Related Articles
 How to change lock screen and screensaver timeout settings on Windows8 minutes read
 Top 10 Best Screensaver programs for Windows 105 minutes read
 How to install and use screensavers of 'classic' versions of Windows on Windows 114 minutes read
 23 Awesome Screensavers to Protect Your Windows Computer Screen10 minutes read
 6 classic Windows screensavers from the 1990s that still run well on Windows 116 minutes read
 How to Disable Windows Login Screensaver5 minutes read
Reader Comments 0
Sign in with email or Google to join the discussion.