How to Create a Project in iMovie
iMovie is an application for Macs that is used to create videos. An iMovie Project can be as simple or as complex as the amount of time and effort you wish to put into making it. This article walks you through the basics for creating a...
Method 1 of 3:
Import Video
-
 Turn on your camera. Set it to VTR, VCR, or PC Connect. This will vary depending on the type of camera you have, but in general, you want to put it in output mode, not record mode.
 -
 Connect your camera to your computer. Locate the cable that came with your camera. Whether that's a USB cable, or a Firewire cable, there will be one large end, and one small end. Connect the smaller end into your camcorder, and the broad end into your computer.
- If you are importing from a camera that can shoot HD video, an HD Import Setting dialog appears. Select Large or Full, and then click OK.
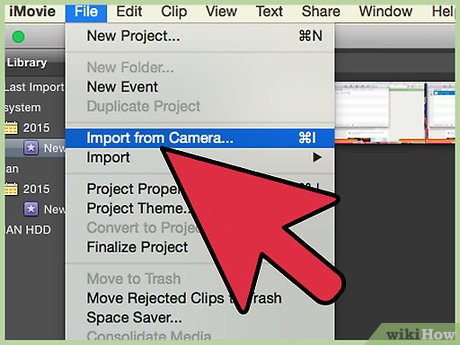
- If the Import window does not open, choose File > Import from Camera.
-
 Set the Automatic/Manual switch. This will let iMovie control your camcorder's transport.
- Automatic rewinds the tape to the beginning, imports all the video on the tape, then rewinds the tape back to the beginning. Use this for bulk importing.
- Manual lets you rewind and fast-forward the tape so that you can import only that footage you want to include in your movie. Use the transport controls to set your tap to the point where you want to begin importing.
-
 Click import.
- From the Save To pop-up menu, choose the disk where you will store your video files. If you have a second drive, that's a good place to store your video, rather than your system drive.
-
 Organize your imported video. Determine how you want to manage the imported video in your Event Library:
- To add the imported video to an existing event (video you've already imported), select 'Add to Existing Event,' then choose the event's name from the pop-up menu. The first time you import video, there won't be any existing events in your Event Library.
- To create a new event, type a name for it in the 'Create new Event' field. If the video you're importing was recorded on several different days and you want iMovie to create an individual event for each of those days, select 'Split days into new Events.'
-
 Analyze your video. iMovie can smooth shaky video through a process called stabilization, and can analyze your video for the presence of people. To do this, select 'After import analyze for,' and then choose an option from the pop-up menu:
- Stabilization reduces the camera motion in your video so that shaky parts can be played back more smoothly.
- Analyzing video for the presence of people marks the footage that contains people.
- Note: stabilization and analyzing video for people can take a long time.
-
 Pick a size. If you're importing HD video, choose a size from the 'Optimize video' pop-up menu.
- If you're not sure whether the video you're importing is HD video, check the camera's user manual for information about how to set the camera to record HD or standard-definition (SD) video.
- If you're still not sure, connect your camera to your television. If your your TV is wide screen, standard video will have black bars on the left and right sides of the video. If your TV is standard, an HD video will show black bars above and below the video. If your video fills the screen, then it's the same format as your tv: widescreen or standard.
- The option you choose overrides what you selected in step 4 in the HD Import Setting dialog (which you see only the first time you import video).
-
 Click Import. If you're importing automatically, you can leave your computer and come back when the import is complete.
- If you're importing manually, click Stop (in the lower-right corner of the Import window) when the section of video you want has been imported. Then use the import controls to set your video to a point where you want to begin importing again, and repeat starting at the first import step.
- Continue in this manner until you have imported all the video you want.
Method 2 of 3:
Start A New Project
-
 Launch iMovie. Click File in the menu bar, and select New Project... from the drop-down menu.
 -
 Name your project. In the setup window that appears, enter a name for your project.
 -
 Assign an aspect ratio. The aspect ratio refers to the width-to-height ratio of your movie, and will affect how it will appear on screens and monitors.
- Standard (4:3) is almost square, and is the ratio used in standard-definition TVs. A video in 4:3 will fill the screen of those TVs. On an HDTV or widescreen monitor, there will be black bars on either side of the picture so that it still looks correct. This is a good choice for standard TVs, and for iPad or iPhone playback.
- Widescreen (16:9) is much wider than it is tall, and is suitable for widescreen monitors and HDTV televisions. When viewed on a standard-definition monitor or TV, there will be black bars on the top and bottom so that it displays correctly.
-
 Set your frame rate. Chose one of the three options from the menu. Use the same frame rate that you used when you recorded your video you'll be using in your project.
- 30 fps - NTSC is the frame rate you will use if using a camera sold in North America, South America, Japan, and South Korea.
- 25 fps - PAL is the frame rate you will see in cameras sold in Europe, Hong Kong, and most other countries.
- 24 fps - Cinema is the setting you will use if you set your camera (either an NTSC or PAL camera) to record in Cinema mode.
-
 Set your project theme. You can set a basic template for your movie using Themes. Click on each thumbnail, and in the preview area to the right, you'll see a sample video of how that theme looks in use.
- Select 'Automatically add transitions and titles" if you want iMovie to insert standard cross-dissolve transitions with occasional theme-styled transitions between the clips in your project. If you don't choose this option, you can still add theme-styled transitions to your project manually.
-
 Click Create. This will finalize your choices, and take you back to the main iMovie window's Project browser, where you can begin to build your project:
Method 3 of 3:
Add Video To Your Project
-
 Select an event. In the Event Library, select an event you would like to use in your project.
- Note: If you don't see the Event Library, click the Event Library button, normally located in the lower left corner of the iMovie window.
- Click once on the event name to select the desired event. If you are creating a project with an iPhoto video captured on your iPhone or iPad, click on the iPhoto Videos, then select the desired video in the Event browser to the right of the Event Library.
-
 Select your video. In the Event browser, select a range of frames, or the entire video clip.
- To select an entire video clip, hold down the Shift key and click the clip once. It will be outlined in yellow.
- To select a portion of a clip (called a frame range), click and hold your mouse button and drag across any clip range. Selected frames are outlined in yellow.
-
 Drag your video selection to the Project browser. You can drag it anywhere: to the beginning or end of the project, or between clips you've already added. A vertical green line, along with a green Add (+) symbol, appears anywhere you can place the clip.
- The image below shows how the Project browser appears when you add your first video clip to a project.
- Video that's been added to a project is marked along the bottom with an orange stripe in the Event browser, so that you can see at a glance which video you've used. You can add the same video to multiple projects, and you can use it more than once within a project.
- Continue adding video in this way until you have all the video you want in your project. Next, you can enhance your project by adding music, photos, titles (text that appears onscreen, over your video), and more.


 Adjust the speed of watching videos in KMPlayer
  How to open the camera on laptop Windows 7/8/10
  How to convert the file extension XESC to MP4 by VLC
  How to fix the error that can't send videos via Messenger
  How to get YouTube video link in full screen
  How to Save Videos on Telegram on PC or Mac