How to find, set and change IP addresses on Linux
IP address is like a computer phone number. Computers use it to communicate with other devices and vice versa. Here are some simple ways to manage IP addresses on Linux.
How to find IP addresses and DNS addresses on Linux
Use the command line
Previously to do this, we used the ifconfig command, however, it was replaced with the ip command. To display the IP address type, type the following command:
ip addr show 
In the returned result, you will see a line showing the IP address in the Classless Inter-Domain Routing symbol (CIDR). Basically, it displays your IP address with the subnet mask. If you see dynamic in that line, your IP address is automatically assigned by DHCP.
- How IP addresses work
This output also displays information about devices or interfaces installed on the system such as wired and wireless laptop computers. The most common interface name is eth0, but in the Ubuntu system with systemd (in Ubuntu 16.04 and newer), the network interface is named ens33.
To get the DNS address associated with an interface type, type the following command:
nmcli device show < interface > | grep IP4.DNS 
Using the GUI
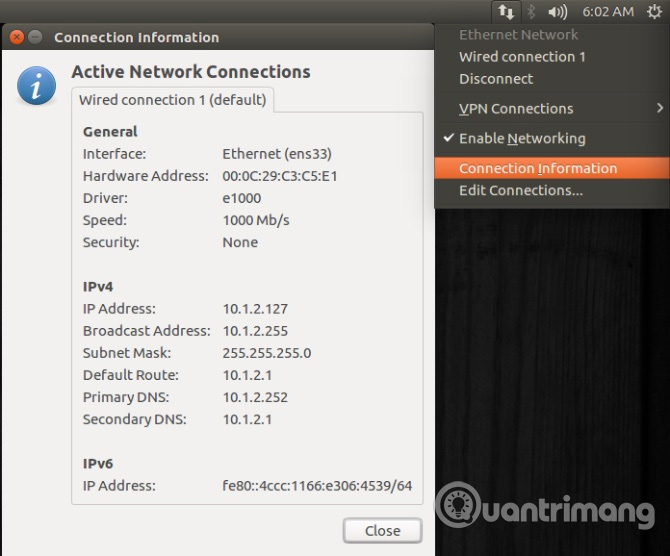
Displaying IP addresses in the GUI is also quite simple. On older systems, click Connection Information under the network icon from the top bar. IP address, DNS server will be displayed in the Connection Information window.

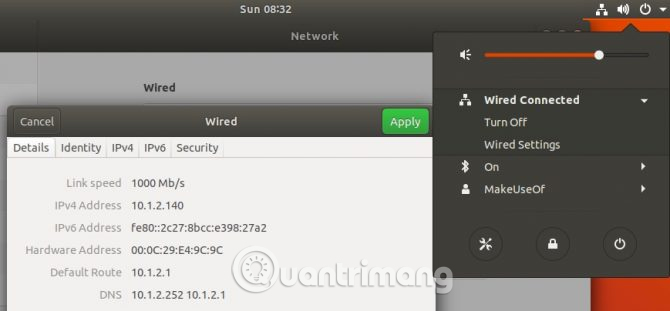
In newer versions of Ubuntu, you need to do some more. In the same network icon in the top bar, choose to install from the connected interface, click on the gear icon and see the IP address from the window that appears.

How to set or change IP addresses (on older systems)
Use the command line
Older desktop versions of Ubuntu use etc / network / interfaces . To display the contents of the file, you use the cat command and if the content looks like the image below then your system is using an older version of the network service.

Currently, your system is configured to automatically receive IP addresses using DHCP. To make changes, open the interfaces file using the nano command and set the values in the file if needed. First, change dhcp to static, then add the lines for your network address, netmask, gateway, and DNS server.
sudo nano /etc/network/interfaces 
After making the changes, close the file by pressing Ctrl + X and save the changes. Finally, restart the network service with the following command for your changes to take effect.
sudo /etc/init.d/networking restart Using the GUI
To configure your IP address in older Ubuntu systems, navigate to System Settings> Network , select the interface you want to configure and click the Options button. Click on the IPv4 tab, select Manual from the Method drop-down list and finally select the Add button.

Set up your Network Address, Netmask, Gateway and DNS servers. Finally, click Save to accept the changes to your new network configuration.
How to set or change IP addresses (on newer systems)
Use the command line
Network configuration has been completely changed with Ubuntu 17.10 with a new tool called Netplan. Netplan configuration files are located in / etc / netplan and like the older method, you can configure your network using a text editor.
Netplan uses the same syntax as JSON, which is Yet Another Markup Language (YAML). To make network changes, open the file located in / etc / netplan / to make the necessary changes:
sudo nano /etc/netplan/01-network-manager-all.yaml To set up an IP address, set the value in the file according to your network. Below is an example of an IP setup file, gateway and DNS address:
This file describes the network interfaces available on your system For more information, see netplan ( 5 ) . network: version: 2 renderer: networkd ethernets: ens33: dhcp4: no dhcp6: no addresses: [ 192.168.1.100/24 ] gateway4: 192.168.1.1 nameservers: addresses: [ 8.8.8.8,8.8.4.4 ] If you want to go back to receive the automatically assigned IP address via DHCP, set the file as follows:
This file describes the network interfaces available on your system For more information, see netplan ( 5 ) . network: version: 2 renderer: networkd ethernets: ens33: dhcp4: yes dhcp6: yes Run the following command to apply the changes or run it with the optional debug switch to get useful output, making sure your file is parsed correctly:
sudo netplan apply sudo netplay --debug apply Using the GUI
To set the IP address in the GUI, go to Settings> Network and click on the gear icon of the interface you want to configure. Click on the IPv4 tab, select Manual and enter your settings as required. Click Apply to accept changes and enjoy your new network settings.

How to set or change the hostname
Use the command line
Just like an IP address, your computer also has an address with the name of the device or hostname. Similar to the IP address, there are no two devices with the same hostname in the network and this hostname can be changed by a text editor. To set hostname type use the following command:
sudo nano /etc/hostname 
Click Ctrl + X to exit and save changes. The last file you need to edit is the / etc / hosts file . Below the line with localhost is the line showing your old hostname. Change the old hostname to a new hostname and click Ctrl + X to exit and save the changes. The last step is to reboot the device using the reboot command for the changes to take effect.

Host files are used to map hostnames to IP addresses and are common to most operating systems. For example, if you execute ping localhost from Terminal, it will resolve 127.0.0.1 because the first line in the host file. That's why we need to update it with the new hostname to make sure it resolves correctly.
Using the GUI
Although hostname changes can be made from the GUI, you need to edit the host file from Ternminal after the change in the GUI. To change the hostname, navigate to Settings> Details> About , change the Device name and close the window. Now, change the host file details as above and restart the system to change the effect.

Viewing or changing network and IP settings on Linux is really simple. There are also several other network commands you can run from Terminal. Refer to the article 7 useful commands for Linux networks.
See more:
- 5 tools to test Linux networks
- Display IP address on the system tray on Ubuntu
- Search for public IP address with Linux command