Table of Contents
How to Change DNS Google Ipv4 and Ipv6 on Windows 10 Fall is easier to understand when the core ideas are paired with practical examples. The sections below explain the topic clearly, highlight useful steps, and point out details that can prevent common errors.
One of the ways to increase Internet speed is to change DNS on the computer. Currently there are many DNS to help you access the network stably and quickly like DNS Singapore, DNS VNPT, DNS OpenDNS,. but most commonly still is Google DNS.Google DNS will ensure faster and more stable network access speed on your computer. Not to mention some errors related to Google services, Google DNS will also fix that error.
- The best, fastest DNS list of Google, VNPT, FPT, Viettel, Singapore
- 6 remarkable security features on Windows 10 Fall Creators Update
Google DNS 8888 for IPv4
Step 1:
First, press the Windows + I key combination to open the Windows Settings interface on the system. Then click on the Network & Internet setup group.

Step 2:
Next, click Status settings in the left menu bar outside the same interface. Users will look to the right content and click on Change connection properties .

Step 3:
This is the interface that will provide all network connection information on the computer, click the Edit button under IP assignment .

Step 4:
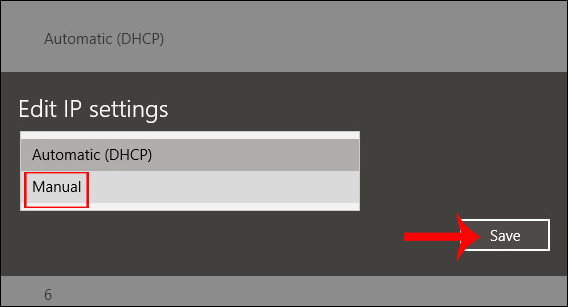
The Edit IP Settings dialog box appears so users can change their IP address, click on Manual, then click Save below.
Step 5:
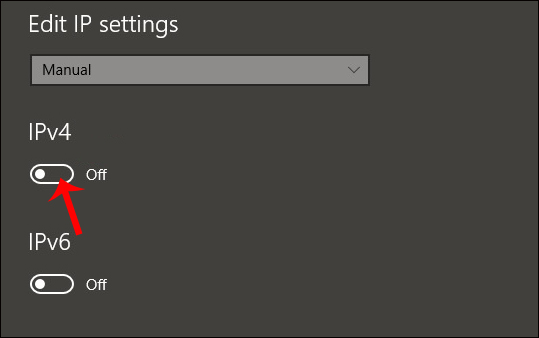
Then at IPv4, push the horizontal bar to the right to switch to On mode.
Step 6:
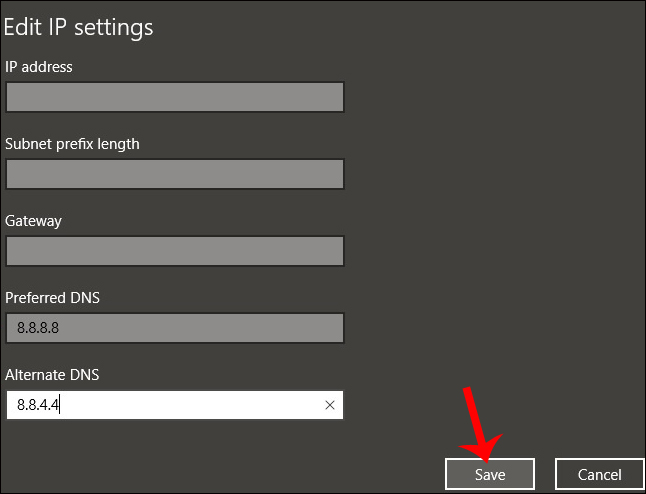
IPv4 options appear in the new interface. Drag the interface down to 2 Preferred DNS and Altemate DNS lines , then enter the Google DNS address information as shown. When done, you need to press Save to save the new changes.
Google DNS:
8.8.8.8 8.8.4.4
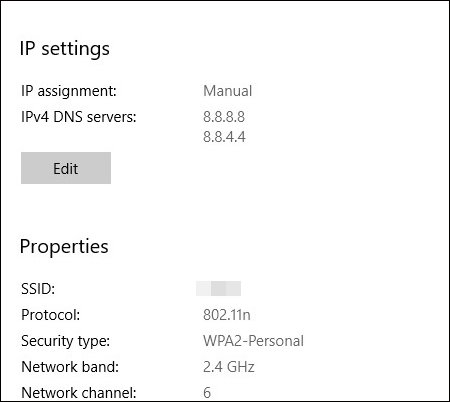
Immediately network connection information on the computer will be changed and supplemented with Google DNS as shown below.
Google DNS for IPv6
If the operator already supports IPv6, then in step 5, you just need to turn on IPv6, and enter this DNS Google IPv6:
- 2001: 4860: 4860:: 8888
- 2001: 4860: 4860:: 8844
Some devices use separate fields for all eight IPv6 address sections and do not accept abbreviated syntax:: of IPv6. For such schools, enter:
- 2001: 4860: 4860: 0: 0: 0: 0: 8888
- 2001: 4860: 4860: 0: 0: 0: 0: 8844
FAQ
What should you know about google DNS for IPv6?
If the operator already supports IPv6, then in step 5, you just need to turn on IPv6, and enter this DNS Google IPv6:
What is How to Change DNS Google Ipv4 and Ipv6 on Windows 10 Fall?
One of the ways to increase Internet speed is to change DNS on the computer.
Why is How to Change DNS Google Ipv4 and Ipv6 on Windows 10 Fall important?
A clear understanding of How to Change DNS Google Ipv4 and Ipv6 on Windows 10 Fall helps you make informed decisions, avoid common mistakes, and use the relevant tools or techniques more effectively.
Related Articles
 What Is Ipv6: How to Transfer Ipv4 Addresses to Ipv64 minutes read
 Disable Ipv6 to Troubleshoot Internet Connectivity Issues on4 minutes read
 How to Convert IPv4 Addresses to IPv66 minutes read
 How to Fix 'IPv4/IPv6 No Internet Access' Error on Windows10 minutes read
 What Is Ipv6: About Ipv6 Address24 minutes read
 Ipv4 Address: 9 Things to Know When Moving to Ipv68 minutes read
Reader Comments 0
Sign in with email or Google to join the discussion.