How to Add/Remove Libraries in File Explorer Windows 11
This guide will show you how to add or remove Libraries in the File Explorer navigation pane for your account or all users in Windows 11.
Windows 7 introduces Libraries, which provide users with a single, coherent view of their files even when those files are stored in multiple locations. Users can configure and organize libraries. Libraries can contain folders found on the user's computer as well as folders that have been shared over a network. Libraries provide a simpler view of the underlying storage system because, for users, files and folders in Libraries are displayed in a single view, regardless of where they are actually stored.
In File Explorer, users interact with Libraries in the same way they interact with other folders. Libraries are built on top of old known folders (like Camera Roll, Documents, Music, Pictures, Saved Pictures, and Videos), and these known folders are automatically included in the default libraries and set as the default save locations.
The navigation pane is the leftmost pane in File Explorer that's used to find files, folders, and drives on your PC or network.
Note :
- If you turn on Show all folders in the navigation pane, Libraries will always be visible in the navigation pane.
- Your libraries are located in the hidden %AppData%MicrosoftWindowsLibraries folder .
Add/Remove Libraries in the File Explorer navigation pane in File Explorer
1. Open File Explorer ( Win + E ).
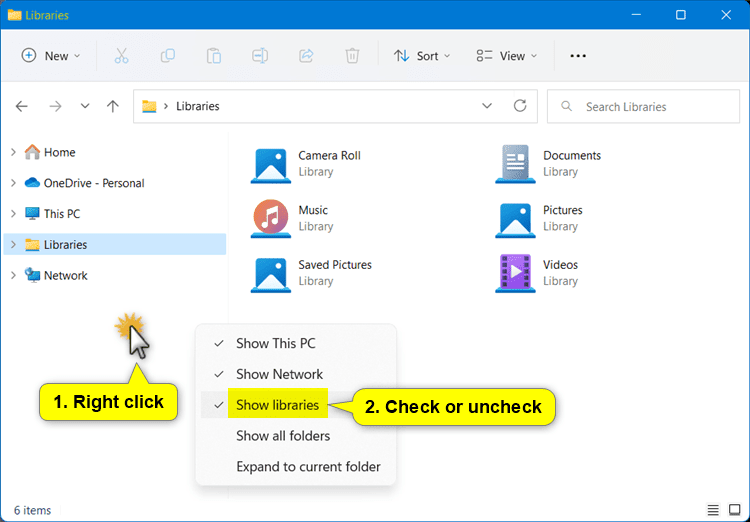
2. Right-click or press and hold on an empty area inside the navigation pane and click Show libraries to add (checked) or remove (unchecked - default) depending on what you want.

Add/remove Libraries in File Explorer navigation pane in Folder Options
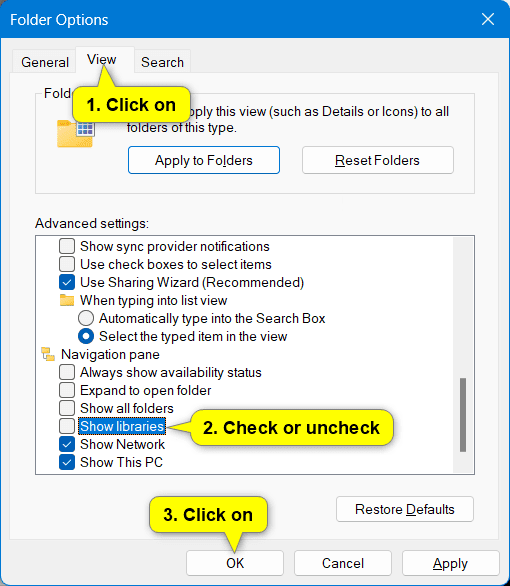
1. Open Folder Options.
2. Click the View tab .
3. In the Navigation pane section , select (add) or uncheck (remove - default) Show libraries depending on what you want.
4. Click OK .

Add/remove specific libraries under Libraries in the File Explorer navigation pane
Note : Removing a library from the Libraries section of the File Explorer navigation pane doesn't delete the actual library from the Libraries section.
1. Open Libraries in File Explorer ( Win + E ).
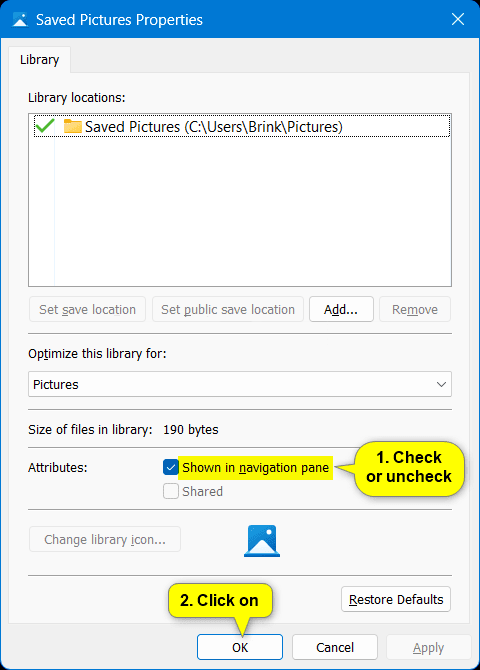
2. Right-click or press and hold on the library (e.g. "Saved Pictures") you want to add or remove, then click Properties .

3. Check (add - default) or uncheck (remove) Show in navigation pane under Attributes depending on what you want, then click OK .

Good luck!