Detailed guide on how to install an M.2 SSD in your PC: A quick at-home tutorial.
Detailed instructions on how to quickly and safely install an M.2 SSD in your PC. Check out the steps for checking your motherboard and installing the drive to effectively speed up your computer..
Users often experience slow computer startup times or long application loading times due to using outdated hard drives. Upgrading to a new storage drive is an effective solution to improve computer system speed. This article will guide you step-by-step on how to install an M.2 SSD in your PC, allowing you to safely and effectively do it yourself at home.
Key points
- Before installation, check your motherboard to ensure you select the correct M.2 SSD (NVMe/SATA) and compatible connector type to avoid purchasing the wrong one.
- Prepare the included screwdriver and M.2 screws; always turn off the power and discharge static electricity before working to ensure the safety of the components.
- Installation procedure: Insert the hard drive into the M.2 slot at an angle, press it down gently, and tighten the screws to secure it to the support.
- After installation, you need to access the BIOS to check and use Disk Management in Windows to initialize and format the new hard drive.
- Loose connections or using the wrong type of drive are common reasons why a PC might not recognize a hard drive after installation.
1. Preparation before installing an M.2 SSD in your PC.
1.1. Check which M.2 SSD standard your motherboard supports.
Users need to carefully read the motherboard specifications from manufacturers such as ASUS, MSI, or Gigabyte to determine whether their machine supports NVMe or SATA protocols. Distinguishing between these two standards visually is quite simple.
On some older motherboards, the M.2 slot directly shares bandwidth with a standard SATA port. If you plug an older HDD into that conflicting SATA port, the system will automatically disconnect and not recognize the device.
To differentiate, M.2 SATA SSDs typically have a B+M Key connector (two notches). Meanwhile, high-performance M.2 NVMe SSDs usually use an M-Key connector (one notch) to take full advantage of the four PCIe lanes.
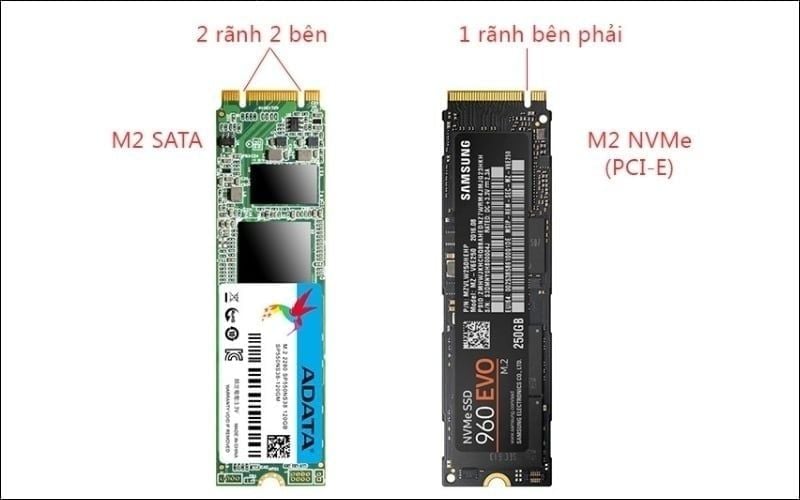
NVMe typically uses a single-slot M-Key connector, while SATA connectors usually use a two-slot B+M-Key connector.
1.2. Necessary disassembly tools
Technicians always advise users to turn off the power, unplug the power cord, and touch a large metal surface to discharge static electricity before starting any work. Below are the essential tools that need to be prepared:
- The Phillips head screwdriver has a magnetic tip to prevent screws from falling into tight spaces.
- M.2 screws and standoffs are included in the motherboard box.
- Genuine M.2 SSD hard drive compatible with the system.
2. Steps to install an M.2 SSD into the motherboard
2.1. Locate slot M.2
The M.2 slot on a motherboard is usually located directly below the CPU area or interspersed between the PCIe slots for the graphics card . On smaller motherboards, this location may be obscured by the graphics card's heatsink. Users need to remove the graphics card to create a more spacious and safer workspace.
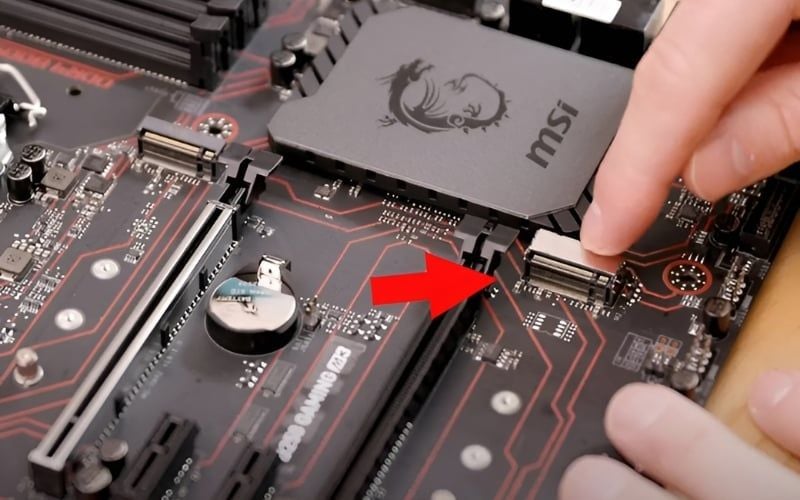
Locate the M.2 slot on the motherboard.
2.2. Heat sink and support structure treatment
If the motherboard has a built-in heatsink covering the heatsink slots, use a screwdriver to remove this aluminum cover. The next mandatory step is to peel off the thin protective film under the heatsink before reattaching it.
Next, locate the correct screw holes on the motherboard corresponding to the physical size of the 2280 hard drive. Use your hand or small pliers to tighten the support bracket into this position to create a base for the component.
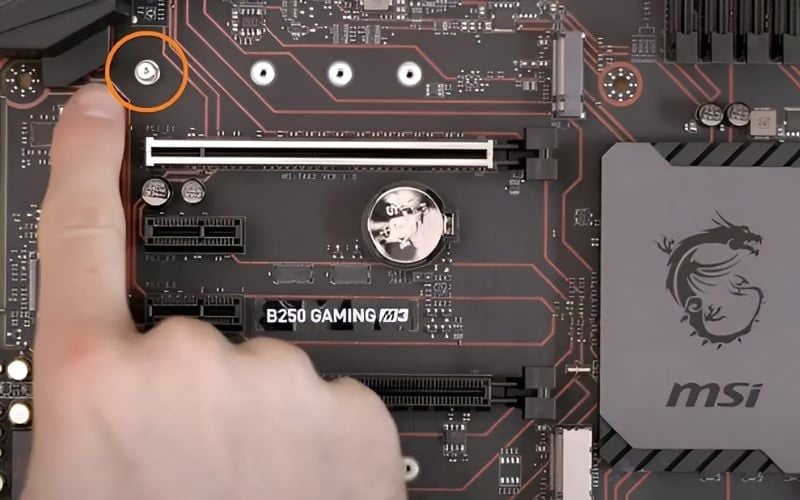
Locate and tighten the mounting bracket for the M.2 2280 standard hard drive on the motherboard.
2.3. Insert the M.2 SSD into the slot.
When handling components, users should only hold the two edges on either side of the circuit board. Absolutely avoid touching the surface of the memory chips or the copper contact pins directly with your fingers to prevent static electricity from damaging the device.
Position the copper pins of the hard drive towards the M.2 slot, creating an angle of approximately 30 degrees relative to the motherboard surface. Then, gently push straight forward to allow the copper pins to fully insert and fit snugly into the slot.
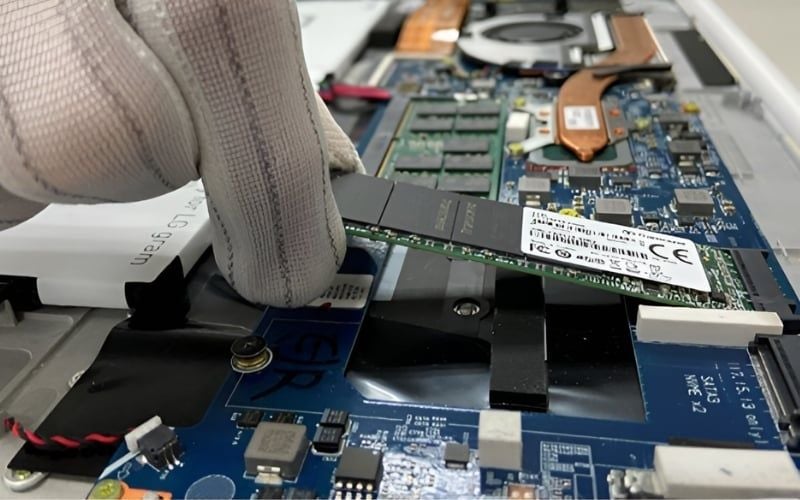
Hold the SSD by both edges and insert it into the motherboard at a 30-degree angle.
2.4. Tighten the screws to secure the components.
Using a finger, gently press the notched end of the SSD down against the support. Insert the M.2 screw into the hole and use a screwdriver to tighten clockwise to secure the component to the motherboard. Finally, reattach the heatsink, tighten the heatsink screws, and close the case.
Note when tightening screws to secure components:
- Tighten the screws just enough to hold the SSD horizontally parallel to the motherboard.
- Never overtighten, as this could crack the motherboard.
- Do not force the component down if the copper pins are not fully aligned with the slot.
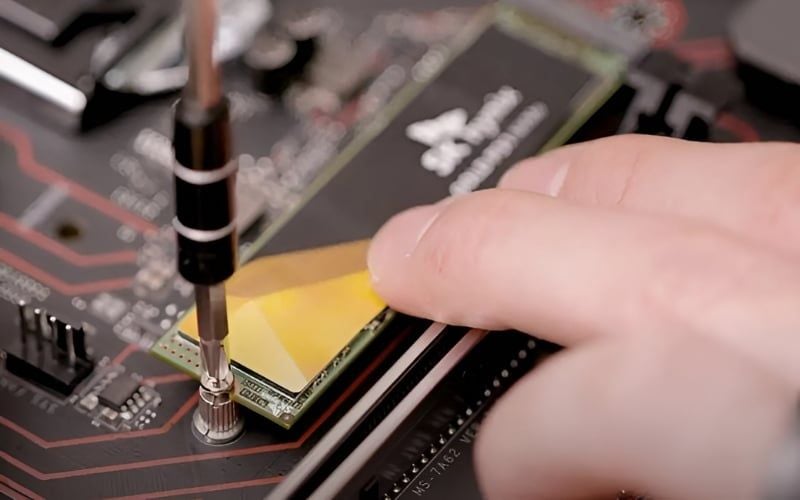
Tighten the SSD screws moderately, avoiding overtightening, to ensure proper installation.
3. Configure the software so that the PC recognizes the M.2 SSD.
3.1. Check for recognition in BIOS
The user starts the computer and simultaneously presses the Del , F2 , or F12 shortcut key repeatedly to access the BIOS/UEFI interface. Navigate to the Storage System or Boot Menu option on the screen. If the system displays the correct model name of the newly installed hard drive, the hardware has been successfully recognized and is ready for formatting.
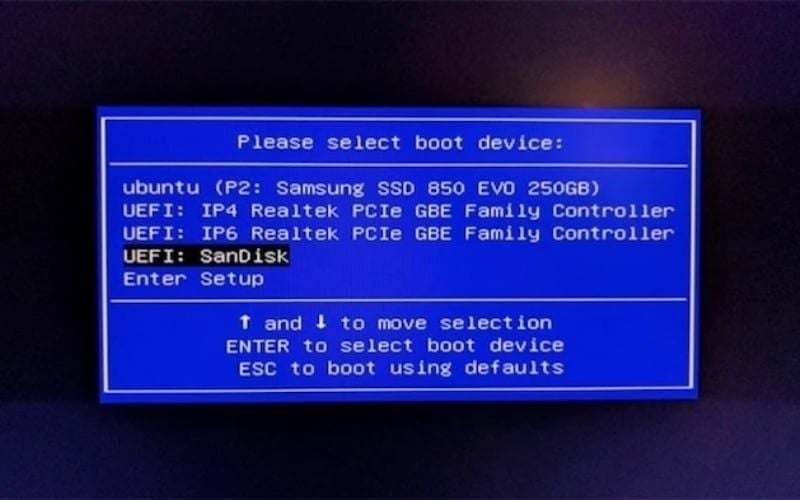
The correct model number displayed for the newly installed hard drive indicates that the system has recognized the M.2 SSD.
3.2. Creating Partitions in Windows
- Step 1: Right-click on the Start icon and select to open the built-in Disk Management tool in Windows.
- Step 2: A notification window will appear; select Initialize Disk and check the box next to the GPT standard suitable for your new PC configuration.
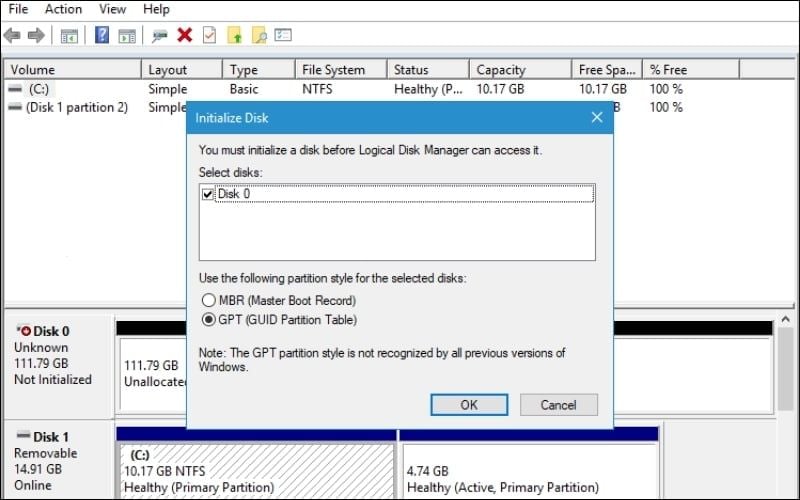
Select the GPT standard in the Initialize Disk tab.
- Step 3: Right-click on the empty space highlighted in black with the label " Unallocated ," then select "New Simple Volume ." Format it to NTFS, assign a drive letter, and click Next repeatedly to complete the partition setup process.
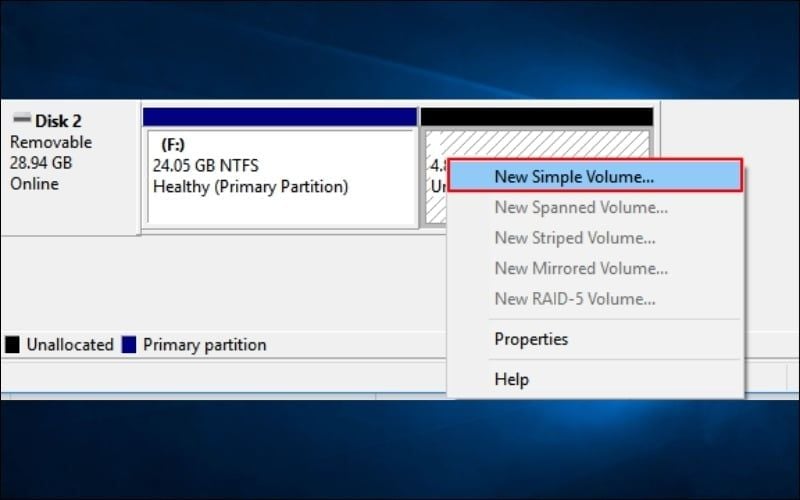
Right-click on the black area and select New Simple Volume
4. Upgrade to a reliable M.2 SSD at GearVN.
GearVN specializes in providing high-end PCs, laptops , PC components ( RAM , CPU, SSD, etc.), and gaming equipment ( monitors , headphones, keyboards, mice, etc.) to meet all the needs of gamers and technology users. In particular, GearVN stands out with advantages such as:
- Diverse products and optimized configurations: GearVN offers a wide selection from major brands such as Corsair, Samsung, Kingston, TeamGroup, Gigabyte, etc. All products are carefully selected.
- Competitive pricing and numerous promotions: GearVN regularly runs attractive promotions and discounts on special occasions. You can easily own your desired components at the best prices, along with attractive gifts or flexible installment payment options.
- Reliable warranty and after-sales service policy: When shopping at GearVN, you can rest assured with our clear warranty policy and dedicated technical support team. Experienced specialists will advise you on choosing the right product and answer any questions you may have during use.
- Convenient shopping experience: Whether you want to experience our products in person at our showrooms or shop online through our website with fast delivery service, GearVN offers maximum convenience.
GearVN contact information :
- Website : gearvn.com
- Hotline : 1900.5301

Buy genuine SSDs at GearVN
5. Frequently Asked Questions When Installing an M.2 SSD
5.1. Can an M.2 NVMe drive be installed on an older motherboard that only has PCIe slots?
Users can easily install newer storage devices via an adapter card that converts the signal from the PCIe slot to the M.2 port. However, if you want to use this hard drive to install Windows and boot the computer, you may need to modify the BIOS on older motherboards.
5.2. What should I do if the M.2 screw is missing?
Never use glue, double-sided tape, or electrical tape to secure the hard drive, as the heat generated during operation will melt the glue, causing a short circuit and damaging the components. It is recommended to purchase a set of replacement standoff screws or take the computer to a technical center for proper screw installation.
See more:
- Signs that your SSD is about to fail that you need to know immediately.
- Should you buy a used SSD? Risks and how to check for safety.
- How to transfer data from an old SSD to a new SSD without reinstalling Windows.
Understanding how to properly install physical drives and configure the correct software formatting helps maximize the speed of your computer's storage system. If you encounter difficulties during installation or need advice on upgrading components, please contact our hotline at 1900.5301 or bring your computer directly to the nearest GearVN showroom for prompt assistance from our technicians.