Create email filters with Kmail
 KMail - KMail is a feature-rich email client for desktop users. In this article we will introduce you to KMail's complex email filtering system.
Email filters allow you to categorize incoming emails based on a number of criteria, then assign them attributes, move or even answer based on certain attributes. Kmail offers a wide range of useful options, making it easier to handle a large number of incoming emails.
Setting up filters in Kmail is relatively simple, when you read through this tutorial, you will get a way to create the most efficient and tidy mailbox. In this tutorial, we will perform an example to configure Kmail to receive all emails sent to tavis at maketech.com and automatically transfer them to another folder in the Inbox. In this way, all MakeTech emails will have a separate folder.
To create a new email filter, launch KMail or Kontact and follow these instructions:

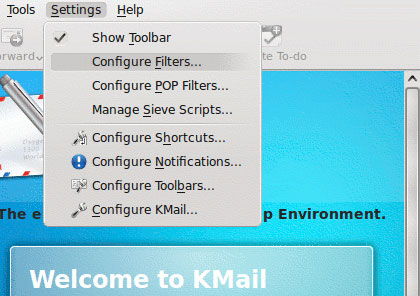
1. Click ' Settings '
2. Click ' Configure Filters '
(The configuration dialog will appear)
3. Click ' Rename ' to change the name of the default filter.
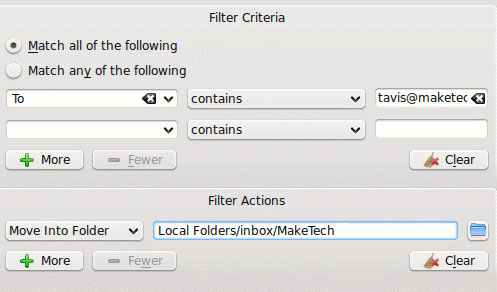
4. Select ' Match all of the following ' or ' . any of the following '. The first option will check every role for mail. The second option will continue even if it finds one of the rules.
Under ' match ', you will see three columns of drop-down menus. Theoretically there is no restriction on the number of rows you can add by pressing the ' More ' button, but for now, we will do it with a row.
The first column tells Kmail which field to extract data (such as Subject, To, Message Body), for example you can select ' To '. The second column tells you how to interpret any data it finds ( contains , does not contain , is in the category ). Leave the option ' contains ' for this column. The last column is where you enter the words, numbers or characters you want the filter to find. In this case, the email address' tavis ', plus sign ' at ' and ' maketech . com '.
In the box below, you will see ' Filter Actions ', this dialog box specifies which action the filter will take with the message when it concludes that the message corresponds to the standard. There are also many other options you can choose such as Move into Folder, Mark As, and Forward To . In this example, we selected ' Move Into Folder '. In the second column, click the browse button with the folder icon to the right of it and select Inbox. Then click ' New Subfolder ', and name it MakeTech .

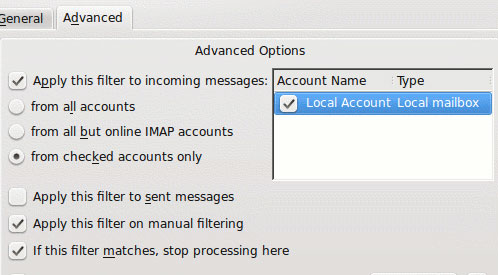
At the top, click the ' Advanced ' tab. Here, you can decide which filters apply to which accounts. You can use filters for sent emails, though this setting is disabled by default. 'Add this filter to the Apply Filter menu' is a very important feature. What it does is allow you to make filtering effective over time. Suppose that you have received 500 emails from MakeTech, this feature will allow you to use your new filter for your inbox. It can scan inbox and transfer emails corresponding to your proposed criteria into a new folder. When finished configuring the filter, click ' OK '. The new filter will work with any incoming mail from now on. If you want to add other filters, click ' New filter ' on the left side of the setting screen.

In addition to the above example, with Kmail's filtering system, you can also set it to perform more complex actions. For example, allow common expressions, digital data, SPAM filtering, etc. However, the program also has a term in the number of filters you can use.
You should read it
- ★ Instructions for setting up Mozilla Thunderbird to set up email scheduling and automatic mail replies
- ★ Instructions for using filters in Yahoo Mail
- ★ How to set up the default email client on Windows 10
- ★ How to Set Default Email Client in Windows 11
- ★ Launch Email editor quickly from web browser