Connect two computers with a USB cable
There is an easy way to connect two computers using a USB-USB cable. With this connection you can completely transfer files from one computer to another, and can even build a network.
Gabriel Torres
There is an easy way to connect two computers using a USB-USB cable. With this connection you can completely transfer files from one computer to another, and can even build a small network to share the Internet connection with the second computer. In this tutorial we will show you how to connect two computers with this cable.
The first thing you need to know in this connection is that there are different types of USB-USB cables currently on the market. The type used to connect two computers called 'bridged' (or USB network cable - 'USB networking cable'), since it has a small electronic circuit in the middle, this electronic circuit will allow two computers. can exchange with each other. There is also a cable called A / A USB, although it has two standard USB jacks at each end without a bridge chip and thus cannot be used to connect between two computers. In fact, if you use an A / A cable, you can 'burn' the USB ports of computers or even their power supply parts. Because of this, the A / A cables are almost ineffective. A / A cables are only used to connect your computer to peripheral devices such as printers or scanners, so they are not suitable for your needs in this topic.

Figure 1: USB-USB bridge cable

Figure 2: Bridge between cables
In terms of speed, bridge chips can be USB 1.1 (12 Mbps) or USB 2.0 (480 Mbps). Therefore, we recommend that you buy a USB 2.0 bridge cable because of its speed. Remember, the standard Ethernet network works at 100 Mps, so the USB 2.0 cable will provide you with a transfer rate of nearly 5 times the standard network connection.
Inside the bridge of the cable there is a bridge chip and that is why it is more expensive than a simple A / A cable without the bridge circuit in between.

Figure 3: Bridge chip
Now that you know the type of cable you should buy for this connection, we will talk about the installation below.
Setting
This cable can work in two modes: link mode and network mode. In federation mode, it works just like the old 'lap link' cables, meaning it needs a software so you can select files and drag them to where you want to transfer or copy to or from the computer. remote control If you just want to copy files, that's the mode we recommend using, because it's easier and faster in both installation and use.
In network mode, you will create a small network between two computers. After creating this network, you can share files, printers and Internet access. This mode is recommended if, besides copying files, you want to access a printer located on another computer (or any computer on the network, if the computer is connected to the network) or want to access the Internet.
The process of installing this cable depends on the cable manufacturer. You need to install the programs and drivers that come with the cable on the CD-ROM. This procedure must be performed on both computers without the cable.
So you must not install the cable first, leave it there.
Some manufacturers offer two different installation files, one for link mode and one for network mode. Some other factories only offer a valid installation file for both modes. You then need to select the mode you want to use during the installation process or within the transfer program to be installed.
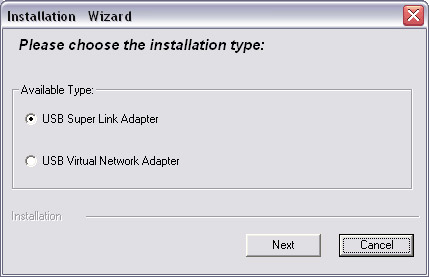
Figure 4: Select the mode during installation
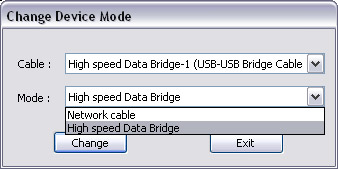
Figure 5: Select the mode inside the transfer program
After installing the corresponding drivers (link mode and network mode), you need to plug the cable into the computer. Windows will recognize it and install the correct driver.
If you have installed the program and driver when the cable is attached to the computer, you need to remove it from the computer and reinstall it. This will cause Windows to recognize and install its driver.
Repeat this procedure for the second computer.
If you want to change the working cable mode, you need to run the setup program for another mode or choose to change the mode in the transmission program, depending on the model of the cable. This procedure should be performed when no cables are attached to the computer before. After changing the mode, you reinstall the cable and the system will recognize it automatically. If you run the installation program or change the mode with the pre-installed cable, remove the cable from the computer and install it again to make Windows install the correct drivers (the driver used in link and processing mode). Network level is completely different). You need to repeat this process for another computer.
Now that the cable is installed, see how to use it in both modes
Link mode (Link Mode)
As we mentioned, link mode is the simplest and fastest way to connect two computers with a USB cable for transferring files on it. If you want to access the Internet or access the printer, you need to do it in network mode.
After installing the cable as described above, you need to check if the cable is properly installed in Device Manager (right-click My Computer > Properties > Hardware > Device Manager ). It needs to be listed in ' Universal Serial Bus controllers ', see Figure 6 (the cable in this example is listed as ' Hi-Speed USB Bridge Cable ', but your cable may use a different name) .
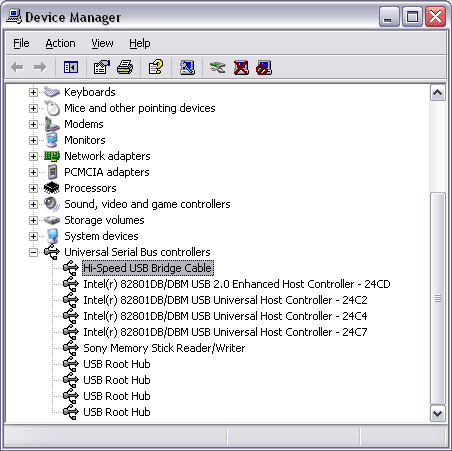
Figure 6: USB-USB cable has been installed correctly by link mode
To transfer files, you need to open the installed transfer program when you run the installation file. Our program is PClinq2 , this is the program that needs to be opened on both computers.
The use of this transmission program is also very easy. In its left part, you will see the computer name and on the right side you will see the remote computer. Just select the drive / partition and folder / files you want to transfer and drag them to the desired section. Nothing is easier!
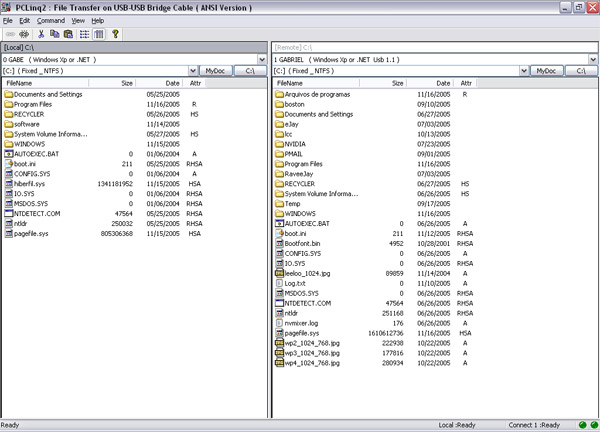
Figure 7: Transmission program
Network mode (Network Mode)
As we mentioned, in network mode, computers will be linked into a small network and the connection will work like a network. This mode allows you to share your Internet connection.
After installing the cable as described above, you need to check if the cable is installed as a network adapter in Device Manager (right-click My Computer > Properties > Hardware > Device Manager ) or not yet It must be listed in the ' Network adapters ' section, as shown in Figure 8 (cable in the example named ' Hi-Speed USB-USB Network Adapter ').

Figure 8: USB-USB cable is properly installed using network mode
The next step is to configure both computers to use a USB cable as a network adapter.
You must first configure the computer with Internet access. In this computer, open Network Connections ( Start > Settings > Network Connections ) and you'll see there are network adapters on the computer. In our computer ' Local Area Connection ' is the network adapter connected to the computer with the Internet (to the broadband router) and ' Local Area Connection 2 ' is a USB-USB cable, see Figure 9.

Figure 9: Network connections
Right-click the network card connecting your computer to the Internet (in this case ' Local Area Connection '), select Properties and on the window that appears, click on the Advanced tab. Here, check the ' Allow other network users to connect through this computer's Internet connection ' checkbox. Depending on the version of Windows XP, there will be a ' Home networking connection ' menu, where you need to select a USB cable connection (in this case ' Local Area Connection 2 ').
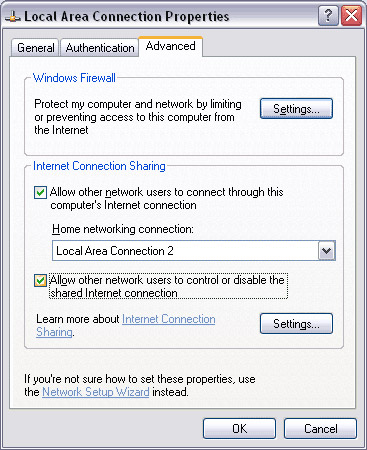
Figure 10: Allow Internet sharing
After you have done this configuration, you must restart the computer. After restarting the computer, everything will work fine. By browsing the network from another computer to see if everything works well or not.
To share files and printers, you can read our instructions on how to share files and printers on the network. If you do not use a broadband router on a computer with an Internet connection, be very careful because sharing may accidentally cause anyone on the Internet to access your files.
If the remote computer cannot access the Internet, check if the USB cable is configured for an IP address automatically. Go to Start > Settings > Network Connections , right-click the cable connection (' Local Area Connection 2 '), select Properties then on the new window that appears, double-click ' Internet Protocol (TCP / IP) '. Both options included in this screen will display with the settings automatically ' automatically ', as shown in Figure 11. Both computers need to be configured in the same way.
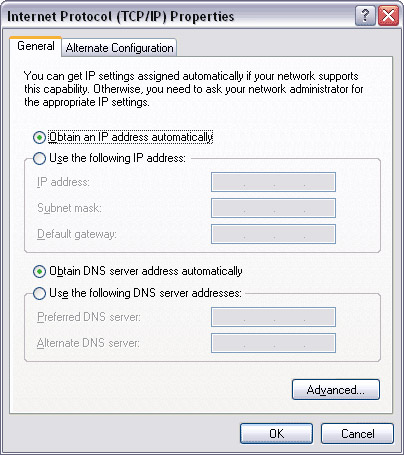
Figure 11: TCP / IP configuration needs to be set up automatically for both computers
Was this article helpful?
Your feedback helps us improve.
Related Articles
 How to quickly connect 2 computers with a network cable7 minutes read
 These are the types of printer cables needed to connect to the computer6 minutes read
 How to Connect Two Computers10 minutes read
 How to Connect Two Computers Together Using a Network Cable4 minutes read
 How to Connect Two Computers Together with an Ethernet Cable7 minutes read
 How to Connect a Smart TV with Cable (Smart TV Setup)8 minutes read
Reader Comments 0
Sign in with email or Google to join the discussion.