Connect anywhere with OpenVPN and Tomato
Wear Management - In the previous article we showed you how to install and tips on using Tomato, an open source firmware for routers on the Linksys WRT54GL. Today we will continue to exploit the features of this firmware by installing OpenVPN with Tomato, then setting up to be able to access the network anywhere in the world.
>>>Enhance OpenVPN security with One Time Password on Ubuntu
What is OpenVPN?
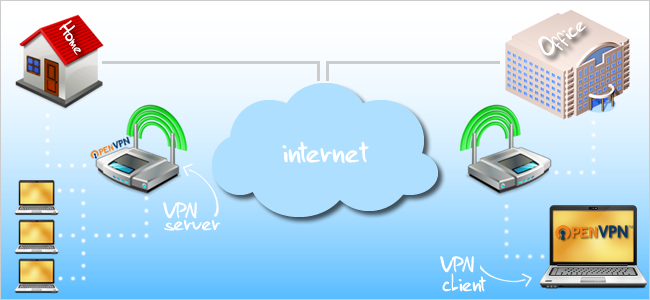
Basically, a VPN is a private network that uses a public network (usually the Internet) to connect remote locations or users to a LAN at the central office. Instead of using a rather complex connection like a digital subscriber line, VPN creates virtual links that are transmitted over the Internet between an organization's private network with a remote location or user.
Virtual Private Network (VPN) is a very secure, reliable connection between a local area network (LAN) and another system. You can imagine your router as a bridge to connect the network. Your computer and the OpenVPN server (in this case the router itself) will " shake hands " with each other using a certificate of mutual affirmation. After confirmation, both the client and server will agree to 'trust ' each other and allow access to the server's network.
Usually, deploying VPN software and hardware is time-consuming and costly, so OpenVPN is a completely free open source VPN solution. Tomato with OpenVPN is now considered the most perfect solution for those who want a secure connection between two networks without any extra cost. However, the default of OpenVNP does not work as expected. So we need to tweak and reconfigure it a bit. Here are the steps to take:
Request
To do this tutorial we need a computer running Windows 7 with an admin account. If you are using Mac or Linux, this guide will also help you understand its performance, but you need to do more research to be most effective for yourself.
We will install a special version of Tomato called TomatoUSB VPN on the Linksys WRT54GL version 1.1 router. To check if your router is compatible with TomatoUSB, please go to the TomatoUSB Build page to see it.
Before we start we need to install the original firmware on the router or Tomato firmware that we described in the previous article.
Install TomatoUSB
In the previous tutorial, we installed the Tomato v1.28 firmware from PolarCloud 's website. However, this version does not support OpenVPN, so we need to install a new version called TomatoUSB VPN .
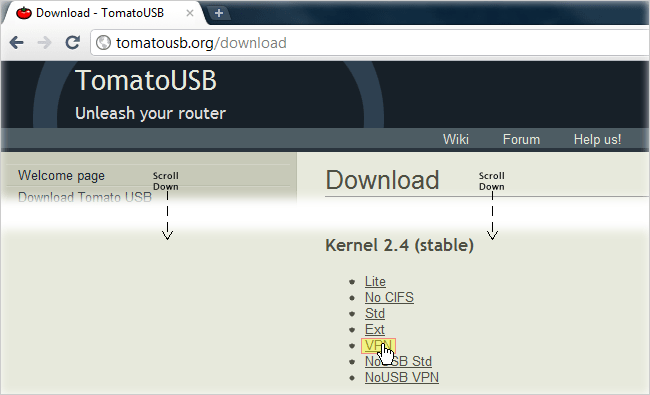
First go to TomatoUSB's homepage and click the Download Tomato USB link to download.

Scroll to the bottom of the page, in the Kernel 2.4 (stable) section, click the VPN link to download your file with the .rar file .
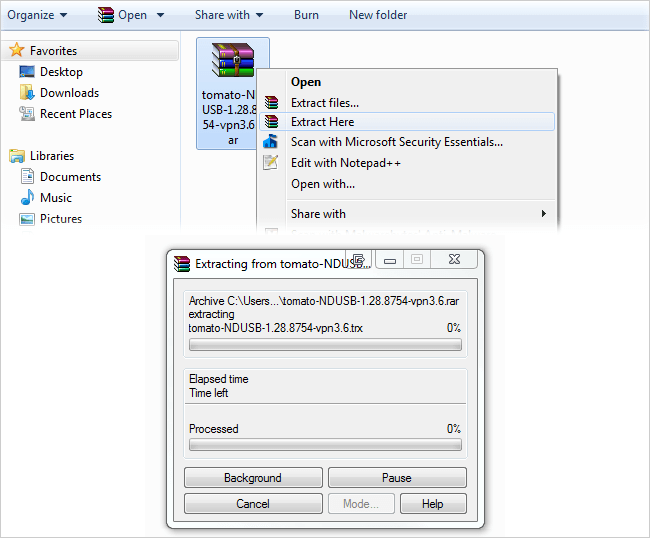
Then you use the decompression program (like WinRAR) to extract the downloaded file. You will receive two files, CHANGELOG and tomato-NDUSB-1.28.8754-vpn3.6.trx .
1. Where the router is running Linksys firmware
Open your browser and enter the IP address (default is 192.168.1.1 ). Enter ' admin ' for both "username" and "password" fields when requested.

Login successfully, click the Administration > Firmware Upgrade menu .

Click the Browse button and navigate to the extracted TomatoUSB file, select the tomato-NDUSB-1.28.8754-vpn3.6.trx file , then click the Upgrade button on the browser interface.
Your router will start installing TomatoUSB VPN, this process takes a few minutes to complete. After the update process finishes, open the command prompt dialog box and enter ipconfig –release to redefine the new IP address for the router, then type ipconfig –renew to give it a new address. The numbers next to the Default Gateway line will be the router's new IP address.
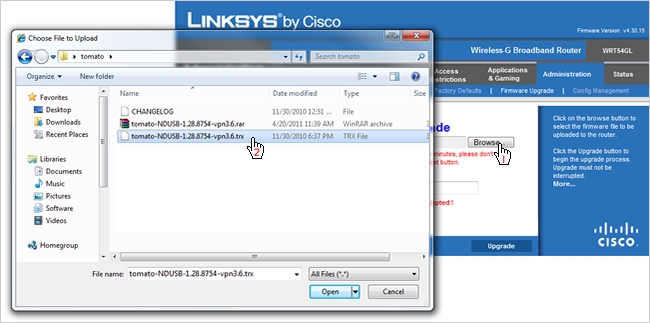
Note: After installing Tomato, go to Administration > Configuration and select ' Erase all NVRAM . '.
2. If the router is running Tomato firmware
Open your browser and enter that IP address and then log in as above.

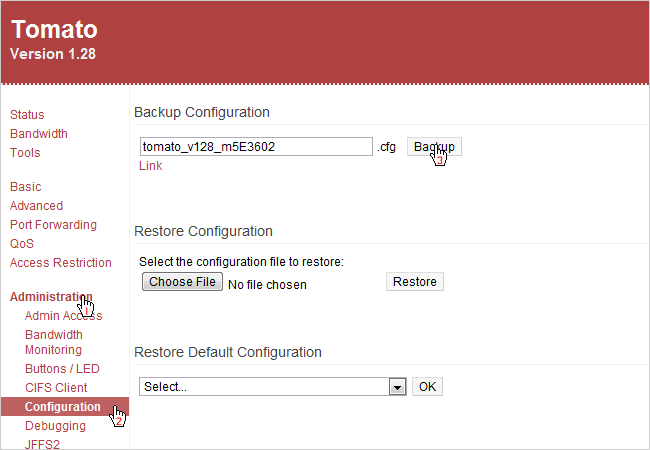
Although it is not necessary, you can also back up the Tomato configuration before proceeding to upgrade to TomatoUSB VPN. To save the configuration, go to Administration > Configuration and click Backup . This will ask you to save a file in .cfg format on your computer.
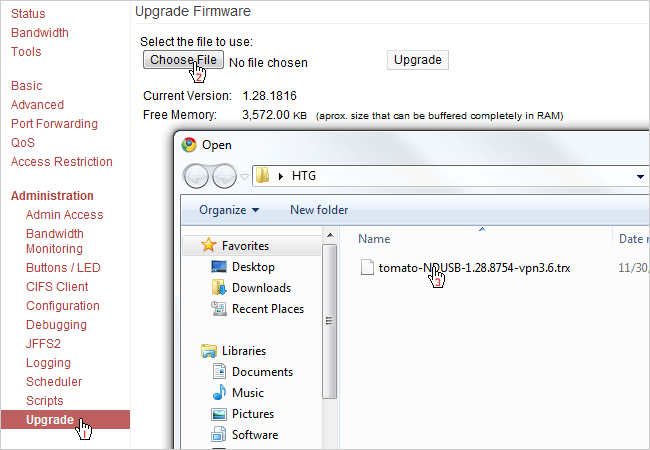
Now is the time to start upgrading Tomato to TomatoUSB VPN. Under Administration menu select Upgrade , then click Choose File button, navigate to the unzipped folder and select tomato-NDUSB-1.28.8754-vpn3.6.trx . Press Upgrade .
The dialog box asks for confirmation of upgrade, press OK .
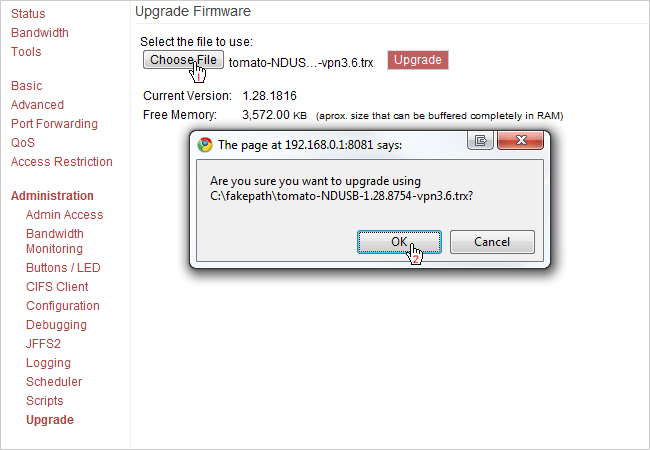
Wait a few minutes for the router to update and restart automatically.
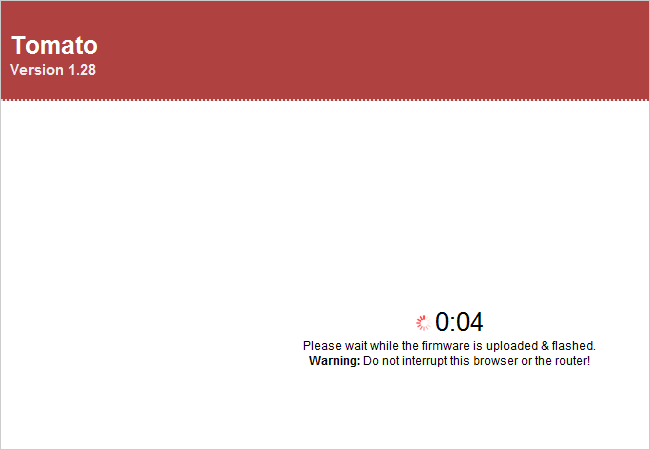
After restarting, you will probably get another IP address. In our case, the IP address remains the same. To determine the IP address, open the command prompt and type ipconfig –release , then ipconfig –renew and look at the Default Gateway line.
If your configuration is returned to the default, go to the Configuration page ( Administration > Configuration ) and click the Choose File button under Restore Configuration . Find the .cfg file you just saved in the previous step and click Restore .
Configure OpenVPN
After upgrading to TomatoUSB VPN, at Tomato interface, there will be a new menu, Web Usage, USB and NAS , and VPN Tunneling . In this example we are only interested in the VPN Tunneling menu, click it and keep the browser open and go to the next step.

The next step is to go to the OpenVPN home page and download the OpenVPN Windows Installer OpenVPN version 2.1.4 . Note that while the latest version is 2.2.0, there is an error that makes this process much more complicated. The OpenVPN program that we downloaded will allow you to connect to the VPN network, so install it on any computer you want it to be a client. Save openvpn-2.1.4-install.exe on your computer.
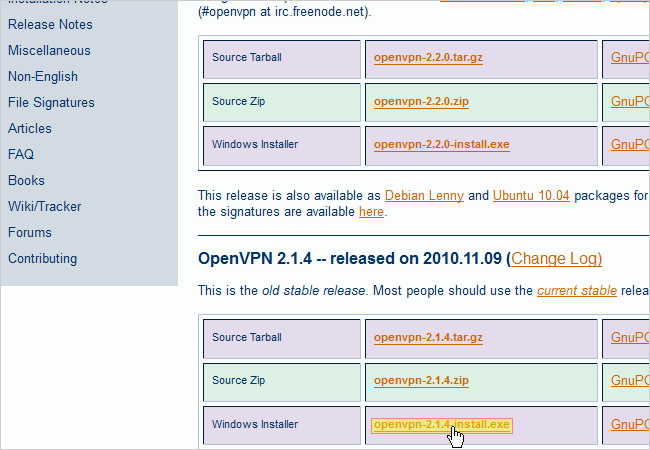
Navigating to the OpenVPN file just downloaded and double-clicking on it, the installation process will begin. The installation is very simple, just keep the default options and click Next . During installation, a small pop-up dialog box will appear and ask if you want to install a new virtual private network adapter named TAP-Win32 , click Install .
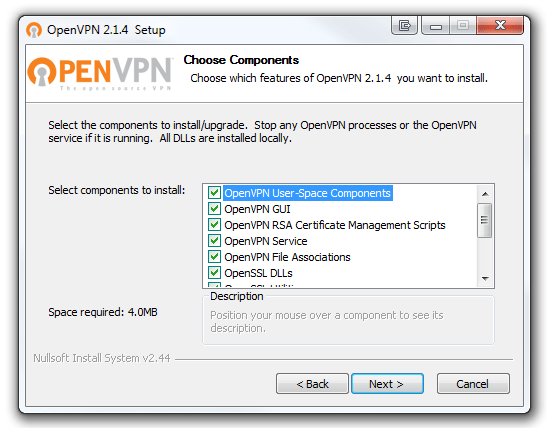
After installation is complete, you start creating Certificates and Keys for device authentication.
Create Certificates and Key
Go to the Start menu, select Accessories . Right-click Command Prompt select Run as administrator .
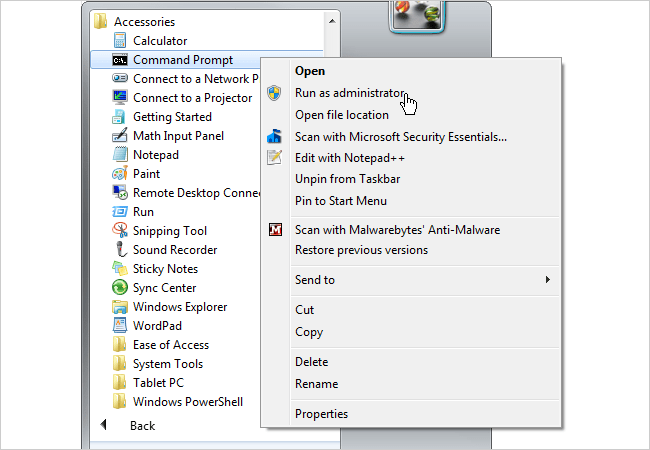
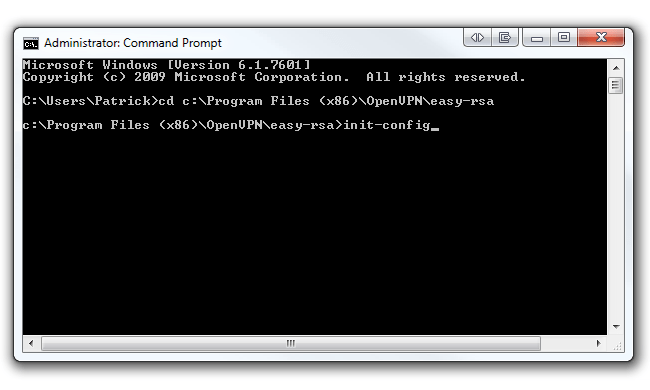
At the command prompt, type cd c: Program Files (x86) OpenVPNeasy-rsa if you are running Windows 7 64-bit as shown below. (If using 32-bit Windows 7, type cd c: Program FilesOpenVPNeasy-rsa ). Press Enter .

Now type init-config , press Enter to copy the two files named vars.bat and openssl.cnf into the easy-rsa folder. Maintaining the command prompt window always opens and switches to the next step.
Open the folder C: Program Files (x86) OpenVPNeasy-rsa (or C: Program FilesOpenVPNeasy-rsa with 32-bit Windows 7) right-click the vars.bat file> select Edit to open it in Notepad. However we recommend using Notepad ++ as a text editor in a much better file. You can download Notepad ++ here .

We will be most concerned about the end of this file. Start from line 31 , change the value of Key_COUNTRY , Key_PROVINCE . to your information. Such as the illustration below:

Go back to the command prompt window, type vars and press Enter , then type clean-all , press Enter . Finally type build-ca > Enter .

After executing the build-ca command, you will receive a request to enter information such as Country , State , or Locality . but since we have set up the vars.bat file above, just press Enter. to forgive. But before that, remember to enter the information in the Common Name section like your name. This command will output two files ( Root CA Certificate and Root CA Key ) in the easy-rsa / Keys folder.

Now we will build a Key on the client machine. In the open command prompt, type build-Key client1 . You can change client1 to any name you want, just make sure the name matches the Common Name when requested. Other parameters are the default, then type ' y ' and press Enter .
If you get an error ' unable to write' random state 'you don't need to worry because your certificates are still working normally. This command will export two files ( Client1 Key and Client1 Certificate ) in the easy-rsa / Keys folder. If you want to create another Key for any client, repeat the steps above and just make sure to change the Common Name.

The final certificate is the Key server . In the command prompt, type build-Key-server server . You can replace ' server ' at the end of the command with the name you want (Example: QTM-Server ) provided that the name must match the information recorded in Common Name. Finally press ' y ' to finish. This command will create two files ( Server Key and Server Certificate ) in the easy-rsa / Keys folder.

Next we have to create Diffie Hellman parameters. The Diffie Hellman protocol allows two users to exchange a secret key on an insecure environment. You can find out more about Diffie Hellman at RSA's website.
In the command prompt, type build-dh . This command will export dh1024.pem file in easy-rsa / Keys folder.
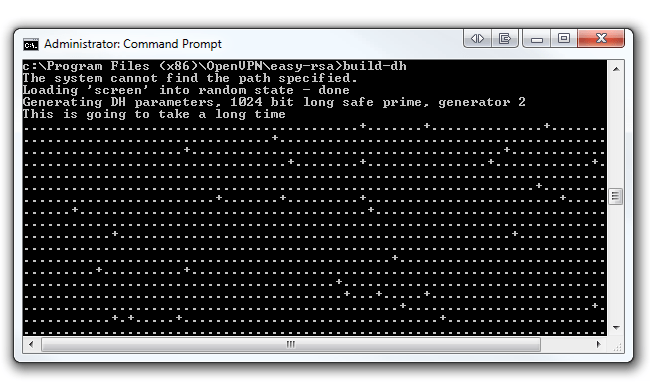
Initialize and configure the file for Client
Before we edit any file, setting up dynamic DNS service is a good idea. This service will be used if your ISP usually provides a dynamic IP address, if you have a static IP you can skip this step and move on to the next step.
Here we use DynDNS.com, a service that allows pointing a hostname to a dynamic IP address. The most important thing is to have OpenVPN always know your public IP address, and DynDNS will help OpenVPN do this. Register a free hostname and point to the public IP address. After registration is complete, set up Tomato auto-update in Basic > DDNS .
Go back to configuring OpenVPN. In Windows Explorer, move to C: Program Files (x86) OpenVPNsample-config (with Windows 7 64-bit) or C: Program FilesOpenVPNsample-config (with Windows 7 32-bit). In this directory you will see 3 files, but we only need to care about client.ovpn .
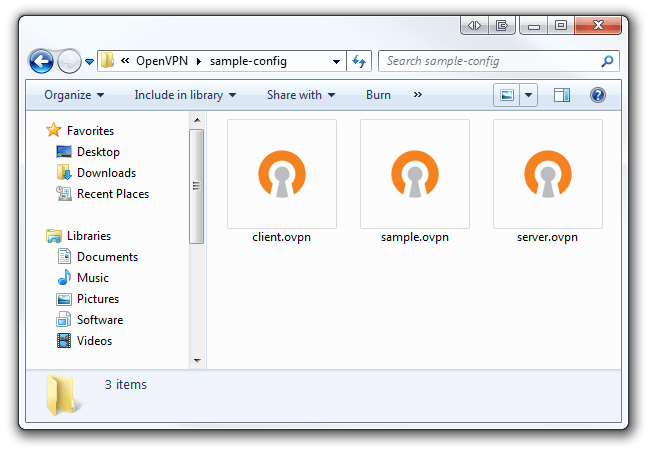
Right-click it and open it with Notepad or Notepad ++, you will see the content as shown below:
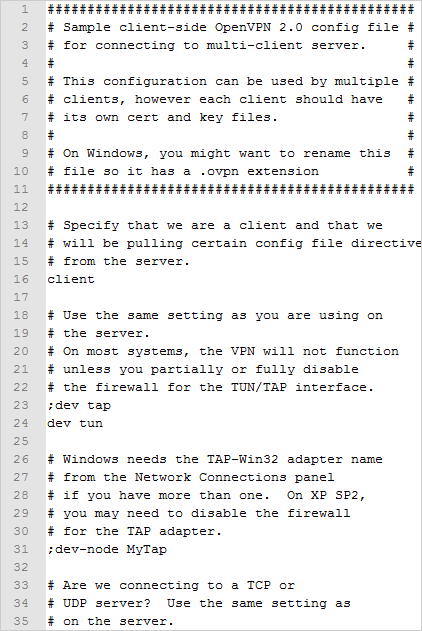
However, we want the client.ovpn file to be exported to be similar to the image below. Make sure you have changed DynDNS hostname in line 4 (or change the IP address if it is static). Keep port 1194 intact because this is the standard port of OpenVPN. Next, change lines 11 and 12 by the name of the Certificate file and Key you created for the client. Save this file as a new .ovpn file in the O penVPN / config folder.

Configuring VPN Tunneling for Tomato
Now we will copy server certificates and keys and paste them into the Tomato VPN menu. We will then test some settings in Tomato, testing the VPN connection.
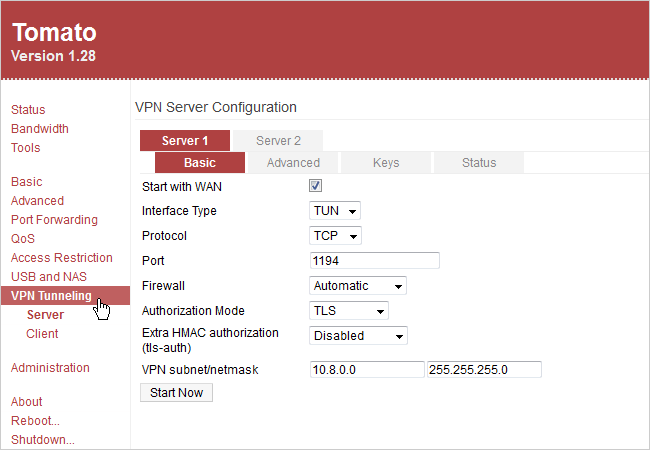
Open the browser and navigate to the router. Click the VPN Tunneling menu. Make sure Server1 and Basic are both selected. Set up exactly the following, then click Save .
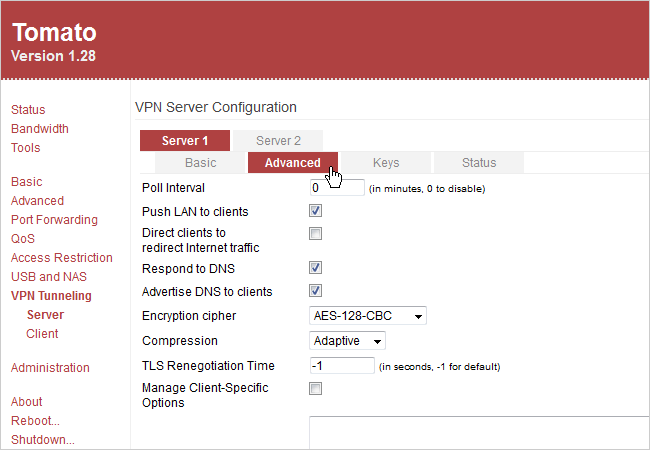
Switch to the Advanced tab next to the Basic tab. Set up the image below and click Save .
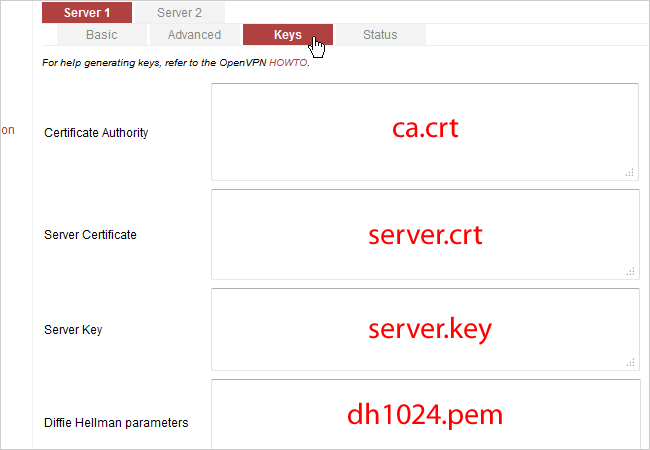
Finally, paste the Key and Certificates we created earlier. Switch to the Keys tab next to Advanced. In Windows Explorer, go to C: Program Files (x86) OpenVPNeasy-rsaKeys (Windows 7 64-bit) or C: Program FilesOpenVPNeasy-rsaKeys on Windows 7 32-bit. Open each corresponding file below ( ca.crt, server.crt, server.key, and dh1024.pem ) with Notepad or Notepad ++ utility and copy the contents. Paste this content into the corresponding boxes. Note that you only need to paste things below --BEGIN CERTIFICATE-- in server.crt . OpenVPN will still work properly if you paste the entire content, but it's best to just paste the ' clean ' information into it. Click Save and click Start Now .
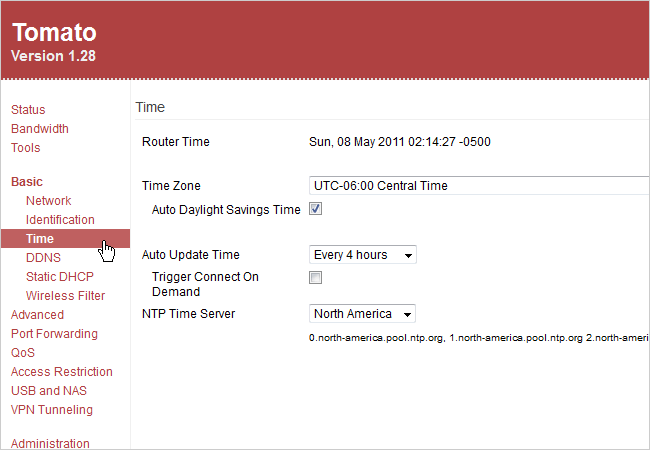
Before we test the VPN connection, there's another problem to check in Tomato. Go to Basic > Time menu. It is important to make sure that Time Router and Time Zone display times are correct with your current time zone. Set the NTP Time Server section according to the country you live in.
Set up OpenVPN Client
In this example we use a laptop running Windows 7 as a client. First, you also install OpenVPN for the client as shown above in configuring OpenVPN. Then open C: Program FilesOpenVPNconfig , this is where you will paste the files.
Now go back to the first computer to copy a total of 4 files to the laptop client. Navigate to C: Program Files (x86) OpenVPNeasy-rsaKeys and copy the ca.crt, client1.crt files, and client1.key then paste into the client's config folder.

Finally we need to copy a file. Navigate to C: Program Files (x86) OpenVPNconfig and copy the previously created client.ovpn file, then paste it into the config folder.
Test OpenVPN Client
On the laptop client, click the Windows Start button> All Programs > OpenVPN . Right click on the OpenVPN GUI file> select Run as administrator . Note that you must always run OpenVPN as an administrator so it works best. To do this, set it up forever as an administrator by right-clicking on the file, selecting Properties , under the Compatibility tab, tick the entry ' Run this program as an administrator '.

The OpenVPN GUI icon will appear next to the system clock of the taskbar. Right-click this icon and select Connect .
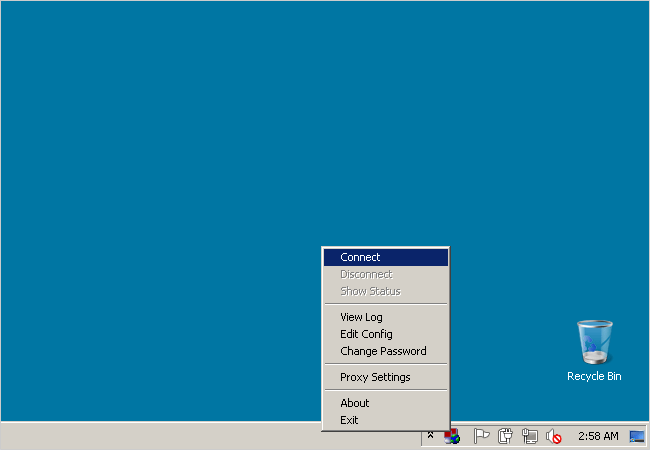
A pop-up dialog box will display connection logs.

Once you have connected to the VPN, the OpenVPN icon in the taskbar will turn green and display your virtual IP address.

So you succeeded. You now have a secure connection between the server and the client using OpenVPN and TomatoUSB. To continue checking the connection, try opening a browser on the client and navigating to the Tomato router on the server's network.