Configure and use the print server
Printers are an effective tool in the office. However, not everyone knows how to set up a printer so it costs little ....
Printers are an effective tool in the office. However, not everyone knows how to set up a printer so that it costs less and is most effective for work.
For example, users often connect the printer to a computer, then share this printer to all other computers on the same LAN. This will be restricted every time when printing because the print order from other machines will run through the machine being shared, then depending on the priority (metric) of the job that executed. Another problem that is also quite important is that the machine being shared will have to be in continuous operation state, otherwise the print job will go to this machine and be stopped, and thus the printer will not be able to receive the commands. already requested.
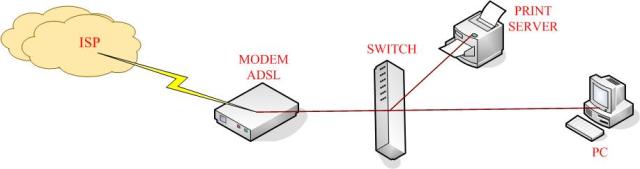
A print server model.
The print server model was born that brought about effective solutions. Print server is a network printing model. Now the workstations in the same local network just connect to the printer via the printer's IP address, which can be printed directly without having to go through a shared workstation. There are two popular models in use: Models using printers that have print server functions and models that use printers often have a box of print server attached to support.

Connect the printer to the box of box print server.
Configure the printer with the print server function
For printers with print server functions, you will see on this printer that there is a small screen and command buttons to control and set up the printing functions, behind the printer, there is an additional RJ45 port for connection. Connect the cable to the network. To configure this printer line, you only need to care about how to set the IP address, the rest of the other parameters on the system tray settings, paper size . you can leave the manufacturer by default or can be customized when referring to the attached document when purchasing.

The printer has a print server function with a screen and control buttons.
Depending on the type of printer, there are different print server functions of different brands that have different configuration methods. But in the middle, to configure the IP address, you need to pay attention to the command menu with TCP / IP. In the popular HP 5100 printer line, go to Menu and select EIO 1 Jetdirect , then click the Item button to display the CFG Netword = No * line . Click the Value button to change the value to CFG Nework = Yes , then click the Select button to make the selection, the command will add a * and look like this: CFG Netword = Yes * .
Next, click the Item button to select smaller menu commands. Choose the command line CFG TCP / IP = No * to configure the IP address according to the Ethernet standard. You change the command value to CFG TCP / IP = Yes * . At this point, you will adjust the IP address so that the same network layer with the local network layer is in use. You should choose an IP address that is rarely used to set the IP address for the printer, usually used at the end of the IP address range and before the Broadcast address.
If you are accustomed to using the C network layer to configure your local network, you can set the IP address for the printer as follows: Byte IP 1 = 192, Byte IP 2 = 168, Byte 3 = 1 IP, IP Byte 4 = 254, meaning the IP address is now 192.168.1.254. Similarly, you will use the Subnet Mask 255.255.255.0 and the Default Getway address pointing to the Default Getway address of the local network, commonly used is 192.168.1.1. Here, you have finished setting up the IP address of the printer and then you connect the network cable connected from the ADSL Modem or from the Switch directly to the RJ45 port of this printer.
Configure the printer via the print server box
If you already have a printer that normally connects to a computer via a paralell or usb port, it is enough to buy a box print server. This print server box will intermediate IP connection to the network system you are using and the printer. There are many different print server boxes from different vendors, but most providers are going to simplify the configuration so you can easily set up the print server box without any problems.
If you use LinkPro's print server box, you log in to the default address with the user and password included in the document, or find out the manual file included in the CD when you purchase the device. After successful login will have the following interface:
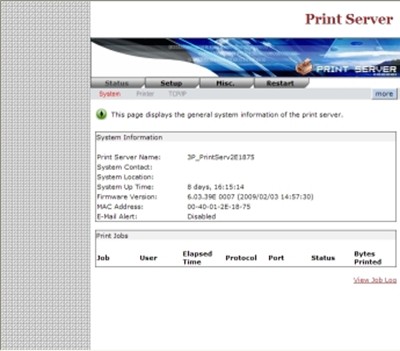
Interface after successfully logging in LinkPro's print server box.
To configure the IP address, go to the Setup tab and select TCP / IP. Then select Use the following TCP / IP settings and enter the IP address according to the criteria mentioned above, then click the Save & Restart button to save the configuration and restart. For security, to prevent users from accessing the print server box to change configuration parameters, select System, in the Administrator's Password section, type in the password you want to secure.

Configure IP address according to network class C.
Add printers to computers on the local network
Thus, the configuration of the print server is finished, then you need to add the printer (add printer) to each machine in the local network to execute the print job. Go to Start - Settings and select Printers and Faxes . In the Printer and Faxes window, click the Add a printer button, then click Next and select the Local printer attached to this computer and uncheck Automatically detect … and click the next button. Next, in the Add Printer Winzard window, select the Create a new port box and select the Standard TCP / IP port line and click the Next button to move to the next step.
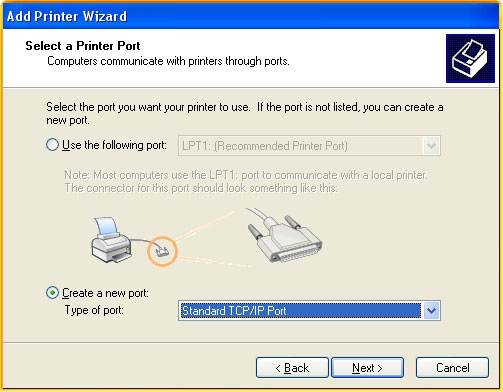
Select the TCP / IP type to connect the printer.
In the Add Standard TCP / IP window, enter the IP address of the configured printer, here is 192.168.1.254 and click Next. Finally, you select the manufacturer name and driver of the printer you are using in the system's available repository or look in the manufacturer's driver disk. So you have finished adding a printer to your computer, now you just sit directly on the computer and press the print job without having to go through any shared computer.
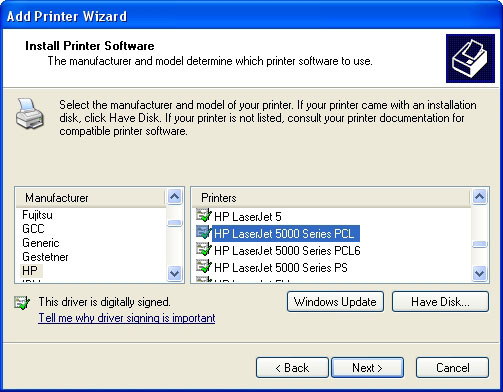
Select the driver for the printer.