Table of Contents
This guide covers backup iphoto photo library with practical context and easy-to-follow details. Use it to understand the subject and apply the information confidently.
Damaged system may cause data loss, especially all images that you store in your computer. Therefore, Mac users should regularly use the Time Machine feature to back up images to an external hard drive.
Backup to External Hard Drive
Connect an external hard drive to your Mac and turn it on. A Finder window appears, displaying the content in the external hard drive. Then, open a new Finder Window and select your Pictures Folder, which is the folder containing iPhoto's image library file. Next, drag this file to the external hard drive folder. You can overwrite the old file if available.
 Drag your photo library to external hard drive for backup.
Backup to CD // DVD
For small iPhoto libraries, you can backup to CD / DVD. Load CDs or DVDs into your Mac optical drive, drag your iPhoto library from the Pictures Folder into the optical disc icon on the desktop. Then, drag this icon towards the trash to activate the Burn Disc Burning app.
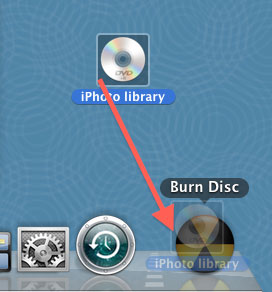 Drag the disc icon towards the trash to write.
If your iPhoto library is too large for the size of a DVD, you can record it in sections. From the iPhoto app, mark the photos you want to copy, then select Share -> Burn From the menu bar. This is a great way to create a backup disc.
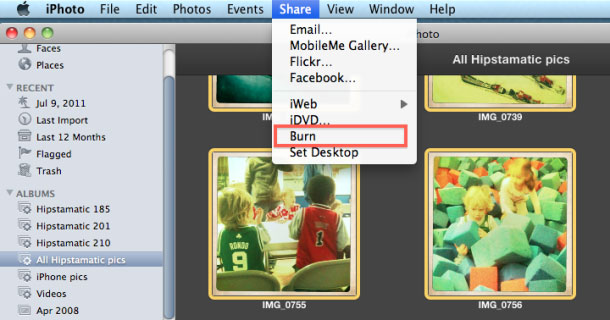 IPhoto allows you to burn images to disc.
To export presentation files, use Finder to locate the Pictures folder and drag them to the DVD folder.
If you want to create an image disc for viewing on your computer, you must first export the images to a folder on the desktop using the File -> Export Command, and then drag the folder to the DVD.
FAQ
What should I check before following these steps?
Confirm device and software compatibility, save important data, and make sure you have the required permissions, files, and account access.
Why might the process not work?
Common causes include outdated software, missing permissions, incompatible hardware, an unstable connection, or completing a step in the wrong order.
Can I undo the changes if necessary?
That depends on the tool or setting. Use built-in restore options when available, keep a backup, and record the original configuration first.
Related Articles
 How to Move Your iPhoto Library to the Photos App on Your Mac4 minutes read
 Click: How to Crop Images in Iphoto2 minutes read
 Select: How to Shrink a Photo in Iphoto4 minutes read
 How to Prevent Iphoto from Starting Automatically?4 minutes read
 These Backup Mistakes Could Cost You Years of Photos: Complete Guide7 minutes read
 How to Back up Mac Photos4 minutes read
Reader Comments 0
Sign in with email or Google to join the discussion.