Access remote VPN client via Site to Site VPN
In this article, I will show you how to enable client VPN connections to remotely access the Site to Site VPN for branch office networks.
In some articles introduced earlier about ISA Server, we have introduced you to a lot of knowledge about the Site to Site VPN infrastructure. Therefore, in this article, I want to introduce you to an advanced issue in this technique, which is to enable client VPN connections to remotely access the Site to Site VPN for network networks. branch office.
The problem may be simple for someone who has worked a lot with the ISA Firewall. But for the vast majority, this is still a complex issue. However, in the process of use, we can present the main problems here are the definitions of the ISA Firewall Networks and the Network Rules used to connect to that defined ISA Firewall Networks.
When you first install the ISA Firewall, some default ISA Firewall Networks will be created. The things that can be said to be important to mention here are:
- Local Host Network - The network is defined by all boundary IP addresses for any interface on ISA.
- The Default Internal Network - This is an ISA Firewall Network that you can define when the ISA Firewall is installed. Typically, it is the closest interface for the main network infrastructure services that the ISA Firewall depends on, such as Active Directory domain controller, DNS server, DHCP server, and certificate service.
- The Default External Network - the Default External Network is defined with all IP addresses not included in the definition of any ISA Firewall Network . You never need to add IP addresses to the Default External Network because it is a self-defined network, including IP addresses that you don't group on any ISA Firewall Network.
- VPN Clients Network - VPN Clients Network is an ISA Firewall Network that contains the IP address of the remote access VPN client and the VPN gateways connecting to the ISA Firewall. Definition This ISA Firewall Network is dynamic. Since the VPN client and gateway connect to the ISA Firewall, their VPN interface addresses are automatically added to define the VPN Clients Network, and are automatically deleted when the VPN client and gateway cancel the connection to the ISA Firewall.
ISA Firewall Networks are assigned to the network interface closest to the addresses defined by the ISA Firewall network. In particular, the NIC is the 'root' of specific ISA Firewall Networks.
For example, if the network IDs are 192.168.1.0/24, 192.168.2.0/24 and 192.168.3.0/24 are located behind the interface A (meaning that the interface A is closest to these network IDs), then the interface A is the root of the ISA Firewall Network defined for these three network IDs. This helps prevent fake attacks. If the ISA Firewall sees a source address of a communication process from a host that does not belong to one of these network IDs, the ISA Firewall will block that communication because this IP address is not within the ISA Firewall definition. Network to be allowed to communicate.
The following figure shows where you can find a list of ISA Firewall Networks. In the ISA Firewall management console, open the array (or Standard Edition server), then click the Configuration button. Under Configuration button, click Networks . Click the tab in the middle pane, and you will see a list of ISA Firewall Networks.
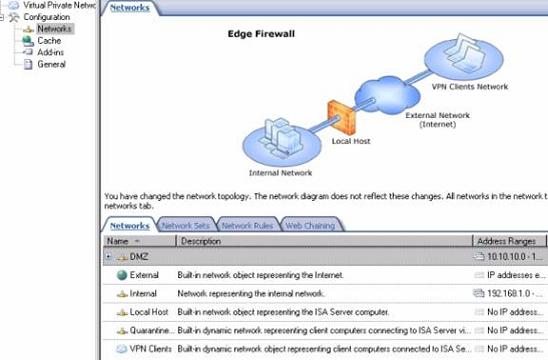
Figure 1
In order for hosts on the ISA Firewall Network to communicate, you need to create Network Rule rules. If there is no Network Rule for connecting two ISA Firewall Networks, there will be no communication between hosts on these two networks.
See page 2
Network Rules can define the way NAT or Route relationship between the source network and the destination network. Q Route access will allow the hosts on this side of the relationship to initiate communication with the other hosts using Access Rules. With NAT relationships, only NAT connections can initiate the connection through the Access Rule. Inbound or reverse NAT connections depend on the Web Publishing Rule or Server Publishing Rules.
The ISA Firewall installer will create Network Rules for you during the installation of the ISA Firewall. In the Networks node, click the Network Rules tab in the middle part of the ISA Firewall console. The three default Network Rules are shown in the figure below (although in the figure, the default definitions of these rules have been changed). Those rules are:
- Local Host Access - defines the Route relationship between Local Host Network and other networks.
- VPN Clients to Internal - define the Route relationship between VPN Clients Network and Default Internal Network networks.
- Internet Access - defines a NAT relationship for communications originating from the Internal Network to the Default External Network.

Figure 2
Let's study the situation where we want to allow remote VPN clients to connect to the resources at the branch office when they establish a connection to the branch office. The figure below provides basic sketches of the relevant ISA Firewall Networks in this communication:
- VPN Clients Network - This is the network ISA Firewall Network has all VPN clients and gateways when they connect to the ISA Firewall.
- Main office default Internal Network - This is the network behind the main office ISA Firewall. Note that the network name (Network name) of the ISA Firewall is related to the location of the client connecting to this ISA Firewall Network. When the remote access VPN client connects to the branch office ISA Firewall, this will be a Default Internal Network for the members of the VPN Clients Network. However, if a host at the branch office is connected to this network, the network name will show that. We will consider an example of this later.
- Branch Remote ISA Firewall Network - Remote Network networks are defined when you create site to site VPN connections. From the host side connecting from the main office ISA Firewall, the connections created with the branch office network will be connected to the Branch Remote Network. However, if a client is connected to the branch office ISA Firewall, what is the network the clients will connect to? That's the Default Internal Network because in the site to site VPN scenario, the name of the destination ISA Firewall Network is related to the ISA Firewall that the remote access VPN client connects to.

Figure 3
The figure below shows the Route relationship as defined by the Network Rules for connecting these networks:
- There is a Network Rule for connecting VPN Clients Network to the default Internal Network. This Network Rule establishes a route relationship between the main office's VPN and default Network clients.
- A Network Rule for connecting the main office's Default Internal Network to the branch office ISA Firewall Network. This Network Rule establishes a Route relationship between these networks.
See page 3
These Network Rules allow VPN clients to connect to the resources in the main office's Default Internal Network, allowing members of the main office's Default Internal Network to connect to the underlying resource. in the branch office ISA Firewall Network. However, is there a rule that can allow members of the VPN Clients Network to connect to the branch office ISA Firewall Network? The answer is no.

Figure 4
The figure below shows what happens when we create a new Network Rule to connect the main office's VPN Client Network to the branch office network. The red arrow indicates that we have a Network Rule defining the route relationship between these two networks. There is a Network Rule for connecting the main office's VPN Clients Network and we can create Access Rules to allow communication between these two networks (VPN Client and branch network).

Figure 5
The figure below shows a slightly different situation than what we mentioned above: Suppose you want to allow remote VPN client connections to the branch office ISA Firewall. In this case, the Network Rule requires connecting the branch office VPN Clients Network to the Default Internal Network at the branch office. Do you see differences based on location? When VPN clients connect to the main office ISA Firewall, they must connect to the branch office ISA Firewall Network. When they are connected to the branch office ISA Firewall, they will be able to connect to the Default Internal Network (for the branch office ISA Firewall).
Note that the network name will change based on the perspective of the hosts connecting through the branch office ISA Firewall. To connect to the main office, the hosts are connecting from the branch office ISA Firewall to connect to the Remote Site Network named 'Main'.

Figure 6
With this foundation, you can now show why some ISA Firewall administrators have had problems allowing remote access VPN clients to connect to the office ISA Firewall to access the resources. Branch office ISA Firewall Network: they need to create a Network Rule to connect the main office VPN Clients Network to the branch office ISA Firewall Network.
See page 4
In fact, one other thing to do is to create an Access Rule to allow communication from the main office VPN Clients Network to the branch office network. Although there is a Network Rule that connects networks, there is a need for an Access Rule that allows communication between these networks.
- At the CSS machine, open the ISA Firewall console. In this window, click Arrays and click the Main array. Then click Configuration and Networks .
- On the Networks node, click the Network Rules tab in the middle pane. In the Tasks tab on the Task Panel, click the Create a Network Rule link .
- In the Welcome to the New Network Rule Wizard page , enter the rule name in the Network Rule name dialog box. In this example, we used the name VPN Clients to Branch and clicked Next .
- On the Network Traffic Sources page, click the Add button. In the Add Network Entities dialog box, click the Networks folder, and then double-click the VPN Clients network. Click Close .
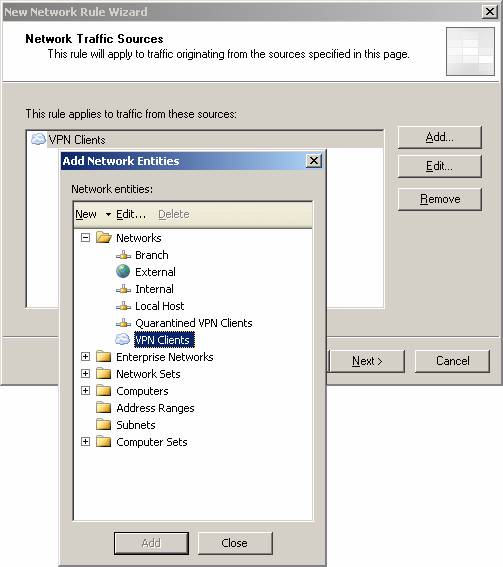
Figure 7
- Click Next on the Network Traffic Sources page.
- On the Network Traffic Destinations page, click the Add button. In the Add Network Entities dialog box, click the Networks folder, then click the Branch network. Click Close .
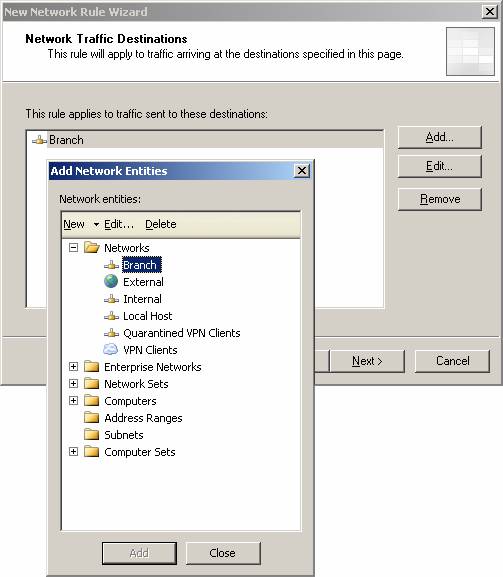
Figure 8
- On the Network Relationship page, select the Route option. There is a problem here, from the security perspective of using NAT for this scenario, so we must always select the Route option. Click Next .
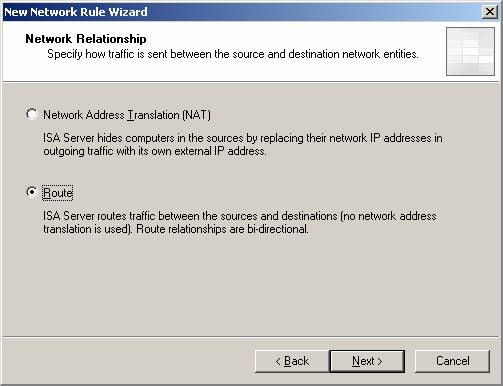
Figure 9
- Click Finish on the Completing the New Network Rule Wizard page
Now we need to create two Access Rules, one in the main office ISA Firewall array and one in the branch office. The rule at the main office will allow PING from VPN Clients Network to the branch office, the Access Rule at the branch office will allow PING from the main office to the Default Internal Network. Create the first rule on the main office ISA Firewall array to allow ping from the VPN Clients Network to the branch office network:
- At the CSS computer in the main office, in the ISA Firewall console, click Firewall Policy (main) in the left pane of the interface.
- In the Tasks tab of the Task Pane, click the Create Access Rule link .
- On the Welcome to the New Access Rule Wizard page , enter a name for the rule in the Access Rule name box. In this example, we use the name Ping VPN Clients to Branch and click Next .
- In the Rule Action page, select the Allow option and click Next .
- On the Protocols page, select the Selected protocols option from the This rule applies drop- down list . Click the Add button. In the Add Protocols box, click the Infrastructure folder, then double-click the PING protocol. Then click Close .
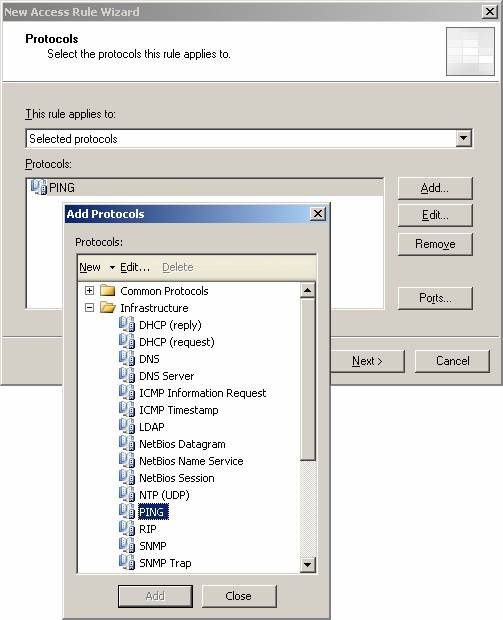
Figure 10
- On the Access Rule Sources page, click the Add button. In the Add Network Entities box, click the Networks folder, then double-click the network. Click Close .
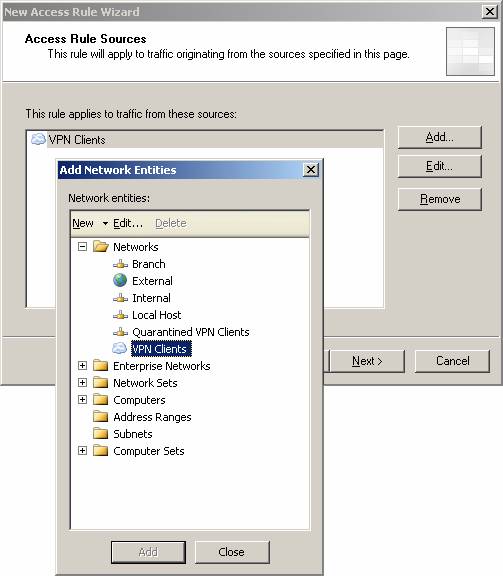
Figure 11
- Click Next on the Access Rule Sources page .
- On the Access Rule Destinations page, click the Add button. In the Add Network Entities box, click the Networks folder, then double-click the Branch network. Click Close .
- On the User Sets page, accept the default settings, All Users , and click Next .
- Click Finish in the Completing the New Access Rule Wizard page .
- Click Apply to save the changes and update the firewall policy. Click OK in the Apply New Configuration dialog box.
See page 5
Now let's create the second rule that allows ping from the main office ISA Firewall Network to the branch office's Default Internal Network:
- At the CSS computer at the main office, in the ISA Firewall console, click the Firewall Policy button (branch) in the left pane of the console.
- In the Tasks tab in the Task Pane, click the Create Access Rule link .
- In the Welcome to the New Access Rule Wizard page , enter the rule name in the Access Rule name box. In this example we use the name Ping Main to Branch and click Next .
- In the Rule Action page, select the Allow option and click Next .
- On the Protocols page, select the Selected protocols option from the This rule applies to drop- down list . Click the Add button. In the Add Protocols dialog box, click the Infrastructure folder, and then double-click the PING protocol. Click Close .
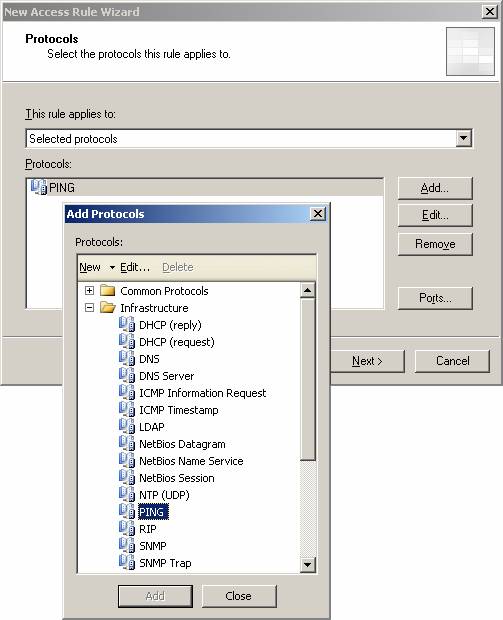
Figure 12
- On the Access Rule Sources page, click the Add button. In the Add Network Entities box, click the Networks folder, then double-click the Internal network. Click Close .
- Click Next on the Access Rule Sources page.
- On the Access Rule Destinations page, click the Add button. In the Add Network Entities dialog box, click the Networks folder, then click the Branch network. Click Close .
- On the User Sets page, accept the default settings, All Users , and click Next .
- Click Finish in the Completing the New Access Rule Wizard page .
- Click Apply to save the changes and update the firewall policy. Click OK in the Apply New Configuration box.
Although we have configured the site to site VPN, we have not enabled the main office ISA Firewall to be a remote access VPN server. Follow the steps below to activate the VPN server:
- At the main office CSS machine, click the Virtual Private Networking button (VPN) in the Main array tree.
- In the Virtual Private Networking button (VPN) , click on Tasks tab on the Task Pane. Click the Enable VPN Client Access link .
- Click OK in the dialog box informing you that the RRAS service can restart.
- Click Apply to save the changes and update the firewall policy. Click OK in the Apply New Configuration dialog box.
Now that we have enabled the VPN connection from our VPN client (using PPTP, the default protocol is allowed in VPN connections after activating the VPN server on the ISA Firewall). Once connected, we begin to execute a ping -t 10.0.1.2 command, which is DC at the branch office. After a period of time, you will see the ping process successful, see the picture below.

Figure 13
If we look at the real-time logging for the branch office array, we can see that the Ping Main to Branch rule is allowing connections, as shown in the figure below.

Figure 14
And if you perform a tracert from the VPN client to the DC at the branch office, we will see it using the branch office ISA Firewall as the gateway for that location, see the figure below.

Figure 15
Conclude
In this article, we have added to you some site to site VPN networking knowledge by introducing how to enable remote VPN client access for remote networks connected through a site to VPN link. site. There are two things required to do this: first, there must be a network rule to connect the source network to the destination network; second, there must be the appropriate Access Rules on both the main office ISA Firewall and the branch. to allow traffic. Once you have the appropriate Network Rules and Access Rules, you will have communications from remote access VPN clients to your remote networks.
You should read it
- ★ Create a Site-to-site VPN on ISA 2006 (Part 1)
- ★ Create a Site-to-site VPN on ISA 2006 (Part 5)
- ★ Instructions for setting up a VPN site to site model on Cisco ASA systems
- ★ Create VNP Site to Site with the ISA 2006 Firewall Branch Office Connection Wizard - Part 1
- ★ Create a Site-to-site VPN on ISA 2006 (Part 6)