Table of Contents
Reinstalling Windows can resolve persistent operating-system problems, but it is not the first fix for every slow laptop. Start with a backup and basic diagnostics. If Windows still starts, try the least destructive repair option first. Use Reset this PC when you want a broader refresh, and use official USB installation media for a new drive or a clean installation.
Warning: Reset and clean-install options can remove applications, settings, and files. A clean installation can erase the wrong disk if you select it by mistake. Do not continue until you have a verified backup, your BitLocker recovery key if encryption is enabled, and a clear record of the target drive.
When reinstalling Windows makes sense
Consider a reinstall when Windows has recurring system corruption, repair tools have failed, unwanted software cannot be removed reliably, or a replacement SSD has no operating system. A reinstall may also be appropriate before transferring a laptop to another owner, together with the correct data-erasure option.
First investigate hardware symptoms. A failing SSD, bad memory, overheating, or an unstable power supply will not be fixed by repeatedly reinstalling Windows. If files are not backed up and the drive may be failing, stop and follow TipsMake's guide to recovering data from a laptop that will not start.
Reinstall only after separating software problems from possible hardware failure.
Choose the least destructive recovery option
| Option | What it keeps | Best use | Main risk |
|---|---|---|---|
| Fix problems using Windows Update | Apps, files, and settings | Repairing Windows system components when the PC still works | Requires power, internet access, and enough free space |
| Reset this PC: Keep my files | Personal files; removes apps and resets settings | A broader refresh without intentionally deleting user files | It is not a backup; failures or wrong choices can still cause loss |
| Reset this PC: Remove everything | Nothing you should rely on | Starting over or preparing a PC for transfer | Deletes personal files, apps, and settings |
| Clean install from USB | Only data on disks or partitions you deliberately preserve | New SSD, unbootable system, or fully clean installation | Selecting or deleting the wrong disk or partition |
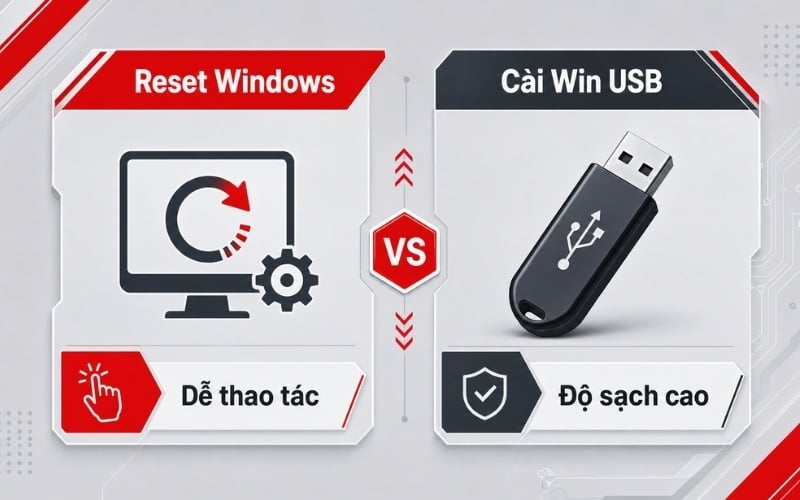
Use the least destructive option that addresses the problem.
Preparation checklist
- Copy documents, photos, downloads, desktop files, browser data, application projects, and any locally stored email or game saves to another device or cloud location.
- Open several files from the backup to verify that it is usable.
- Find the BitLocker recovery key and confirm that you can sign in to the Microsoft or organization account that holds it.
- Check Windows activation and note the installed edition, such as Home or Pro.
- Download the laptop manufacturer's network and storage drivers to a separate USB drive if the model may need them during setup.
- Keep the charger connected. Disconnect unnecessary external drives, memory cards, and USB devices before a clean install.
- If creating installation media, use a spare USB drive whose contents can be erased.
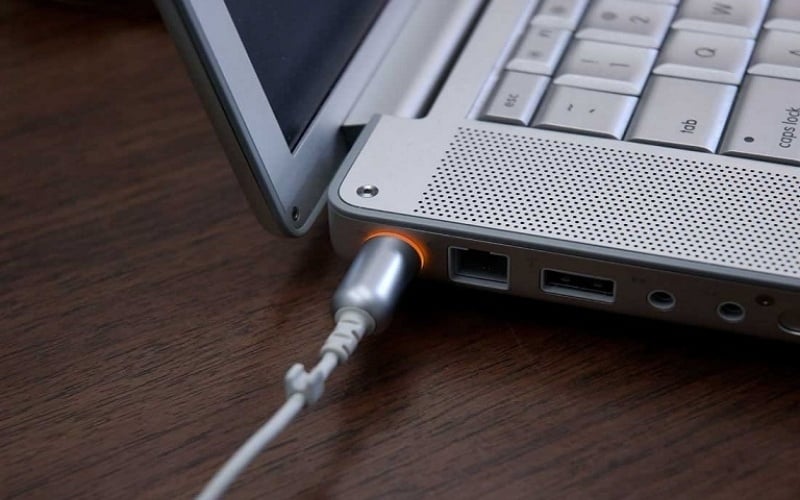
Power, backups, recovery keys, and drivers should be ready before installation begins.
Option 1: Repair Windows 11 without removing apps
On supported Windows 11 systems, open Settings > System > Recovery. Under Fix problems using Windows Update, select Reinstall now. This downloads and reinstalls the current Windows version while preserving apps, files, and settings. If the option is unavailable, use the recovery choices below. Microsoft documents the current process in Fix problems by reinstalling Windows.
Option 2: Reset Windows 11 without a USB drive
- Open Start > Settings.
- Select System > Recovery.
- Beside Reset this PC, select Reset PC.
- Choose Keep my files or Remove everything only after reading the description.
- Choose Cloud download or Local reinstall.
- Review Change settings and the summary of what will be removed.
- Select Reset only when the summary matches your intention.
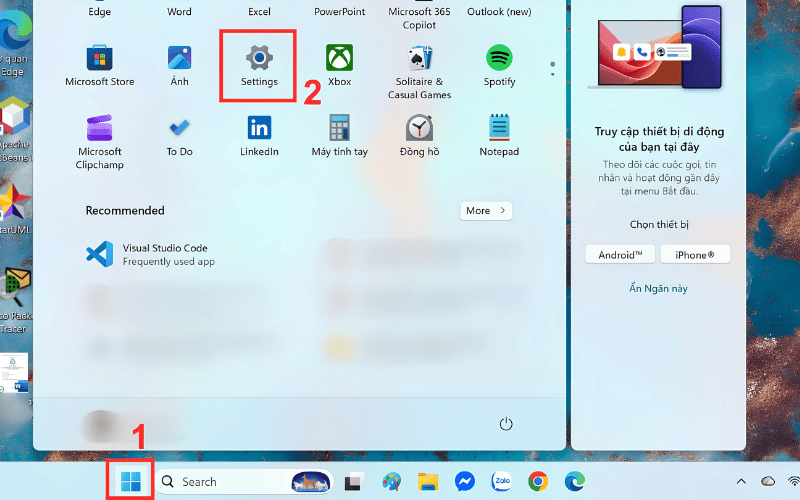
Open Settings from the Start menu.
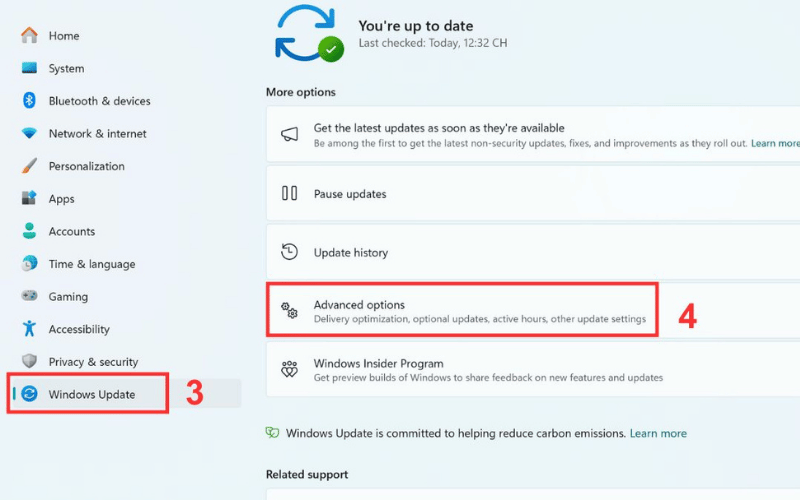
Menu locations can differ between Windows versions; in Windows 11, Recovery is under System.
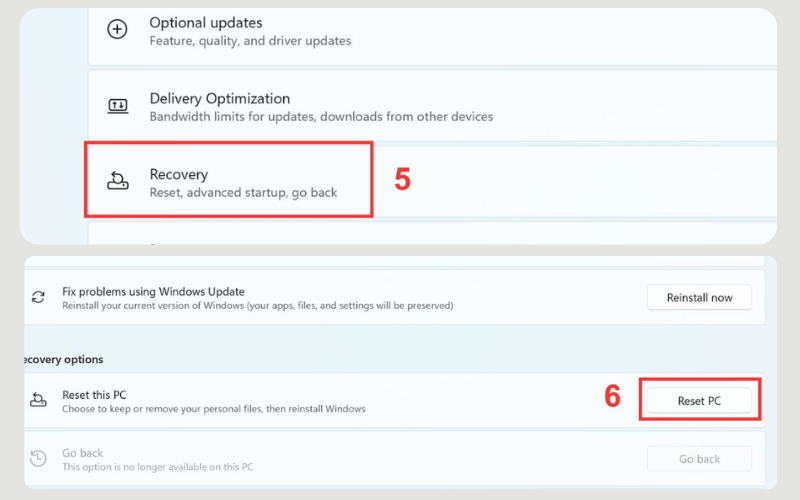
Select Reset PC from the Recovery page.
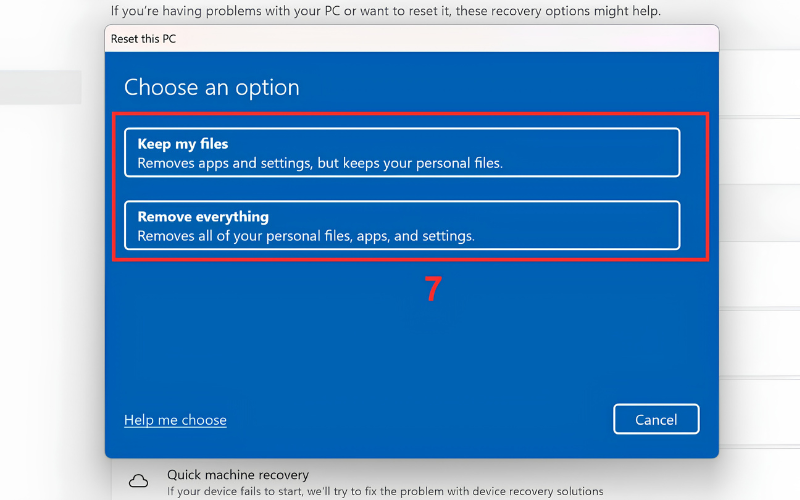
Keep my files removes applications and settings; Remove everything also removes personal files.
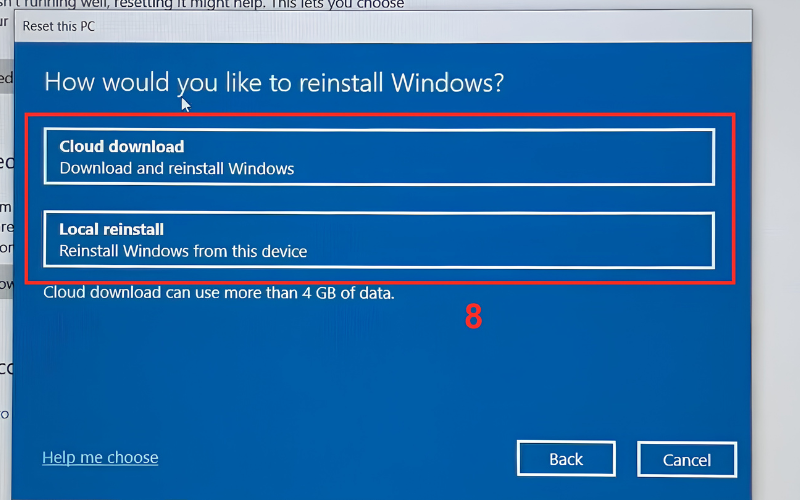
Cloud download obtains fresh files; Local reinstall uses files already on the PC.
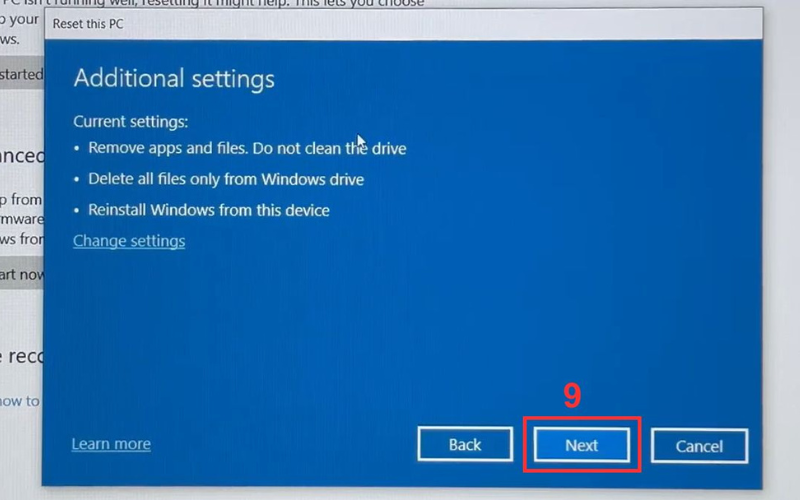
Review every setting and the list of effects before continuing.
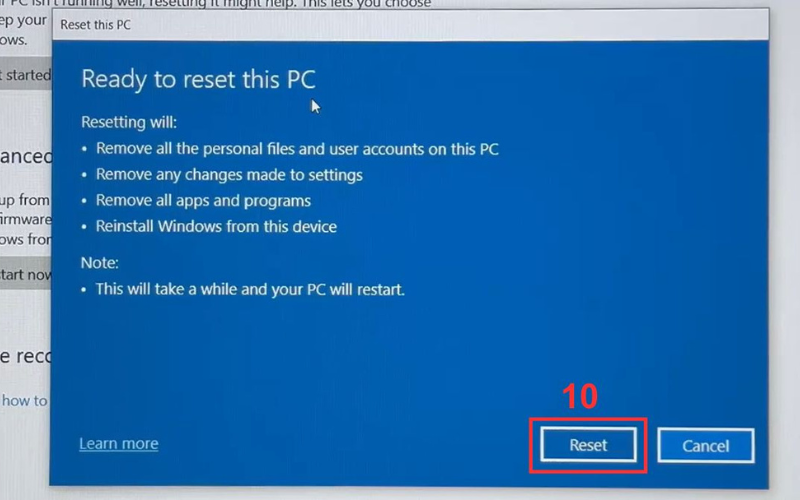
The final Reset command starts the destructive phase of the process.
Microsoft's Reset your PC guide explains the current options. During a reset, the screen may stay black for an extended period and the computer may restart itself. Do not force it off unless the process is clearly stuck and you have checked the manufacturer's support guidance.
Option 3: Create official Windows 11 installation media
For a new SSD or a clean installation, use another working Windows PC and a blank USB flash drive. The USB will be erased.
- Open Microsoft's Download Windows 11 page.
- Under Create Windows 11 Installation Media, download the Media Creation Tool.
- Run the tool, accept the terms, and verify the language and edition.
- Select USB flash drive.
- Carefully select the correct removable drive and let the tool create the media.
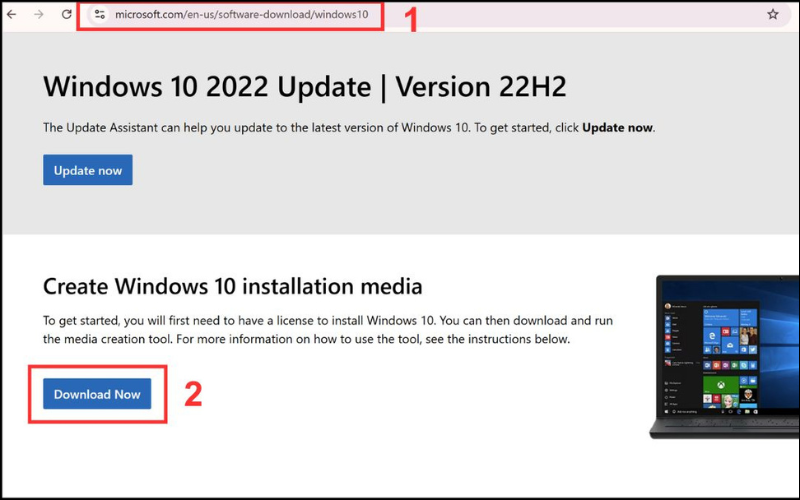
Get Windows installation files from Microsoft.
TipsMake also explains the official options for downloading a Windows 11 ISO.
Alternative: create the USB with Rufus
Rufus is useful when you already have an official ISO or need manual control over the media. Download it only from rufus.ie. Connect a disposable USB drive, verify the device name and capacity, choose the ISO, and keep settings compatible with the laptop's firmware. Most current Windows 11 laptops use UEFI and GPT, but check the manufacturer's documentation rather than guessing.
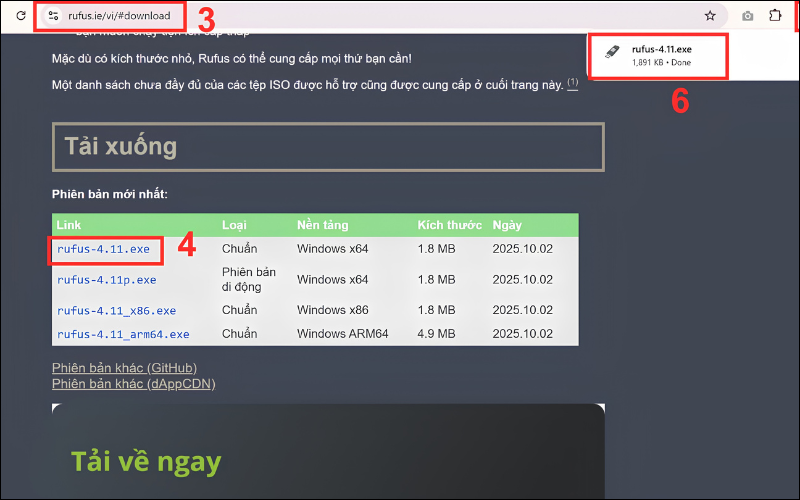
Use the official Rufus website if you choose the manual method.
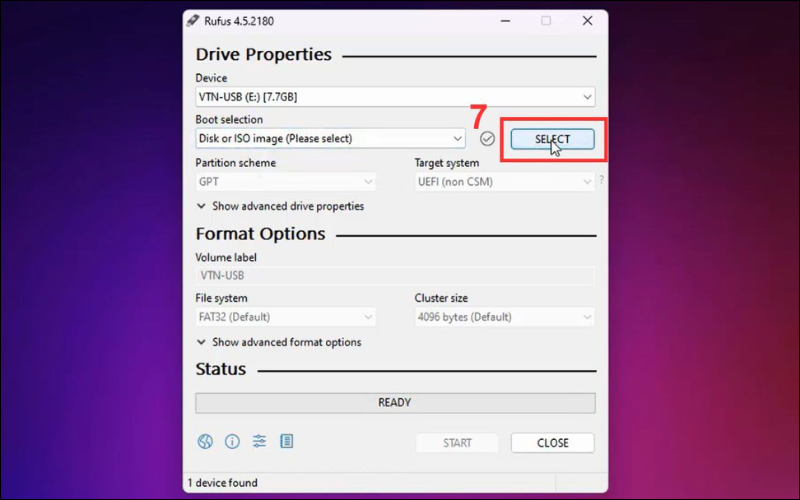
Confirm the USB device carefully; Rufus will erase it.
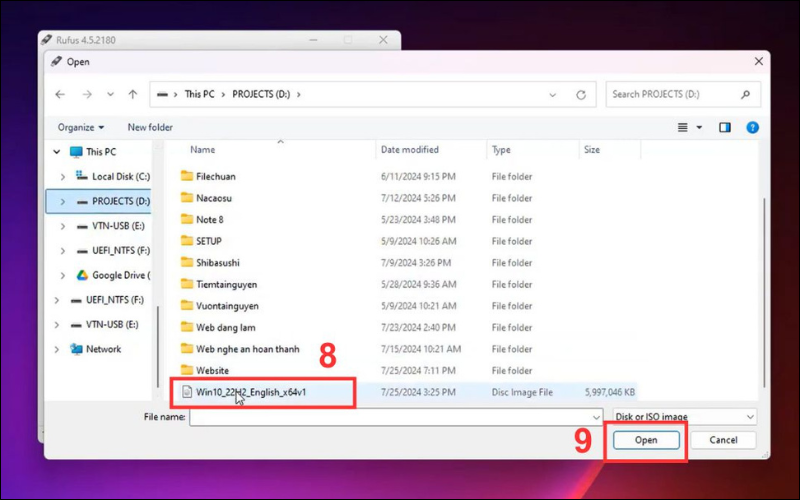
Select the official Windows ISO.
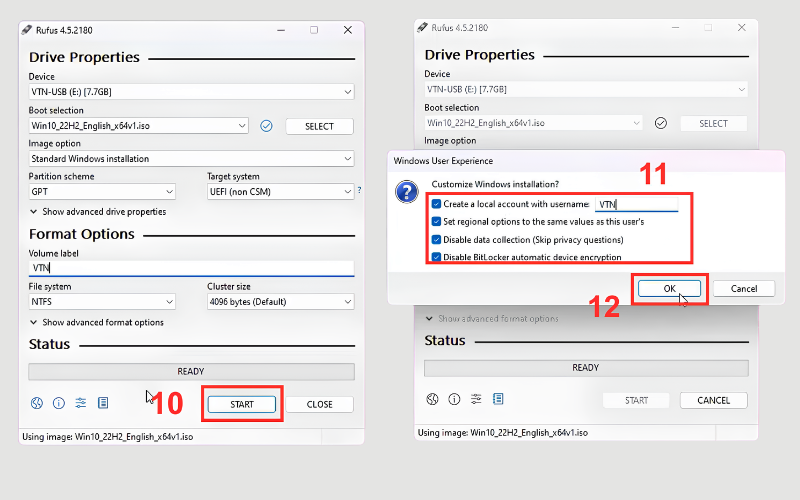
Review the device, boot selection, partition scheme, and other options before selecting Start.
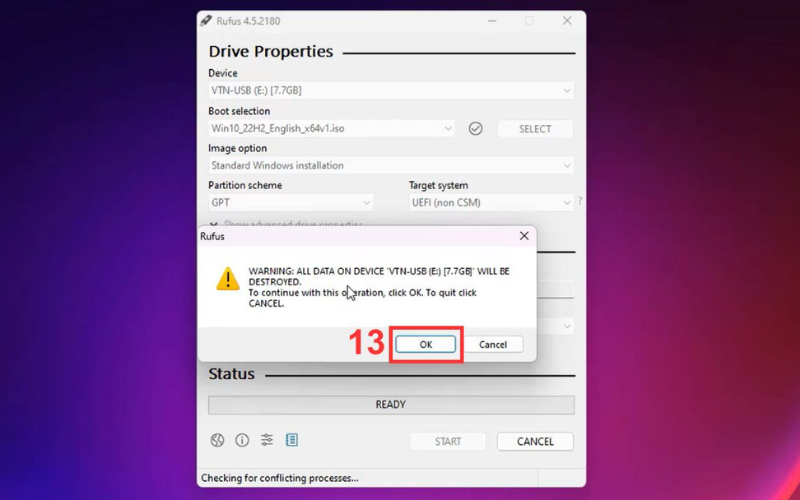
Proceed only after confirming that nothing on the USB drive is needed.
Boot the laptop from the USB drive
- Shut down the laptop and insert the installation USB.
- Turn it on and open the one-time boot menu using the key documented for the exact model. Common keys include F12, F9, Esc, and Novo-style hardware buttons, but they are not universal.
- Select the entry for the USB drive marked UEFI when installing on a modern UEFI system.
- If the USB is absent, recreate it, try another port, and check the manufacturer's boot and Secure Boot instructions before changing firmware settings.
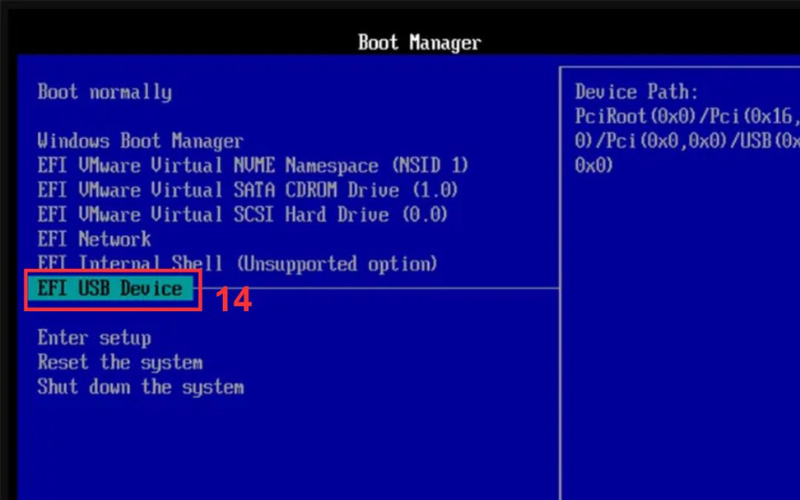
Use the one-time boot menu when possible instead of permanently changing boot order.
Install Windows 11 from the USB drive
- Select the language, time format, and keyboard layout.
- Select Install now.
- If asked for a product key and the laptop already has a digital license, select the option indicating that you do not have a key. Activation should occur after the matching edition goes online.
- Select the same licensed edition previously used on the laptop.
- Read and accept the license terms.
- Select the clean or custom installation option.
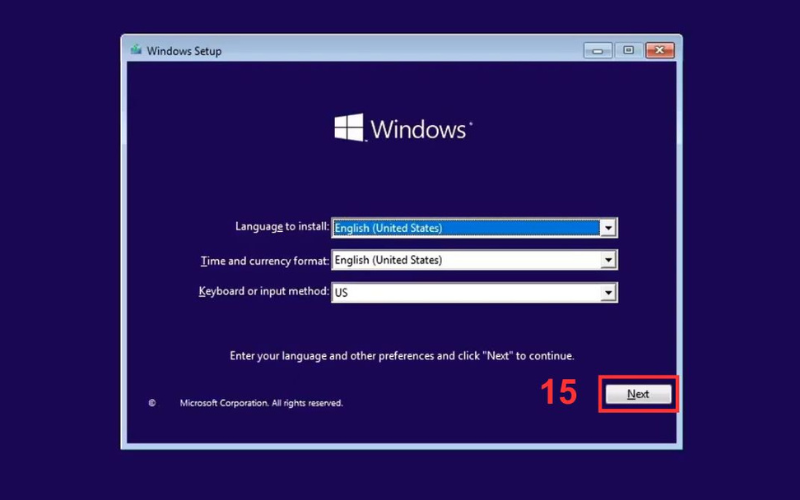
Choose the correct regional and keyboard settings.
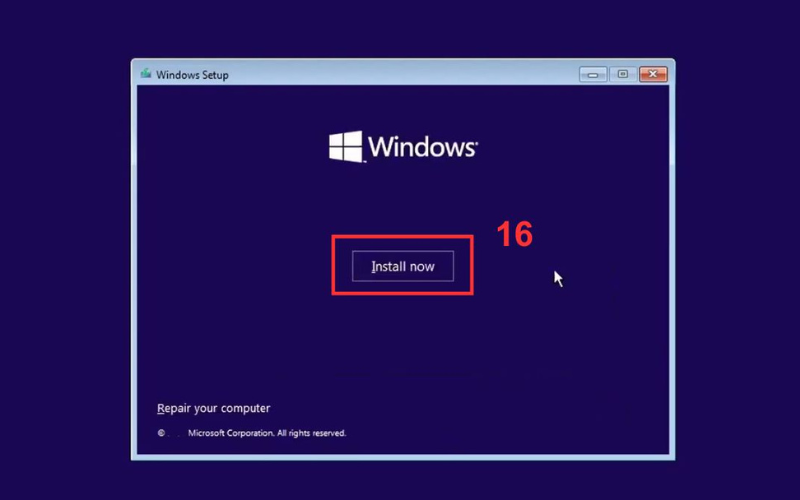
Start Windows Setup from the official media.
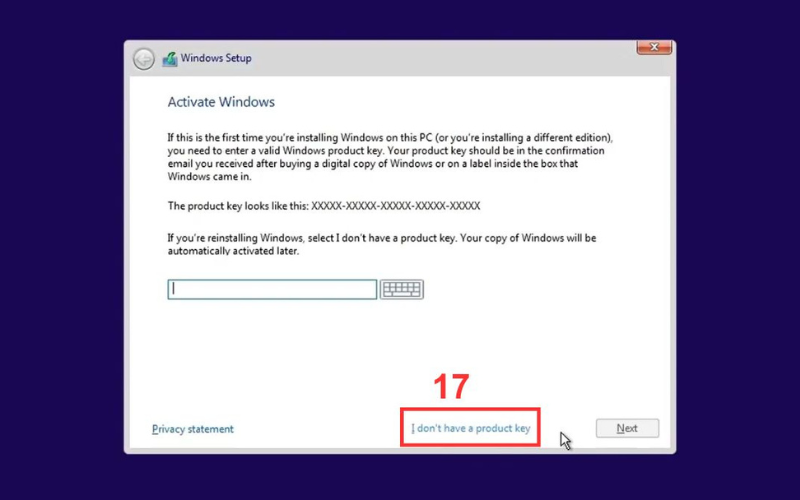
Use a valid key or the laptop's existing digital license.
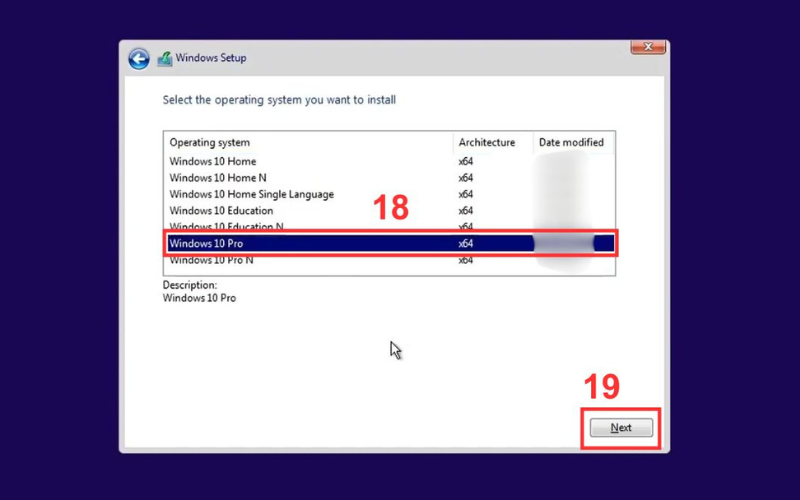
The installed edition must match the license, such as Home or Pro.
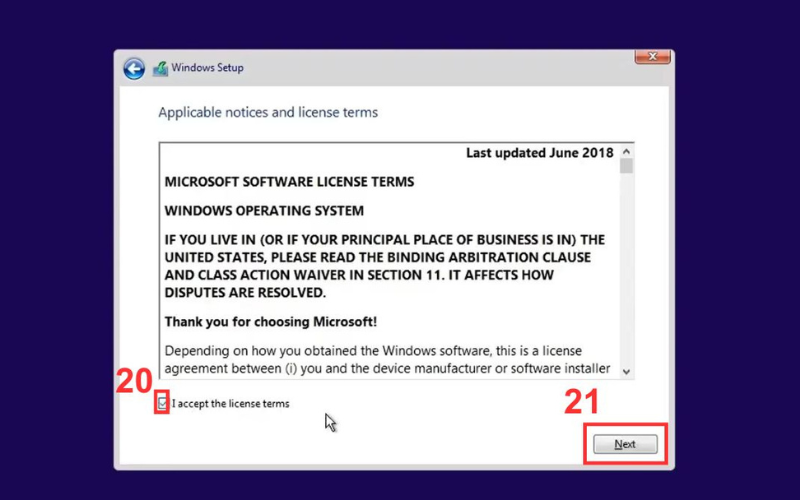
Read and accept the license terms to continue.
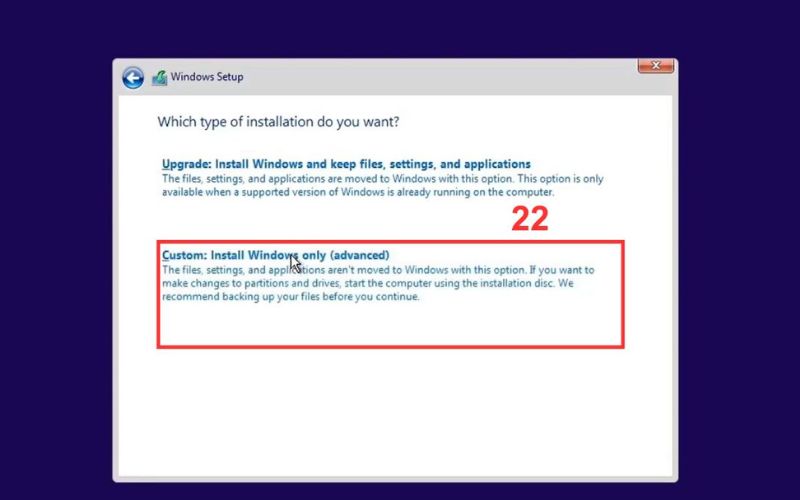
A custom installation exposes disk and partition choices, so the next step requires care.
Select the target disk without erasing another drive
Do not assume that the old Windows partition is called C: inside Setup; drive letters in the installer can differ from those in normal Windows. Identify the physical disk by its model, total capacity, partition layout, and the notes you made before starting.
If the laptop has multiple internal drives and the manufacturer permits it, disconnect non-target drives before a clean installation. In Windows Setup, delete partitions only from the target disk when you deliberately want to erase that entire disk and the backup is verified. Deleting OEM recovery partitions also removes the manufacturer's local recovery environment.
If you cannot identify the target with certainty, cancel the installation. Do not guess. A technician can perform the installation without risking an unrelated data drive.
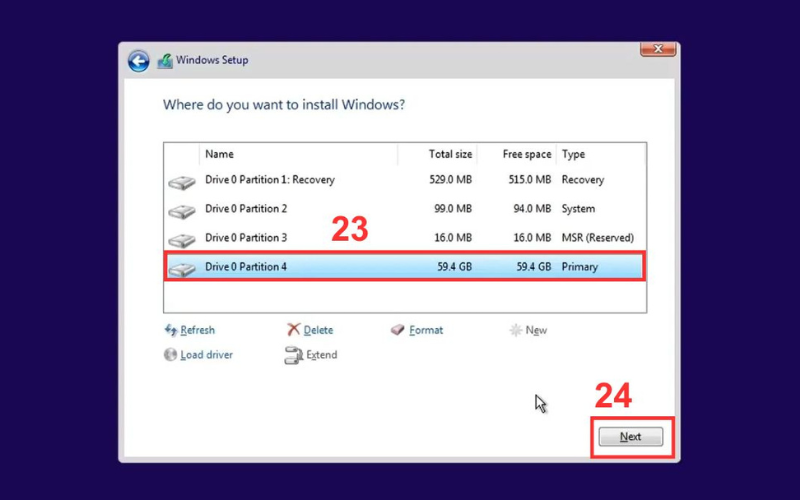
Use disk capacity and layout—not a presumed drive letter—to identify the correct target.
Complete setup and update the laptop
Windows will copy files and restart several times. When the first restart begins, remove the USB if the laptop would otherwise start Setup again, or select the internal drive from the boot menu. Complete the out-of-box setup, then:
- Connect to a trusted network and run Settings > Windows Update > Check for updates repeatedly until no important updates remain.
- Check Settings > System > Activation.
- Open Device Manager and look for unknown or malfunctioning devices.
- Install missing chipset, storage, Wi-Fi, graphics, audio, touchpad, and firmware packages from the laptop manufacturer's official support page.
- Test Wi-Fi, Bluetooth, camera, microphone, speakers, keyboard shortcuts, sleep, and charging.
- Enable Windows Security protections and device encryption as appropriate.
- Reinstall trusted applications, then scan and restore the backed-up files.
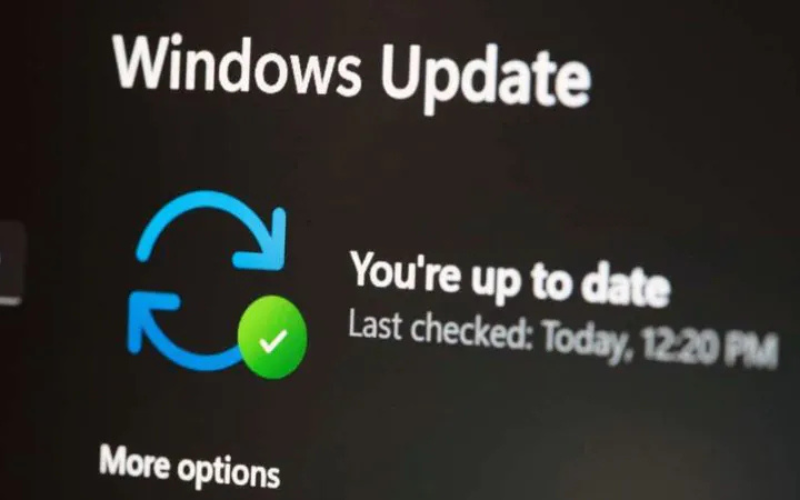
Install Windows and manufacturer updates before restoring daily work.
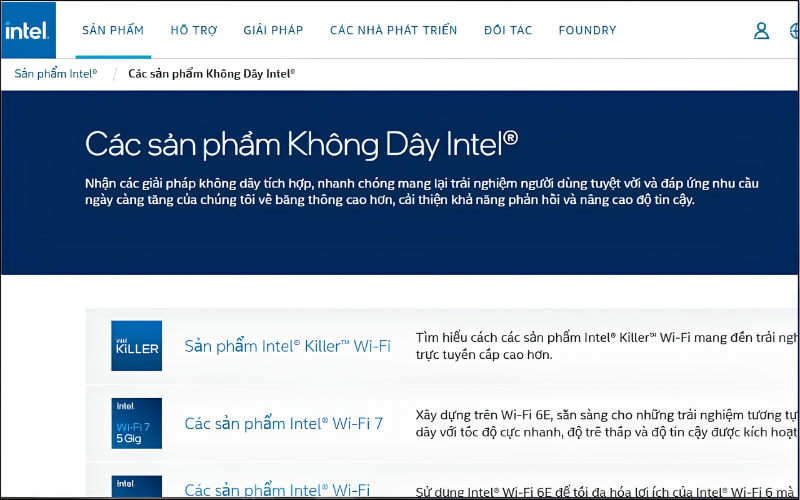
Keep the official network driver available offline in case Wi-Fi is initially unavailable.
If installation fails
- USB does not boot: recreate the media with the Microsoft tool, try a reliable USB port, and confirm the model's UEFI boot instructions.
- SSD is missing: stop before changing partitions. Check whether Setup needs a manufacturer storage-controller driver or whether the drive appears in BIOS/UEFI.
- No network after setup: install the saved official network driver from a separate USB drive.
- Windows will not activate: confirm that the installed edition matches the digital license, connect to the internet, and use Activation Troubleshooter if available.
- Freezing continues after a clean install: investigate storage, memory, temperatures, firmware, and power instead of reinstalling again.
Persistent problems after a clean install often point to drivers, firmware, or hardware.
A reinstall is successful only when the backup is intact, the correct disk was used, Windows is activated and updated, device drivers work, and restored files have been verified.
Related Articles
 Genshin Impact - Detailed Guide for the Beginners Player Genshin Impact6 minutes read
 Detailed Instructions on How to Install Windows 7 for Beginners4 minutes read
 How to Install Mac OS on Laptop Using USB6 minutes read
 How to Play Balatro Game for Beginners5 minutes read
 Safe Mode Windows 7: Enable Safe Mode in Windows 75 minutes read
 How to Switch from Windows to ChromeOS: Step-by-Step Guide for Beginners6 minutes read
Reader Comments 0
Sign in with email or Google to join the discussion.