6 ways to use the Motion Tracking tool in After Effects
Let's start with what Motion Tracking is, the options in this tool and how to use it in After Effects filmmaking software.
Table of Contents
As you get more familiar with After Effects and develop your skill set, you will inevitably come across a situation of inserting graphics or effects into 2D movie scenes. This will be the right time to use the Motion Tracking tool.
Let's start with what Motion Tracking is, the options in this tool and how to use it in After Effects filmmaking software.
![]()
Before starting, if you have not used the software, you can download it here.
I. What is Motion Tracking? Who should use it?
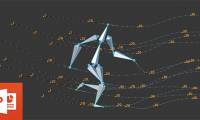
I will try to explain in the simplest way, Motion Tracking is the process of tracking the movement of a subject in a movie.
- -> When you have collected this tracking data from the selected audience (1)
- -> You then apply it to another element or object (2)
- -> The result of applying motion data (1) up is a new element or object (2)
- -> The second element (2) will match the movement in the shot with your subject (1).
What can you use Motion tracking for?
Now that we have the basics of what it is, now we need to ask the really important question. What will I use this for? So, let's take a quick look at some great apps you can use Motion tracking.
For example, you can :
- Video stabilization / stabilization using tracking data.
- Add elements like text or solids to a layout.
- Insert 3D objects into 2D movie footage.
- Apply color grading effects or techniques.
- Replace screens on TV, Computer or mobile device.
These are just a few of the things Motion tracking will help you with. From simple to complex compositions, Motion Tracking is a must-know technique.
Before we dive into Motion Tracking types, check out this video from Mikromedia for a few more examples of complex tracking types.
II. What kinds of motion tracking are there in After Effects?
1. Single - Point Tracking
- Pros: Works well for simple tracking
- Cons: Needs a clear contrast point to be effective, with no rotation or ratio properties
- Levels: Beginners can also use it
- Usage: Track or synthesize movie footage with a single focus point
This tracking technique works exactly as its name suggests, by tracking a single point in the composition to collect the required motion data.
To better understand this type of motion tracking we can watch an instructional video from MStudio. In this video, we will learn how to use the Motion tracking option in the Tracker panel.
Keep in mind that using a single-point tracker may work for some simple shots, but you'll most likely want to use the follow-up techniques for the job.
Basic knowledge of Motion tracking
2. Two - Point Tracking
- Pros: Multi-dimensional and scale tracking, unlike single point.
- Cons: Doesn't work well with shaky footage.
- Experience - Level: Beginners
- How to apply: Add simple elements to a scene with little shake
Just as the name of single-point tracking suggests how the technique works, two-point tracking is no different. With this technique, you can track two points proportion to each other and take turns increasing accuracy, you'll see that you now have two track points to work with. Check out the following great tutorial using two-point tracking from Robert's Productions
Learn How to Use Two Points!
3. Corner Pin Tracking
- Pros: Using corner pins determines the precision tracking area.
- Cons: It is area specific, all points must show up on the screen
- Experience - Education: Intermediate
- How to apply: Replace screens or signs
Next is Corner Pin Tracking. This is a great tool to use when you need to track the four corners of any point. It is really useful when doing screen replacement in clips like phone, television . Luckily for us Isaix Interactive has a tutorial on how to do that, using option 'Perspective Corner Pin The 'tracker panel' of After Effects is definitely not too difficult to get used to.
Let's see how to use Corner Pin Tracking
4. Planar Tracking
- Pros: Works extremely well
- Cons: Pretty beginners to get used to
- Exp. Education: Advanced
- How to apply: Advanced level tracking for flat surfaces.
This tracking method is a bit more advanced, you will need to use the Mocha add-on (free with After Effects) to do this. The more complicated of course using Planar Tracking will give you extremely accurate results that would normally not be possible in After Effects.
You should use this technique when you want to track a flat surface. This is done by visiting Mocha in After Effects, then using x-spline and surface.
This technique will allow you to draw a shape around the area you are trying to follow. Thanks to Tobias from Surfaced Studios for this great tutorial.
Let's learn how to keep track of flat surfaces.
5. Spline Tracking
- Pros: Helps keep track of complex scenes
- Cons: It takes quite a while to get used to
- Experience - Education: Advanced
- Application: Used to track complex objects and subjects in the project.
Again we will use Mocha for Spline Tracking. This type of tracking will certainly be the most accurate of all the methods, but it will also take the most time. Stay tuned to this tutorial video from Imagineer Systems, the creator of Mocha will give us a full breakdown of how to use Spline Tracking for more accurate tracking.
Use splines to keep track of information visually.
6. 3D Camera Tracking
- Pros: Perfect for adding text, shapes and 3D objects in 2D scenes.
- Cons: It can be difficult the first few times you try to use it.
- Experience - Education: Intermediate
- How to apply: Add 3D object, paint blur, set extensions, etc.
The 3D Camera tracking option in After Effects is one of the most powerful features in the software. When you use this option, After Effects will analyze your footage and the 3D space inside. Once completed, it will generate a large number of track points that you can select and add text, solid, empty, etc.
While 3D tracking is an intermediate level technique, you can get really advanced by combining it with an Element 3D or Cinema 4D, below Mikey will guide us on this type of track.
Track 2D footage and add 3D objects.
III. Conclude
Motion Tracking is a key technique on your way to becoming a professional Video designer, motion video or visual effects artist. You will definitely use this technique more than you think. Tracking can be useful in a myriad of situations, whether it's simply nesting text or blurring the face of an object, replacing your computer screen with other information . and a ton of other utilities that Motion Tracking can do it. The second best time was yesterday, the second best time is right now. Let's get on the road to After Effect conquest with this Motion Tracking tool.
Was this article helpful?
Your feedback helps us improve.
Related Articles
 How to combine Motion Paths animation effects in PowerPoint4 minutes read
 Instructions on how to turn off the motion effects of windows on Windows2 minutes read
 3 Ways to Add Motion Blur Effects to Photos (No Software Needed)5 minutes read
 How to create motion effects on PowerPoint4 minutes read
 How to turn off Motion effects on Windows 10 to help Win 10 run faster2 minutes read
 Animation animation effects in CSS8 minutes read
Reader Comments 0
Sign in with email or Google to join the discussion.