6 ways to fix the error 'This site can't provide a secure connection'
This error can be difficult to identify. The cause can range from a Secure Sockets Layer (SSL) misconfiguration to incorrect date and time settings. However, there are simple ways to fix this error, whether you are a website owner or a visitor.
What is the error "This site can't provide a secure connection"?
The "This site can't provide a secure connection" error appears when a website does not comply with the HTTPS protocol. This error is often caused by not having an SSL certificate on the website, not automatically using HTTPS, having an expired or invalid SSL certificate, or having an outdated SSL cache in the browser.
Causes of the error "This site can't provide a secure connection"
There are 6 common reasons why browsers display this error.
No SSL certificate installed
The error message may appear because the website does not have an SSL certificate installed. This means that you are accessing the website via an HTTP connection and the destination server sends all requests and responses in plain text.
Data is not encrypted and can be intercepted by third parties to collect information transmitted between the web server and the browser. This can expose the website to cyber attacks such as malware and man-in-the-middle attacks.
HTTPS is not mandatory on websites
The issue can occur when you have installed an SSL certificate but do not enable the option to force HTTPS. This way, visitors will access the HTTP version of the site instead of the secure URL.
Invalid or expired SSL certificate
You may see this error when the website is using an invalid or expired SSL certificate. This means that the website is currently running over an HTTP connection.
Outdated SSL Cache in Browsers
An outdated or corrupted SSL cache in your browser can contribute to website errors. This can typically happen while you are developing websites or after installing a new SSL certificate.
QUIC protocol enabled
Quick UDP Internet Connections (QUIC) protocol is enabled by default in Google Chrome browser. This protocol is used to reduce connection time, improve congestion control, scalability of transmission and multiplexing without Head-of-line blocking.
However, in some cases it can cause SSL issues, such as the 'This site can't provide a secure connection' issue.
Incorrect date and time settings
Incorrect date and time settings on your computer can cause Google Chrome to block the website. Incorrect information can cause problems in validating the website certificate. This is why the error occurs.
6 ways to fix the error 'This site can't provide a secure connection'
Before you begin, you should check your Internet connection, disable Chrome extensions, and disable SSL scanning on your antivirus and firewall. If the problem persists, here are six troubleshooting methods you can try.
1. Install SSL certificate
Installing an SSL certificate is one of the most effective ways to fix the Can't Provide a Secure Connection error message if you are a website owner. Depending on your web hosting provider, the way to configure the additional layer of security may vary.
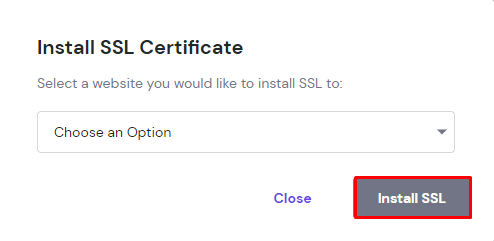
At Hostinger, you can install SSL certificate on hPanel:
- Go to SSL section and click on Install free SSL button .

- Select the domain and click Install SSL .

- When the website address shows a green checkmark and Active status , the SSL has been successfully installed. If not, make sure the domain is pointing to Hostinger nameservers.
This method will solve the Can't Provide a Secure Connection issue on your website.
2. Force HTTPS connection
By forcing HTTPS, visitors will be automatically redirected to the secure URL after they load your website.
If you are a Hostinger user, follow these instructions to force HTTPS connection on your website:
- Go to Security → SSL from the hPanel dashboard.
- Click the three dots button next to the problematic domain and select Force HTTPS .

This should allow you to open the website. If the problem persists, try the next method.
3. Reinstall SSL certificate
An invalid or corrupt SSL installation can cause your website to display Can't Provide a Secure Connection. The best way to resolve this is to reinstall the SSL certificate.
Here's how to do it on hPanel:
- Go to Security → SSL from the hPanel dashboard.
- Click the three dots button next to the problematic domain and select Reinstall .

4. Reset SSL cache and clear browser cache
If the above solutions do not work, try resetting the SSL cache on your computer and clearing your browser history. This should allow you to start a new connection.
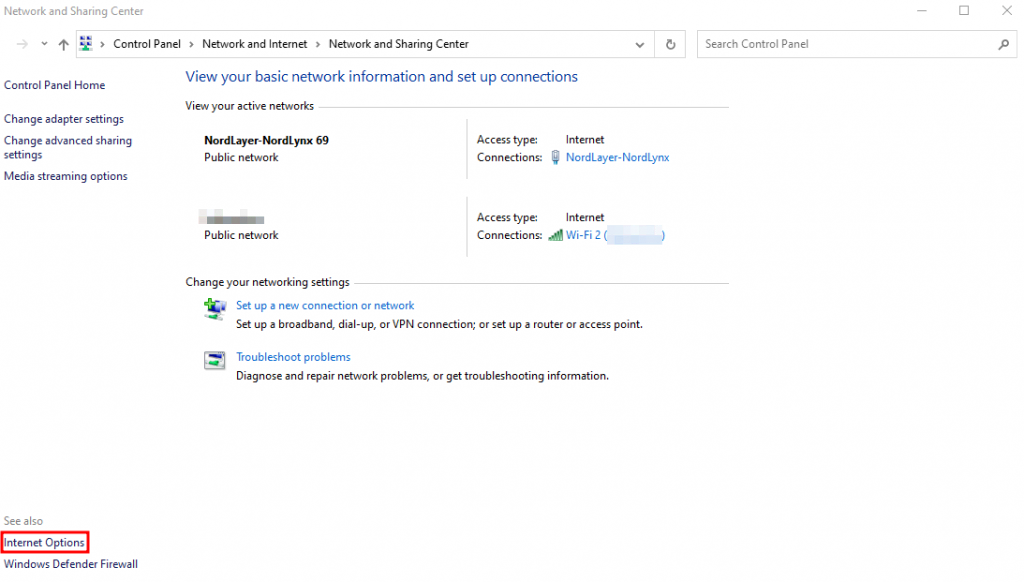
Follow these instructions to reset the SSL cache on Windows:
- Type Control Panel on the Windows search tab .
- On the Network and Internet control panel , select View network status and tasks , and then click Internet Options .

- When the Internet Properties box opens, select the Content tab and click Clear SSL state .

To clear data on Google Chrome browser, click on the three dots in the upper right corner of the screen → More tools → Clear browsing data .
5. Disable QUIC protocol support
Another popular solution is to disable QUIC protocol support on the Google Chrome browser.
Follow these steps to do so:
- Type chrome://flags/#enable-quic in the address bar.
- Look for the Experimental QUIC protocol option , usually located at the top of the page.
- Click the drop-down box and select Disabled .

- Relaunch your browser for the changes to take effect.
If disabling the protocol does not resolve the issue, proceed to the next method.
6. Check date and time settings
Certificate validity is an important factor in the authentication process. Before accessing a website, the browser checks the SSL certificate's signing date and expiration date using the system's date and time settings.
If it's incorrect, the certificate may no longer be valid. Therefore, adjusting the settings is one of the most effective ways for website visitors to fix the Can't Provide a Secure Connection error message.
Follow these instructions to set the correct date and time zone on different operating systems, such as Windows and macOS.
Windows
- Click the Windows Start button and select Settings .
- Select Time & Language .

- Turn on the Set time automatically button . Do the same for the Set time zone automatically option .
- Verify the changes and make sure the settings are correct.
macOS
- Select the Apple menu button and click System Settings .
- Select General in the sidebar and scroll down to find Date & Time .

- To set the date and time automatically, turn on the Set time and date automatically option . To set it manually, turn it off, and then insert the current date and time.
- To set the time zone automatically, turn on Set time zone automatically using your current location . To set it manually, turn the option off, enter the nearest city, and select its full name from the list.

You should read it
- 8 ways to secure SSH server connections on Linux
- Is a decentralized VPN more secure than a regular VPN?
- Fix the 'This site can't be reached' error in Chrome browser
- Quickly fix the 'Your connection was interrupted' error on Chrome
- Quickly fix the error 'This site can't be reached' on Chrome
- Don't believe 7 'myths' about this SSL and HTTPS certificate
 How to Use Windows Advanced Boot Options to Troubleshoot Faster
 Quickly fix Unmountable Boot Volume error on Windows 10/11
 Quickly and effectively fix your computer's self-refresh
 Apply how to fix a computer with wireless capability is turned off
 How to fix 'No Internet Access' error on Ethernet connection in Windows
 The computer does not have a HID-compliant touch screen, what should I do?